|
|
||||||||
|
|
|
||||||||
|
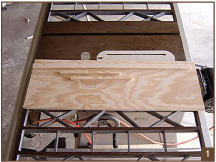
I remember as a young boy in the early 70’s reading old Popular Mechanic magazines and each issue had articles about how to make everything from solar water heaters to laminated recurve bows. Sadly, as technology progressed, we somehow lost the urge to build even the simplest things that we use day in and day out. Thankfully, for many of us there is primitive archery and we can make most of our equipment with our own hands. Following are instructions on how to make an arrow point taper jig that can be used on a table saw or sander. Most will have the materials at hand, but if you don’t, it won’t cost more then a few dollars to purchase everything. You will need some scrap 3/8" or 1/2" plywood, two 1/4"-20 x 1 1/2" carriage bolts, and two 1/4" wing nuts with washers. Start with your base and cut it 1" longer then the width of your table saw from front to back, and 10" wide. Next you will need to cut two cleats for the front and back stops and one for the miter gauge slot to keep the jig from moving around (Photo 1).
The cleats are 1/2" wide—that is why you cut the base 1" longer than your saw. This jig is easy to make, so measurements are not critical. Just make it to the size that works for you. Glue the cleats at the front and back of your base, and once the glue dries, place the jig on your saw to make sure it fits nice and tight from front to back (Photo 2). Now find the center of your sanding disc. The pivot point for your adjustable arrow fence will be 1 1/4" back from the center line and 3/4" from the disc. This places your fence 3/8" from the sanding disc when it’s installed. The fence that I used is 1/2" x 3/4" x 17" long (Photo 3). The reason this location is important is if you go forward of your disc’s centerline, the arrow will want to lift up off the jig as you try to grind a taper. I need to mention that when you glue the cleat that rides in the miter slot of your saw, use a shim, like a piece of thin cardboard, to keep the base slightly away from the sanding disc (Photo 4).
It is important that you do this so the disc can rotate freely. Next, you will need to make an adjustable arrow stop. I used a piece of scrap pine that was 1/2" x 1 1/4" x 7" long and cut a slot down the center. I cut a 1/2" x 1/2" x 7" long piece to use as a guide for the stop. The location of the stop is at the edge of the base and approximately 1/8" front of the fence. Take a pencil and mark the slot on the base. The location of the bolt is at the forward edge of the slot. Now place the 1/2" guide against the stop, mark its location, and glue it to the base. Once you have all the locations marked, go ahead and drill and counter bore the holes so the bolts can be epoxied to the base (Photo 5). The bolts and the guide for the arrow stop are now epoxied in place and all you need to do is assemble the jig and you are done (Photo 6 & 7).
To use your jig, take the miter gauge from your saw and set the angle you want to grind. Place the miter gauge at the end of your jig and swing the arrow fence to it (Photo 8 & 9).
My jig was made for a table saw, but it can easily be made for a sander also. For less then $5 you have a jig that will last a lifetime and grind any angle you wish with complete accuracy.
|
Copyright
©2015 Primitive Archer Magazine
All rights reserved.


 Drill
a hole through the fence and jig base and use a finish nail to hold the
angle for you while you grind your taper. You should also mark the angle
above the hole if you grind different angles. It’s easy to pick the
angle you want to grind, swing the fence, drop a nail in, and grind your
taper (Photo 10).
Drill
a hole through the fence and jig base and use a finish nail to hold the
angle for you while you grind your taper. You should also mark the angle
above the hole if you grind different angles. It’s easy to pick the
angle you want to grind, swing the fence, drop a nail in, and grind your
taper (Photo 10).