Author Topic: Building another flintlock  (Read 82161 times)

0 Members and 1 Guest are viewing this topic.

Offline JW_Halverson

  • Member
  • Posts: 11,878
Re: Building another flintlock
« Reply #45 on: December 14, 2015, 07:57:21 pm »
On the couple of guns I have done, I have always worried about just that issue, nclonghunter.  Therefore, I cheated like a sonofagun!  I used Brownell's glass bedding to make sure tang, breech, and at least the last half of the barrel was wedded 'right and tight'. I ain't too proud to break out the effing-glass, just so long as it ain't on a bow!
Guns have triggers. Bicycles have wheels. Trees and bows have wooden limbs.

Offline nclonghunter

  • Member
  • Posts: 1,779
Re: Building another flintlock
« Reply #46 on: December 14, 2015, 08:13:56 pm »
I have built my guns to look old and used but they function at top level. I have spent a lot more time behind a flintlock than any gun I have owned. I took a picture of the tang on my Caywood smooth-bore and Mark Silver Rifle. Just a small gap at the end will do it. I need to put in a little more beeswax on the Caywood...lol.

John, you would think putting a srew through the tang and pinning the barrel would stop any movement but not the case. The key is to get the breech end as tight and solid into the backstop as possible.
There are no bad knappers, only bad flakes

Offline JW_Halverson

  • Member
  • Posts: 11,878
Re: Building another flintlock
« Reply #47 on: December 14, 2015, 08:17:37 pm »


John, you would think putting a srew through the tang and pinning the barrel would stop any movement but not the case. The key is to get the breech end as tight and solid into the backstop as possible.

Hence the use of Brownell's in mine!
Guns have triggers. Bicycles have wheels. Trees and bows have wooden limbs.

Offline Eric Krewson

  • Member
  • Posts: 5,322
Re: Building another flintlock
« Reply #48 on: December 15, 2015, 07:42:07 pm »
I loosened up the tang yesterday and dropped it a little deeper so I would have solid barrel contact with bottom of the barrel channel.

After I get everything together and before I apply finish I clean up any "pinch " points.

I have always left a little space behind my tangs on the guns I have built.

Here is the just inletted tang on my last build, an english fowler, you can see the gap at the back.

What looks like a big hole on one side disappeared when I shaped the wood.


Offline Eric Krewson

  • Member
  • Posts: 5,322
Re: Building another flintlock
« Reply #49 on: December 17, 2015, 09:27:15 am »
Still working on the tang inlet, when I seat the tang the barrel has been moving up about .010, a little more work last night and I think I have the problem solved.

For lock inletting you first have to locate the touch hole location. I will be using a 1/4" white lightning liner with the hole set at mid point on the barrel flat and about 1/16" in front of the breech face. All the wood on the top of the stock will be reduced to half a flat on the side of the barrel or a little less. This makes a slender gun.

Touch hole location and half a flat measurment;


Too much wood;


Rasping the wood down, I got a little heavy handed and took off a little too much on the opposite side but it should be alright when I tighten the tang bolt. and drop the barrel down.

« Last Edit: December 17, 2015, 09:32:23 am by Eric Krewson »

Offline Eric Krewson

  • Member
  • Posts: 5,322
Re: Building another flintlock
« Reply #50 on: December 17, 2015, 09:44:21 am »
Here is clearer shot of my Walley World elcheapo oil lamp, a qt of their lamp oil lasts a long time.


Offline JW_Halverson

  • Member
  • Posts: 11,878
Re: Building another flintlock
« Reply #51 on: December 17, 2015, 11:57:39 am »
Yup, I bet that quart of lamp oil is cheaper than the amount of industrially manufactured spotting compound needed to do the same amount of work!  And if the power goes out, try using spotting compound to add a warm glow to the room!
Guns have triggers. Bicycles have wheels. Trees and bows have wooden limbs.

Offline Eric Krewson

  • Member
  • Posts: 5,322
Re: Building another flintlock
« Reply #52 on: December 20, 2015, 07:24:48 pm »
Time to inlet the lock; first you have to disassemble it because you inlet the plate first the each internal piece separately.


Keep your parts together or you will regret it later.


Now to locate where the lock is supposed to go, I have to drill a hole in the barrel channel to locate the exact location of the ramrod hole. The front lock bolt should go through the web between the ramrod hole and barrel channel so I have to know its exact location.


I stick my fancy depth checker through the hole in the barrel channel and mark the locations on the  lock panel.

« Last Edit: December 20, 2015, 07:30:20 pm by Eric Krewson »

Offline nclonghunter

  • Member
  • Posts: 1,779
Re: Building another flintlock
« Reply #53 on: December 20, 2015, 09:03:30 pm »
Eric, looking good. Really enjoying this thread. Sorta like getting to experience building one without having to do the work..lol
You ever just drill a vent hole rather than using a screw in vent? Like the originals.

That little space between the barrel and ramrod channel was the only real screwup I ever had. Ended up putting a half screw in the front on one gun. Had another that had to use a round file and slightly thin the bolt where the ramrod passed under it. I like your gauge for locating the ramrod depth. Good idea!
There are no bad knappers, only bad flakes

Offline Eric Krewson

  • Member
  • Posts: 5,322
Re: Building another flintlock
« Reply #54 on: December 20, 2015, 11:33:02 pm »
I missed the web on my first build, I wasp waisted the front bolt so the ramrod would go all the way down. At first I just cut a notch out of the bolt but always forgot to pull the ramrod when I took the  lock off. When I turned the bolt it would take a chunk out of my ramrod.


I won't hit the center of the lock plate nose with my lock bolt on this build, it is too narrow to have much wiggle room.
« Last Edit: February 03, 2018, 04:23:01 pm by Eric Krewson »

Offline Eric Krewson

  • Member
  • Posts: 5,322
Re: Building another flintlock
« Reply #55 on: December 21, 2015, 09:27:09 am »
Now, the tricky part, getting the lock in the right place, once you start inletting it's a done deal, no turning back.


You have to file a draft on the bevel of your lock so the wood to metal fit is tight at the top of the plate. If your plate is square you will end up with a sloppy inlet 100% of the time.


The back of the lock plate has a bolster that fits against the barrel, this is the first thing you inlet so the lock will go down flush with the wood.


Once you get your slot for the bolster cut out the lock plate will lay flat against the lock panel. I use an Exacto knife to scribe the line for the lock inlet. This is a staged picture, I moved the lock plate around to have more of the nose centered as best I could over the web before i cut my lines, I couldn't center it perfectly but the frizzen spring will hide the hole.


« Last Edit: December 01, 2021, 03:55:07 pm by Eric Krewson »

Offline Eric Krewson

  • Member
  • Posts: 5,322
Re: Building another flintlock
« Reply #56 on: December 21, 2015, 09:57:05 am »
An interesting footnote; The camera I use is an ancient Kodak Easyshare model DX 4530. I bought one of these when digital cameras first came out, it cost $450 at the time.

After about 20 years my first camera gave up the ghost. These cameras were made rock solid, not like the beer can things they make today, I am told it has a Leica lense. Its 5MP takes much better pictures than any 10 MP produced today. I ditched the rechargeable battery and run with AAs which last a long time.

I looked on eBay for a replacement and found they could be had in abundance for about $20 or less each. I bought one in working order for 99 cents. I have a spare waiting in the wings if my current one quits.

Offline Eric Krewson

  • Member
  • Posts: 5,322
Re: Building another flintlock
« Reply #57 on: December 26, 2015, 12:43:48 pm »
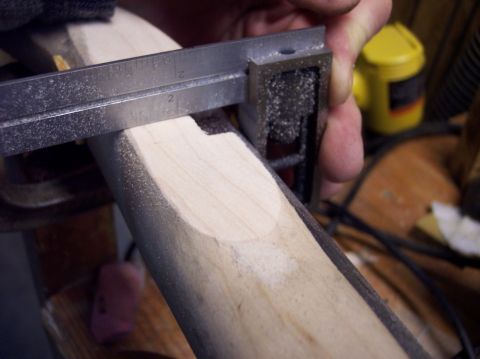
After a little measuring I decided my lock panel was much too thick. When you inlet deeply for your for your lock you tend to get sloppy because you can't see the inlet very well.

I filed off a bunch of wood and followed up with a sanding block.


It is important to keep your lock panel square with the top flat of your barrel as you go down.


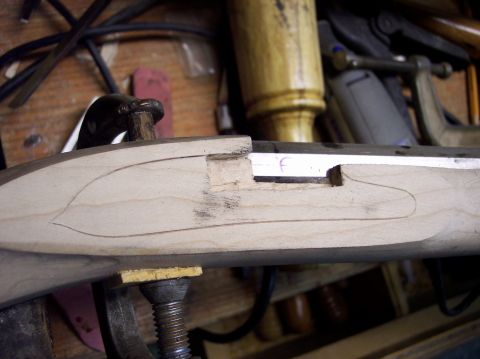
Before, my lock plate only touched wood on the top side, after leveling the lock panel and recutting my inlet marks everything is even.


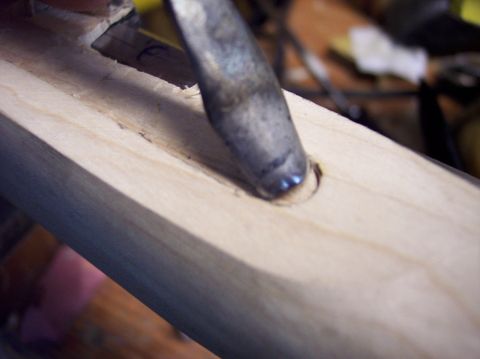
And down we go; black the plate, press it on the wood and remove the black marks only. Takes a while but you will get there.


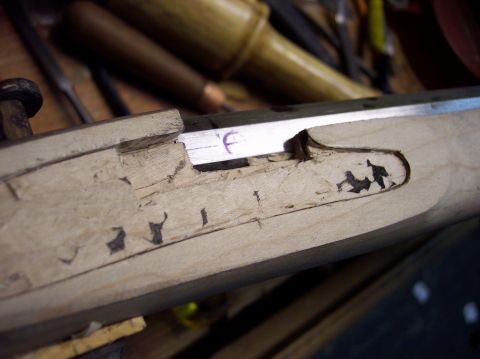
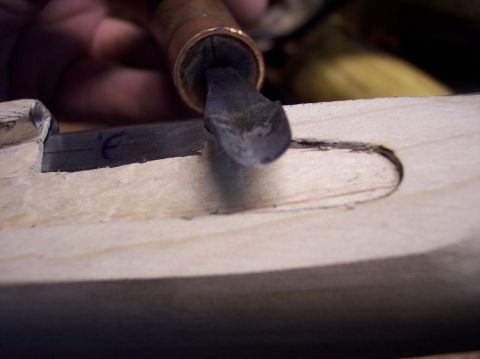
Cutting the inlet for the nose of the lock is always difficult, I never have the right size gouge to fit the curve. Concrete nails to the rescue, I heat a nail, pound it flat and make a gouge to perfectly fit the curvature of the lock plate nose. After I get the gouge shaped I reheat it and quench it to bring back the hardness.


Offline chamookman

  • Member
  • Posts: 2,990
Re: Building another flintlock
« Reply #58 on: December 27, 2015, 04:02:52 am »
Really enjoying this Eric ! Got My Trade Gun kit - that will be easy-peasy compared to Your work tho. Thanks again - Bob.
"May the Gods give Us the strength to draw the string to the cheek, the arrow to the barb and loose the flying shaft, so long as life may last." Saxon Pope - 1923.

Offline Del the cat

  • Member
  • Posts: 8,295
    • Derek Hutchison Native Wood Self Bows
Re: Building another flintlock
« Reply #59 on: December 27, 2015, 04:34:12 am »
Yeah, I love the whole "make a tool for the job" philosophy  :)
I'm also on an archery forum that's mostly olympic recurve and compound (spits on floor)... those guys think that if it's not available from a store it doesn't exist and can't be done. (I'm only on there to try encourage people away from such nonsense).
The sad thing is there's a whole generation who don't realise you can make stuff... :(
Del
Health warning, these posts may contain traces of nut.