Author Topic: How to make a European skull mount  (Read 101647 times)

0 Members and 1 Guest are viewing this topic.

Offline osage outlaw

  • Member
  • Posts: 11,951
How to make a European skull mount
« on: November 03, 2010, 02:45:07 am »
I thought I would do a How-To on making a European skull mount.  I have been doing them for 3 years now.  After doing some research, and seeking the advice of some pros, I was able to make a fine looking mount on my first try.  I have learned some time saving shortcuts since that first one.  Last year, I did a total of 6 mounts.  My buck, plus 5 for relatives.  I have also done a river otter and 2 beaver skulls. 

Warning:  There are graphic photos following that might be disturbing to younger children.  I don’t want any of them to be afraid of deer because of this.

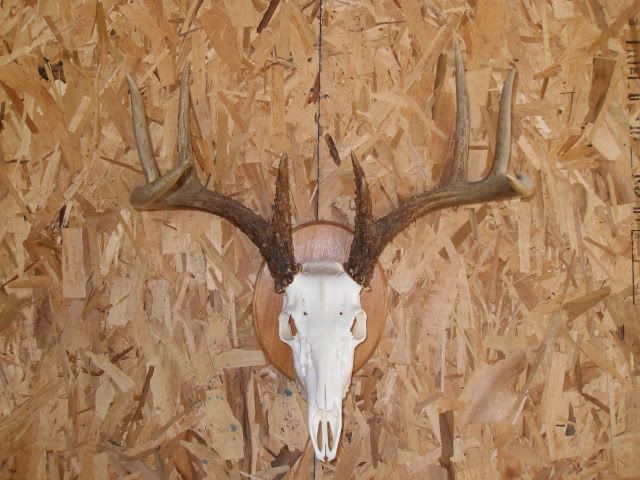
This is what it will look like when finished.  This was my second attempt at a Euro mount.


There are several methods of cleaning the skulls.  You can use dermestid beetles, but you need to buy a colony of them, which can be expensive.  Maceration is another method.  That is where you submerge the skull in warm water for several weeks or months and let the bacteria do the work.  You can imagine what that smells like.  I prefer to cook the skull.  I simmer it over a fire for several hours.  It is a little more work, but you can finish a skull in days, instead of months.  I will show you the way I do them.     

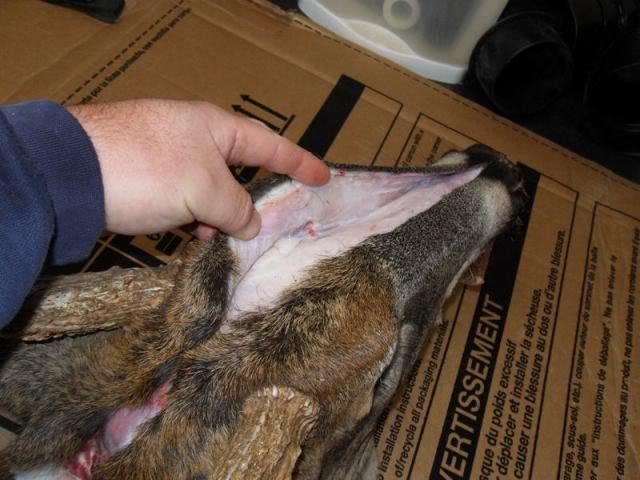
Lets start at the beginning.  I remove the head from the deer so I can clean it on my work bench.  I start by making a cut from the back of the head down to the nose.


I then make a cut across to each antler base.


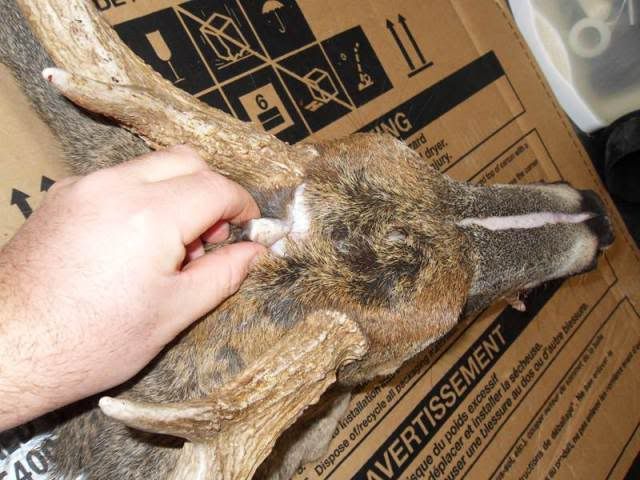
Next, I use the knife and carefully cut the tissue that connects the skin to the bone and start peeling it back.  You want to be very careful not to cut the bone while skinning it out.  The cuts will show up when you are finished..


I started out with nothin' and I still got most of it left

Offline osage outlaw

  • Member
  • Posts: 11,951
Re: How to make a European skull mount
« Reply #1 on: November 03, 2010, 02:49:17 am »
Once I get the sides down a little, I start on the bases.  I use pliars and pull the skin from around the base.  Be careful, it was at this stage when the pliars slipped and somehow the rack flipped up and hit me in the nose.  It started bleeding profusely.  I figured the deer was getting a little revenge.


Keep pulling and trimming until you start unwrapping the skull.


Be very careful around the eyes.  It is easy to cut into the bone.  Don’t worry about removing them.  They are much easier to get out after it is cooked.


Keep going until you get down to the side of the mouth.


Just keep peeling everything back.  You can cut under the cartilage that attaches the ears.  Keep going until you get both sides off.


I started out with nothin' and I still got most of it left

Offline osage outlaw

  • Member
  • Posts: 11,951
Re: How to make a European skull mount
« Reply #2 on: November 03, 2010, 02:51:55 am »
Now you should have something that looks like this.


Next, I remove the bottom jaw.  This is rather disturbing looking, but it needs to be done.  I start by cutting the muscles on each side of the jaw.  Then I start pulling the mouth open.  I had to use a piece of 1x3 to get this one started.  Keep spreading the mouth open until you can cut the muscles and tissue that is in the back of the mouth.  Once you get so far, the top of the jaw bones will flip out.  Cut any remaining muscles to free the jawbone.


Now is a great time to check the age of the buck by checking his tooth wear.  This buck appears to be 3 ½ years old.


Now I move to the back of the skull.  I usually have at least 1 or 2 vertebrae still attached to the skull.  Feel the top of the skull until you find the back edge of it.  Carefully cut down  and then cut around the sides. 


I started out with nothin' and I still got most of it left

Offline osage outlaw

  • Member
  • Posts: 11,951
Re: How to make a European skull mount
« Reply #3 on: November 03, 2010, 02:55:07 am »
Keep cutting and bending it around until you start to free it. 


Once you remove the vertebrae, this will be what it looks like.


Now it is time to remove the brains.  If you leave them in when you cook it, they will turn to rubber and be very hard to get out.  I have made a brain blaster out of a few cheap parts from the local hardware store. 


Just insert the tubing into the opening in the back of the skull and turn the water on.  Point the opening away from you, because the brains will come shooting out.


Not everything will come out, but you should get most of it.  This will save a lot of time later while doing the fine cleaning.


Now it is ready to cook.  This process took around 1 ½ hours.


I will post another update on Saturday evening.
I started out with nothin' and I still got most of it left

Offline Cameroo

  • Member
  • Posts: 1,579
    • Cam's Stuff
Re: How to make a European skull mount
« Reply #4 on: November 03, 2010, 10:33:53 am »
Thanks for sharing.  It's the next steps that I'm most interested in, looking forward to seeing more!

Offline ErictheViking

  • Member
  • Posts: 1,504
Re: How to make a European skull mount
« Reply #5 on: November 03, 2010, 02:04:56 pm »
Always loved european mounts. Thank you for taking the time to post this! They always make me think of a big nordic gathering hall.
"He that but looketh on a plate of ham and eggs to lust after it hath already committed breakfast with it in his heart"  C.S. Lewis

Offline Pat B

  • Administrator
  • Member
  • Posts: 37,482
Re: How to make a European skull mount
« Reply #6 on: November 03, 2010, 03:15:48 pm »
This is very similar to the way I did one afew years ago, Outlaw, except the brain blaster.  Looking forward to the rest of the story!  ;)  8)
Make the most of all that comes and the least of all that goes!    Pat Brennan  Brevard, NC

Offline mullet

  • Global Moderator
  • Member
  • Posts: 22,884
  • Eddie Parker
Re: How to make a European skull mount
« Reply #7 on: November 03, 2010, 10:41:21 pm »
 The biologist in the office across from mine bought the beetles. He does them for all of us. It takes about a week to eat one clean. The next turkey I shoot I'm going to try and do a full body skeleton(mount).
Lakeland, Florida
 If you have to pull the trigger, is it really archery?

Offline woodstick

  • Member
  • Posts: 899
Re: How to make a European skull mount
« Reply #8 on: November 03, 2010, 10:48:08 pm »
faster way is a friend of mine a taxidermist showed me. he has a high pressure washer he does his with and it is fast and clean skull after. gets a little messy.
a drawn bow is a stick 9/10 broken

Offline youngbowyer33

  • Member
  • Posts: 606
Re: How to make a European skull mount
« Reply #9 on: November 03, 2010, 11:00:48 pm »
that 8th picture is really gross looking
"All we have to decide is what to do with the time that is given to us"

Offline Cameroo

  • Member
  • Posts: 1,579
    • Cam's Stuff
Re: How to make a European skull mount
« Reply #10 on: November 04, 2010, 12:52:49 am »
The biologist in the office across from mine bought the beetles. He does them for all of us. It takes about a week to eat one clean. The next turkey I shoot I'm going to try and do a full body skeleton(mount).

That would be freakin awesome! Be sure to post some pics if you do!

Offline JW_Halverson

  • Member
  • Posts: 11,847
Re: How to make a European skull mount
« Reply #11 on: November 04, 2010, 04:30:00 pm »
After the boiling, it gets much easier!  The presssure washer trick helps, too...especially with clearing all the stuff outa the sinus cavities.  On several of my euros I have left all the nasal turbinates up inside the nose cavity.

Keep posting the updates, Outlaw!
Guns have triggers. Bicycles have wheels. Trees and bows have wooden limbs.

Offline skinny d

  • Member
  • Posts: 14
Re: How to make a European skull mount
« Reply #12 on: November 04, 2010, 11:52:18 pm »
when you bleach it put baking soda in the bleach it halps draw the fat out keeps it nice and white
dan

Offline andy thomas

  • Member
  • Posts: 142
Re: How to make a European skull mount
« Reply #13 on: November 05, 2010, 09:39:50 am »
instead of using bleach. go to your local beuty supply shop and look for a powder product that hair stylist use for whitening. mix this with hydrogen peroxide which will make a paste and then just paint it on, let it dry a couple of days and then just brush off the dried powder. one bleached skull

Offline mullet

  • Global Moderator
  • Member
  • Posts: 22,884
  • Eddie Parker
Re: How to make a European skull mount
« Reply #14 on: November 05, 2010, 11:49:17 am »
 These are some good tips, guys. Thanks.
Lakeland, Florida
 If you have to pull the trigger, is it really archery?