Author Topic: Another Arm-Guard Carve-along *Skull one finished too, pg.3*  (Read 19118 times)

0 Members and 1 Guest are viewing this topic.

Offline Cameroo

  • Member
  • Posts: 1,579
    • Cam's Stuff
Another Arm-Guard Carve-along *Skull one finished too, pg.3*
« on: March 27, 2011, 02:05:40 am »
I figured just in case you guys weren't getting sick of seeing these yet, I'd walk you through my current project.


I have been using veg tanned leather for my arm guards, since it is ideal for tooling.  I created a paper patern that I fitted to my arm to trace onto the leather. I have found that tooling stretches the leather quite a bit, so I've been using contact cement to glue the leather to a cutting board so that it keeps it's shape while tooling.  When I'm done, I pull the leather off, the contact cement comes up with it, and then I can peel it off.  It comes off in a sheet of latex, usually pretty easily (unless I put it on too thin).


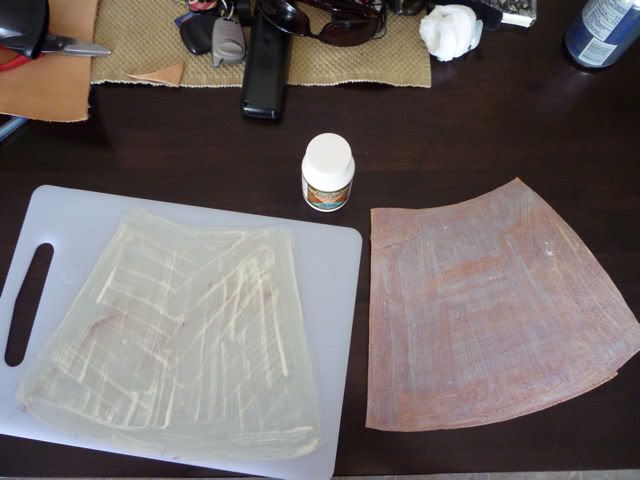
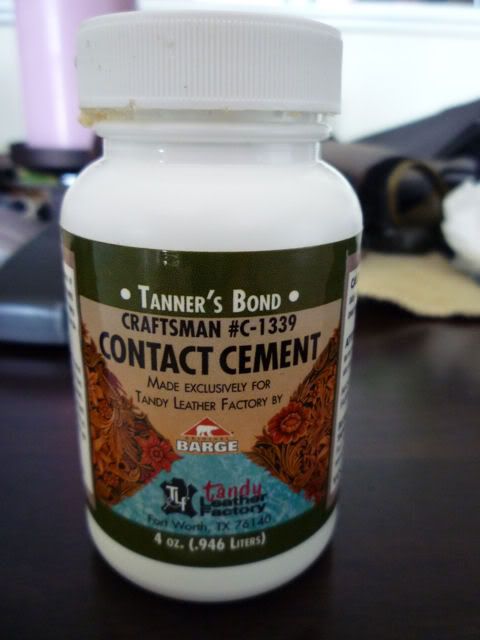
Here's the cement I use, I won't use anything else because I know this comes off easily


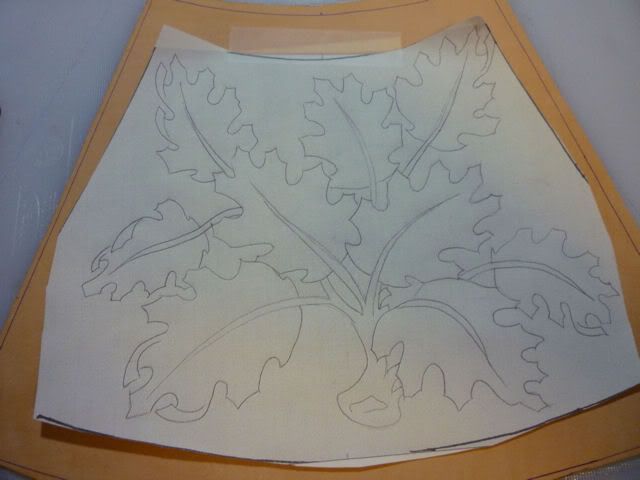
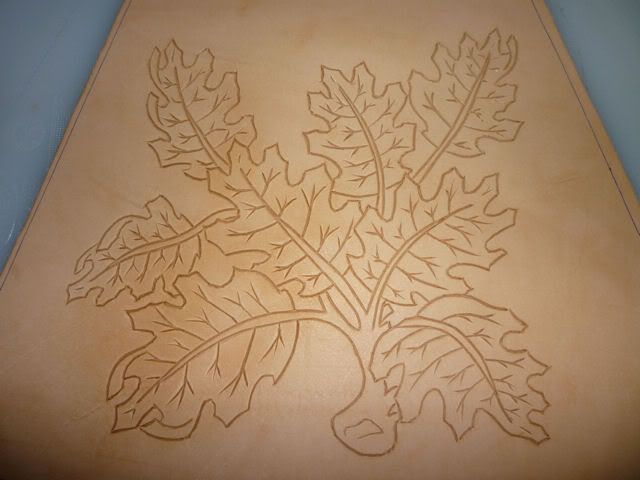
Then I create my design, resize it the the dimensions I need, and print it off.  My friend requested oak leaves, this is what I came up with


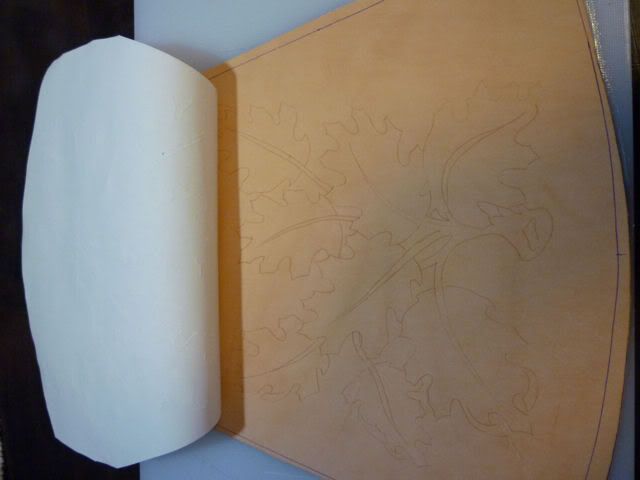
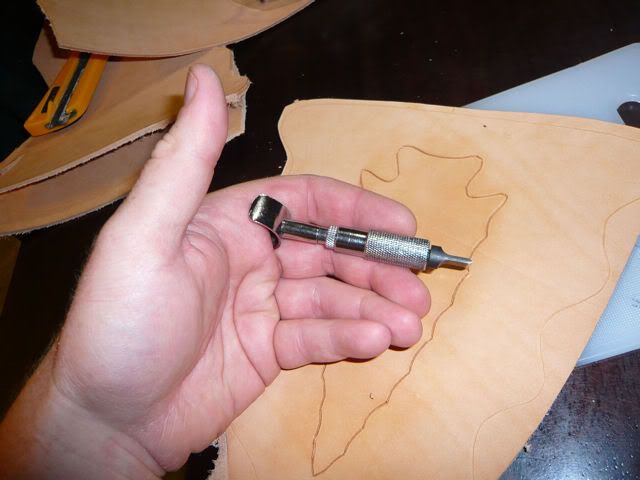
Before tooling the leather, it has to be "cased".  All this means is that you have to dampen it with a sponge and let the water absorb until the leather returns to it's original color.  With that done, I place the pattern on the leather where I want it, and attach it with a piece of tape so that it doesn't slip.  Then I use a scribe to trace over each line and transfer the pattern to the leather.  It doesn't take much pressure on the scribe. 


The next step is to cut all of the lines with a swivel knife.  This allows a nice sharp edge to be tooled that gives more depth.  This is from another project, but I just wanted to show the knife.


The swivel knife takes a bit of practice to get nice smooth curves.  Here's what it looks like after it's cut


Ooops, how'd that get there??

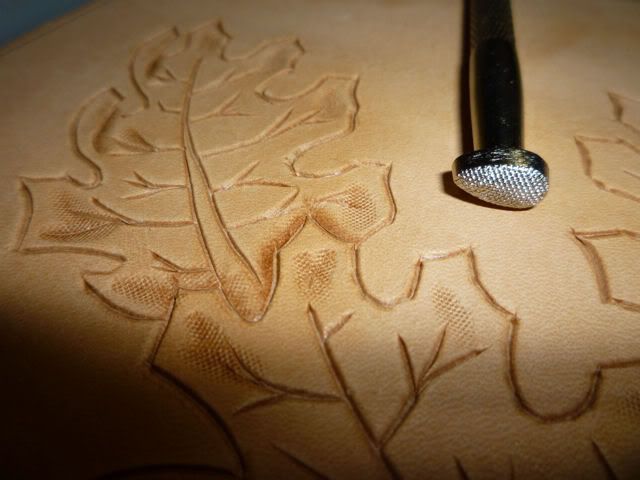
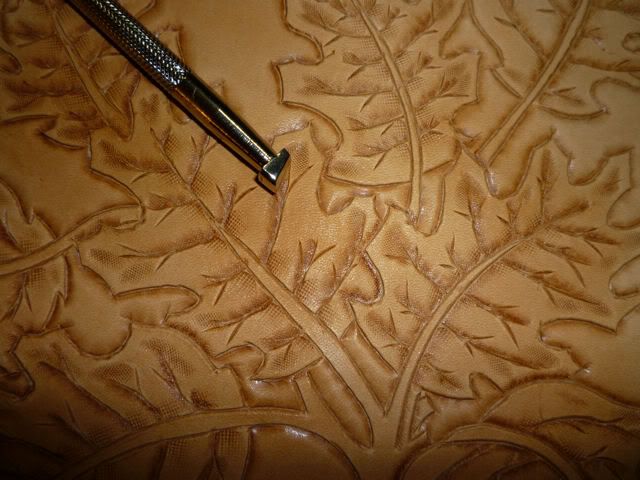
Now comes the real time consuming part, the tooling.  For those that don't know, the tools you'll see in the next few pictures are tapped with a plastic mallet to get different effects.  I'll try to explain the different stamps as I go.  I start of by using a textured "beveller" along all the edges where objects overlap.  It is important to do the tooling on the correct side of the cut.  The shading is always done on the object that you want to appear to be behind.  Hopefully the pictures will explain what I mean.  There are smooth bevelers, and textured ones.  I'm using the textured one, because when I stain this later, the textured leather will hold more stain, making it darker, and giving it more depth.


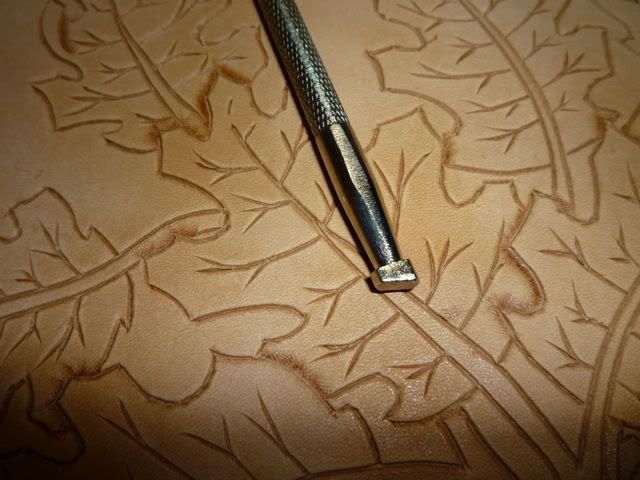
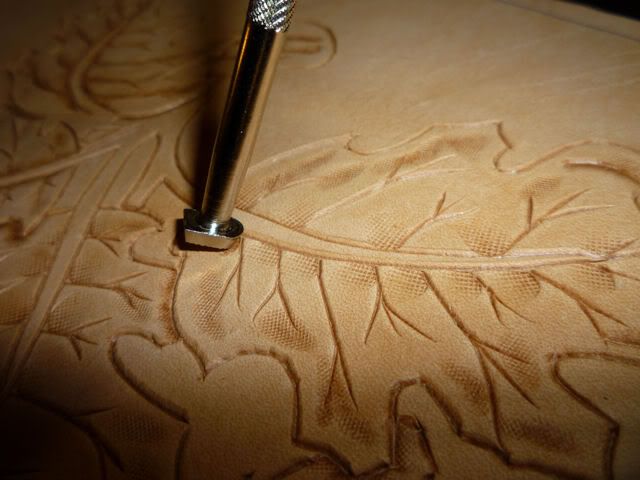
This tool is called a pear shader.  Most of these tools are multi-purpose: you can hold them at different angles to use certain edges to get different effects.  I'm just adding some texture to the leaves


This is another type of shader, I'm using it for more leave texture, where the leaf's veins meet the stem.


After using various shaders and bevelers on the leaves, I end up with this


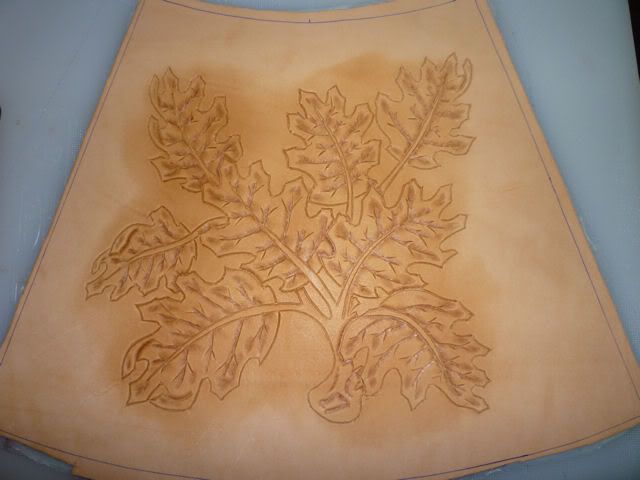
Now I'm going to use a smooth beveler to go around the outside of the leaves and branches, and end up with this


Well that's about it for tonight, I'll post again when I have some more progress.
Thanks for looking.
« Last Edit: April 17, 2011, 01:30:19 am by Cameroo »

Offline ErictheViking

  • Member
  • Posts: 1,504
Re: Another Arm-Guard Carve-along
« Reply #1 on: March 27, 2011, 02:56:06 am »
nice work. thanks for breaking down the whole process from watering the leather to different tooling techniques. makes it seem a little less daunting to try. btw that is one well trained dog to let you put three pieces of biscuit on its snout and still not try to get it. they do look anxious to get to eating though.
"He that but looketh on a plate of ham and eggs to lust after it hath already committed breakfast with it in his heart"  C.S. Lewis

Offline skyarrow

  • Member
  • Posts: 1,703
  • Sterling Lynch Victoria, TX (361)935-1715 text me
Re: Another Arm-Guard Carve-along
« Reply #2 on: March 27, 2011, 11:21:31 pm »
this is sweet thanx for doing this
"We don't have mistakes here, we just have happy accidents" Bob Ross RIP 1995

Offline Cameroo

  • Member
  • Posts: 1,579
    • Cam's Stuff
Re: Another Arm-Guard Carve-along
« Reply #3 on: March 28, 2011, 12:30:30 am »
Thanks Eric, and you are quite welcome Sterling.

Day 2

The guy I'm making this for requested some "green in the middle" and mahogany around the outside.  I didn't know how to pull of a transition between the 2 colors and have it look any good, so I decided to make an oval that divides the 2 areas.  I used Photoshop to make the pattern and printed it off.  I taped and traced it onto the leather, then made another slightly bigger oval around that


Then I used the swivel knife again and cut the ovals into the leather


The next step was to use a beveler to go around the outside edges of the ring


I was kinda jumping around, and started using what is called a seeder tool to fill in the background outside the ring.  I like to do the outside edges first so they're nice and straight, and then randomly fill in the inside.  Tonight I just did the edges.


Then I started filling in the background areas inside the oval with these tools.  The smaller one works nice for getting into tight areas, and you can tilt it to just use the "toe" for really tight spots.  I found that going around the outside edges first works well with this tool as well.


Then I used the larger one to fill in the open spaces faster.


That's as far as I got tonight.  Gotta finish filling in the background with the seeder, then comes the fun part - staining and finishing!


Offline criveraville

  • Member
  • Posts: 3,210
  • Psalm 127:4
Re: Another Arm-Guard Carve-along
« Reply #4 on: March 28, 2011, 01:37:27 am »
That is fine detailed beutiful work. Reminds me of he smell of leather. When I was a kid my dad would tak me into the boot store and buy me a pair of boots. Looking at that arm guard I can almost smell that leather.
I was HECHO EN MEXICO, but assembled in Texas and I'm Texican as the day is long...  Psalm 127:4 As arrows are in the hand of a mighty man; so are children of the youth.

Offline DEllis

  • Member
  • Posts: 397
Re: Another Arm-Guard Carve-along
« Reply #5 on: March 28, 2011, 05:19:14 pm »
Looks real nice Cam. You have a good eye for design. Ever try engraving steel? I think you'd like it. Kinda like leather, but takes longer.
Darcy :)
Darcy Ellis
Fort Fraser BC Canada eh!

Offline _Jon_

  • Member
  • Posts: 889
Re: Another Arm-Guard Carve-along
« Reply #6 on: March 28, 2011, 11:26:43 pm »
Oh my!  I'm a fan!
Member of "Twin Oaks Bow Hunters,"  Chapmansboro, Tennessee

Offline Lee Slikkers

  • Member
  • Posts: 1,545
Re: Another Arm-Guard Carve-along
« Reply #7 on: March 29, 2011, 12:35:58 am »
Man, you really do crank these out...that is a lot of detail and a lot of focused work, looks excellent.

~ Lee

~~~~~~~~~~~~~~~~~~~~~~~~~~~~~~~~~~~
"The last word in ignorance is the man who says of an animal or plant: 'What good is it?"
— Aldo Leopold
~~~~~~~~~~~~~~~~~~~~~~~~~~~~~~~~~~~

HatchA

  • Guest
Re: Another Arm-Guard Carve-along
« Reply #8 on: March 29, 2011, 04:52:04 pm »
Another beautiful piece Cam.  I love your work and your carve alongs.

Offline jwarwick

  • Member
  • Posts: 27
  • Paying Advertiser to PA... StavePress
    • StavePress
Re: Another Arm-Guard Carve-along
« Reply #9 on: March 29, 2011, 07:49:23 pm »
WoW great attention to detail and photos too!!

Jon
Buy a good piece of land and put your heart into it.

Offline Cameroo

  • Member
  • Posts: 1,579
    • Cam's Stuff
Re: Another Arm-Guard Carve-along
« Reply #10 on: March 30, 2011, 01:46:31 am »
Thanks guys.  You keep me motivated :)  DEllis - this is already too time consuming, I can't imagine doing this on metal.  You'll have to show us how that's done :P

Day 3

Well, I didn't get much done tonight, but I have the tooling pretty much finished up I think.  I wish I had never tried using the seeder tool as a background - I love the way it looks but that tool covers such a small area, it takes forever to fill everything in.  Should be able to start staining next.  Here's where it's at now:


HatchA

  • Guest
Re: Another Arm-Guard Carve-along
« Reply #11 on: March 30, 2011, 12:16:40 pm »
I think it looks great with the seeder just accenting the edges (last pic on Day 2).

God bless your patience Cam!!   ;D

Offline Mark Anderson

  • Member
  • Posts: 373
  • Mark Anderson Buckie, Scotland
Re: Another Arm-Guard Carve-along
« Reply #12 on: March 30, 2011, 04:11:15 pm »
Nice work man! I've always used a marble or granite slab for tooling never even tried doing it on anything else. In fact that's why I haven't done any leather tooling in so long, I don't have any slab, but now seeing you doing it on a plastic cutting board I may have to break out my tools again. I've got a nice basket weave that would make some killer looking bow grips I think!!!
Thanks for sharing this!
Mark
"Mommy some guys just don't know how to shoot REAL bows so they have to buy them, probably at Walmart and they have wheels on them."  Caedmon Anderson (4yrs)

Offline Cameroo

  • Member
  • Posts: 1,579
    • Cam's Stuff
Re: Another Arm-Guard Carve-along
« Reply #13 on: March 30, 2011, 05:02:32 pm »
Ya, I'm planning on doing some tooling on the grip for my trade bow.  If I ever get started on it :)

Offline Cameroo

  • Member
  • Posts: 1,579
    • Cam's Stuff
Re: Another Arm-Guard Carve-along
« Reply #14 on: March 31, 2011, 03:17:43 am »
Day 4

Well I had some time today after work to make some progress, and got the staining pretty much done.

The first thing I did was use a product called block-out and painted it on the ring part.  I wanted this to remain the natural color, and this stuff keeps dye and stain from penatrating.  Then I painted the leaves with a reddish-colored stain I mixed up


My buddy requested some green in the middle.  I wasn't 100% sure how good this would look, but after putting it on, I think I like it :) I put a bit of light brown stain on the twigs after that.


Now I was pretty much ready to apply the mahogany colored wipe-off gel antique to the background, but first I had to pull the leather off the cutting board to trim the edges so I could stain them too.
Here's what I was talking about earlier in the thread, this contact cement peels off like a rubber glove.


After I got that pulled off, I cleaned up the edges of the leather with an edge beveler.  This thing works awesome, and it's imposible to gouge out too much leather.


I used a skiver to clean some of the fuzzies off the backside to prepair it for it's dye job later


Next I applied the gel antique.  You brush it on and then wipe it off.  I use a small paint brush to apply it close to the edges where it meets another color, and then use a bigger cotton dauber to apply it to the larger areas.


I work in fairly small sections because I found if you let the gel sit too long, it doesn't wipe off too good and you end up with really dark spots.  I just use strips of rags to wipe it off.  Always start with a clean spot on the rag and start at the outside border between colors and wipe inward, so that you don't get it where you don't want it.


Next I used a dauber to apply a cranberry stain to the backside


And here's where I'm at now.  Should be able to finish it up in under an hour now.  Just gotta seal it and put some eyelettes in for the bungee cord.  Hopefully tomorrow it will be done.