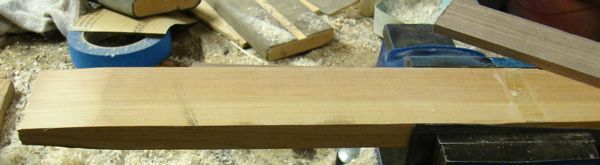
Author Topic: Making power lams  (Read 14406 times)

0 Members and 1 Guest are viewing this topic.

Offline cdpbrewer

  • Member
  • Posts: 90
Making power lams
« on: May 21, 2013, 05:22:05 pm »
Here’s one way to make power lams for wood lam bows.

First finish the flat side of the power lam- smooth for Titebond and grooved for Urac.

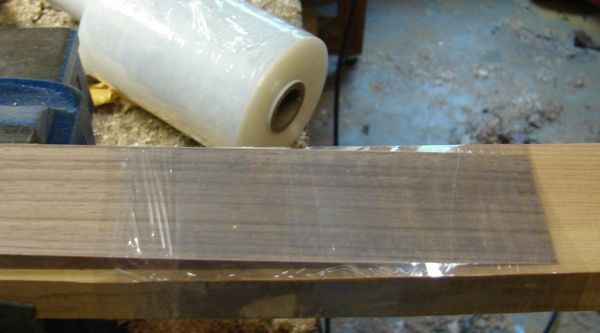
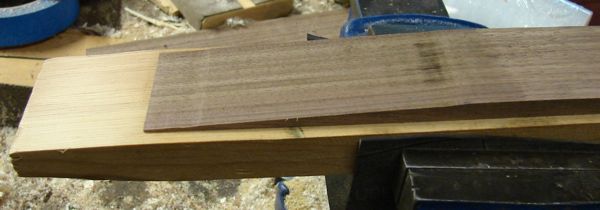
A backer board not much wider than the lam and around a foot longer or so than the lam is needed for backing up the lam.  This one has been previously used for making several other power lams (see the taper at the left end).  A piece of double-stick tape (in right end of pic) is attached to it.
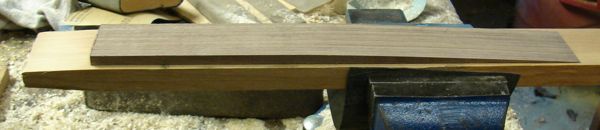

Here’s how the ~1/4” x 1.75” x 14” walnut power lam-to-be is positioned on the board given the taper at the end of the backing board. 


About 10 tight wraps with 4” wide stretch wrap is used to secure the lam to the board.  The double-stick tape is located about in the middle of the area with the stretch wrap.  It prevents the lam from being launched off the backing board in the next step.  It’s not needed with my underpowered belt sander but is needed with the planer.  You can guess how I determined this!


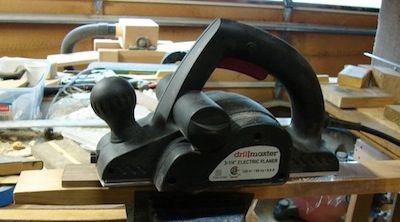
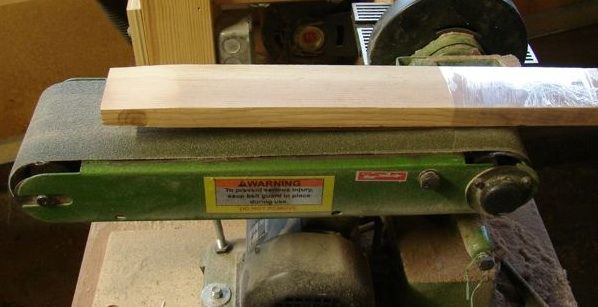
This cheap planer is used to *rough* out the taper.  Before I got it or a belt sander, a coarse rasp was used but it’s kinda tedious to get a level surface.  Then I tried using the lam grinder (in background) with a tapered sled but that was slow.   Using a jointer is an option but that’s too dangerous for me…


This is what the taper looks like after being attacked with the planer.   It’s just *roughly* tapered but is flat enough for the next step and, most importantly, is level across it’s width which helps keep it that way in the next step. 


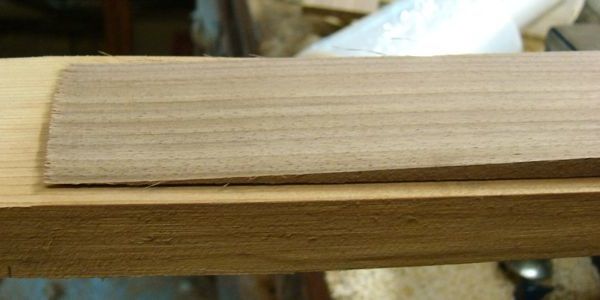
At this stage some sandpaper *firmly attached* to a sanding block and some patience could be used for finishing the tapers but a belt sander, like this 4”x36” one, is quicker but more touchy to use. 

Some belt sander tips:
  1.  A long board helps with getting a good taper. 
  2.  Hold the off end of the board with one  hand and use the other at different locations
       and downward pressures to vary the taper.
  3.  Clean the belt with one of those rubber blocks each time before touching the lam to the belt and
       use the residue build-up on the belt during sanding to keeping the lam level.   
  4.  Putting the lam down on the belt and lifting it off is whenI tend to booger it up.  I can
       avoid the later with this underpowered one by applying more force to the lam until the sander
       chokes down and the belt stops.  A foot switch for the sander could be ideal. 
  5.  If you don’t have a dust collector on your sander, use a piece of resin-rich pine
       for the backing board.  The pine smell will tell you that you’ve thinned
       the end of the lam down to nothing.
   6.  Practice alone doesn't make for perfection but it sure helps.
   7.  Oily woods like IPE don't sand as easily as woods like walnut and maple.

The results- 0.051” @ 1” from end, 0.097” at 2” from end and 0.262” @ center.    Still a little too thick, but about as good as I can get with the belt sander.   The remaining thinning will be done by hand sanding.


More to come...  (Photobucket is a pain to use! >:(  -  Reminds me of AOL)

Offline cdpbrewer

  • Member
  • Posts: 90
Re: Making power lams
« Reply #1 on: May 21, 2013, 06:16:04 pm »
Part 2

The results- 0.051” @ 1” from end, 0.097” at 2” from end and 0.262” @ center.    Still a little too thick but not bad enough go further on the belt sander.   The remaining thinning will be done by hand sanding.


Here’s what the joint looks like with a good amount of clamping pressure.  The taper is too steep and needs to be reduced.


Below is a pic of another lam showing what I like to use to do the hand sanding with.  It’s flat on one side and has curved ends on the other with sticky back 36 grit cloth and staples at ends.  (36 grit followed by 100 grit because Urac glue is said to like a grooved surface- and the 36 grit hogs off wood quickly).  The scribbled sketch on the backing board shows how to sand to thin towards the ends.  Warning: only sand towards the end of the lam when sanding them- a backstroke will booger up the ends!


Ought to be able to see bright light through the ends of the power lam:


Notice that the lam below is a bit pointy in the center, so stretch-wrap both ends and flatten the pointy bit and blend it into the fades by hand sanding.


To roughly see if the lam is OK, lightly clamp the other lams to it just past the ends of the lam.  The 0.152” hard maple mid lam (atop the power lam in the pic below)  fits well enough.  An additional consideration for most of my lam bows is that the other three lams are 36” long and will hence be spliced with long scarf splices before final glue-up of the bows.  One doesn’t want a lot of stress on the splices from pointy bends.


The ~0.3” osage belly is not flexible enough- there are narrow gaps about 4” from the center that require a good deal of force to close.  Heavy clamping would take care of them during glueup but I like to avoid that.   Besides, that’s where the ends of the 8” handle will be.  So, the power lam will be oriented with it’s curvature towards the bow-to-be’s back- as in the pic above.  The center of the lam could be thinned a bit more to narrow to gap but that’ll mean the lam might not be thick enough at the ends of the 8” handle and the handle would be prone to popping off.   I suppose a heat gun could be used to bend the belly lam  into conformance with the power lam if it wasn’t a spliced lam tho’ i’ve never tried it.


Since the back will be curved at the handle, the sort of rig shown below can be used for the glue-up.  The good thing about this is a flat solid handle can be used.   Be sure to recheck for any gaps- especially if you induce deflex in the inner limb!    I always use stretch-wrap to clamp the limbs of the lams together when glueing up and, for this type of form, clamps for the handle and to adjust reflex (and to induce deflex- not done on the one below; my tillering will likely add that!).  If the power lam is done right and the stretch wrap is tight enough the clamps in the pics at the ends of the it’s fades won’t be needed.   An aside: learn from my bad experience and always check for limb twist using winding sticks that the clamps on the limbs can induce when using this type of rig! 


I find this type of form better cause limb alignment is more precise and limb twist isn’t an issue: 

The downside is the belly needs to be thinnish and its is going to be curved and hence require either a laminated handle or a solid one with a curve to match the belly (which is tedious to do).  Alternatively, the one pictured above uses a single ~3/8” lam atop the belly which’ll be flattened afterwards to allow for a using a flat bottom solid handle.   

Examples of finished bows with power lams.

The gluelines are from the grooves in the lams for the Urac.  At least that’s my story :-)   Seriously, they can be camouflaged by using contrasting colored woods for the lams- e.g the bottom one has the same spotty visible gluelines.

Finally (bet ya thought that would never come!), I like to make a bunch of power lams at a time through the belt sanding phase.  It seems I make them better doing ‘em by the batch method.  The downside is that the surfaces have to be resanded to give the glue a fresh wood surface to bite into. 

c.d.

Offline ionicmuffin

  • Member
  • Posts: 1,787
Re: Making power lams
« Reply #2 on: May 21, 2013, 08:36:12 pm »
Thank you so much! this will help me a bunch!
Amo innectis arcus- I love crafting bows (latin)

Offline toomanyknots

  • Member
  • Posts: 3,132
Re: Making power lams
« Reply #3 on: May 22, 2013, 10:50:57 am »
Very nice, I appreciate you taking the time. Very nice finished results!  ;D
"The way of heaven is like the bending of a bow-
 the upper part is pressed down,
 the lower part is raised up,
 the part that has too much is reduced,
 the part that has too little is increased."

- Tao Te Ching, 77, A new translation by Victor H. Mair

Offline lesken2011

  • Member
  • Posts: 2,063
  • Kenny
Re: Making power lams
« Reply #4 on: May 30, 2013, 09:34:24 am »
Glad I found this post! Been going to try some power lams on future bows and this will be a big help!! Thanks a bunch for the info.
For by grace you have been saved through faith, and that not of yourselves; it is the gift of God, not of works, lest anyone should boast.

Ephesians 2:8-9

Kenny from Mississippi, USA

Offline Stefan

  • Member
  • Posts: 167
Re: Making power lams
« Reply #5 on: June 02, 2013, 02:30:15 pm »
Good explanation! I also like the jig you use for glueing reflex/deflex bow. Can you show off some bows (preferably full draw pics) on which you have used a powerlam and  that are glued on the reflex deflex jig with bicycle tires?

Greetings,

Stefan
Iron rusts from disuse, water loses its purity from stagnation... even so does inaction sap the vigor of the mind.

Leonardo

Offline Onebowonder

  • Member
  • Posts: 1,495
Re: Making power lams
« Reply #6 on: July 13, 2013, 04:16:55 am »
Excellent tutorial!!!

OneBow