Author Topic: Arrow tapering jigs???(arrow pics)  (Read 12629 times)

0 Members and 1 Guest are viewing this topic.

Offline Wiley

  • Member
  • Posts: 182
Re: Arrow tapering jigs???
« Reply #15 on: April 18, 2014, 08:52:23 pm »
I like your tapering jig pat. Also good to know other people really like poplar for arrows. It grows rampantly here, more poplar than I would ever know what to do with. Might have to saw a couple big straight grained ones down, turn it into lumber, and have enough arrow wood for the foreseeable future.

Offline okie64

  • Member
  • Posts: 1,134
Re: Arrow tapering jigs???
« Reply #16 on: May 08, 2014, 05:42:52 pm »
Got a jig fixed up about like Pats and heres a set of arrows I made with it. They are poplar tapering from 23/64" at the point down to 5/16" at the nocks. They shot great from my old faithful osage bow. Im a little rusty on my shooting but I still shot a decent group from 20 yards.


Don Case

  • Guest
Re: Arrow tapering jigs???(arrow pics)
« Reply #17 on: May 08, 2014, 05:52:08 pm »
When you chuck the arrow up in the drill how do you keep the chuck from bu%^^ring up the arrow? Mine always seem to loosen while I'm sanding and I end up with chuck marks on the shaft.

Offline okie64

  • Member
  • Posts: 1,134
Re: Arrow tapering jigs???(arrow pics)
« Reply #18 on: May 08, 2014, 06:48:44 pm »
I left the arrows a couple of inches too long that way I could cut off the chucked up ends, and yes they were pretty gouged up from the drill. After i ran the shafts in the jig I left them in the drill and proceeded to sand them with 180, 220 and then steel wool. It was much easier than hand sanding, although I got the steel wool hung up on 2 different shafts and it twisted them until they snapped. I was holding the steel wool around them a little too tight I guess, lesson learned.

Offline Eric Krewson

  • Member
  • Posts: 5,320
Re: Arrow tapering jigs???(arrow pics)
« Reply #19 on: May 08, 2014, 08:47:15 pm »
If you have a belt sander here is a simple jig will will taper an arrow I seconds. Takes a few test holes to get it right, chuck the shaft up in a drill and lower it on the belt. I have a 36 grit belt on my sander and found it is way to course,120 would be about right.


Offline Pat B

  • Administrator
  • Member
  • Posts: 37,525
Re: Arrow tapering jigs???(arrow pics)
« Reply #20 on: May 09, 2014, 12:07:54 am »
Eric, that's pretty cool. Do you have a hole in the cross piece that is the depth gauge?
Make the most of all that comes and the least of all that goes!    Pat Brennan  Brevard, NC

Offline Eric Krewson

  • Member
  • Posts: 5,320
Re: Arrow tapering jigs???(arrow pics)
« Reply #21 on: May 09, 2014, 02:55:16 pm »
Yes, there is a hole the tapered nock end sits in that will determine the amount of taper at the nock. It is a bit of a pain to set up but once set you can taper a bunch of arrows very quickly.

Offline JEB

  • Member
  • Posts: 1,735
Re: Arrow tapering jigs???(arrow pics)
« Reply #22 on: May 10, 2014, 08:03:03 am »
PatB, I am looking to make a tapering jig.  How does yours work and what are all the holes for?  Are the sides tapered in to the stop peg?

Offline Pat B

  • Administrator
  • Member
  • Posts: 37,525
Re: Arrow tapering jigs???(arrow pics)
« Reply #23 on: May 10, 2014, 08:46:14 am »
The holes along the bottom are to allow the saw dust to drop out. The taper angle is adjustable and tapers to the stop.
 I chuck the shaft in my electric drill and gradually work it back and forth progressing towards the stop. I used it on poplar shafts and had to work slowly. If I tried to force it, it would twist the shaft.
Make the most of all that comes and the least of all that goes!    Pat Brennan  Brevard, NC

Offline uklongbow

  • Member
  • Posts: 5
Re: Arrow tapering jigs???(arrow pics)
« Reply #24 on: May 28, 2014, 03:40:57 pm »
I found that the drill chuck had a tendency to split the arrows if they got jammed.
So ... got hold of a top hat screw on point , chucked that in the drill, then ran the shaft
into the point , voila :)

Roger

Offline cdpbrewer

  • Member
  • Posts: 90
Re: Arrow tapering jigs???(arrow pics)
« Reply #25 on: May 30, 2014, 01:41:55 pm »
I got inspired by PatB's rig to make some when he posted it in another thread a good while back.   THANKS Pat!

Pics of the old (top) and new (bottom) versions of arrow tapering jigs with a sanding block between them which is used with the old and new rigs. 
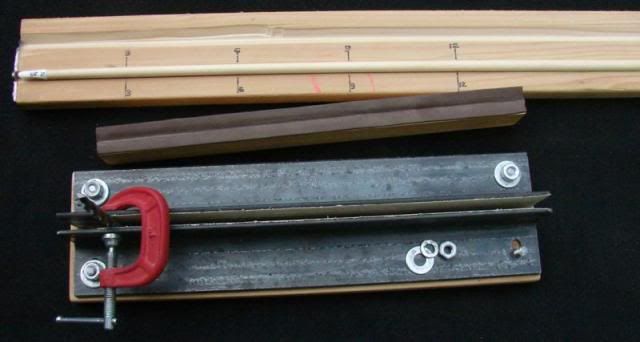


The sanding block has a ~1/4” radius groove in it that’s covered with 1/8” thick sticky back hobby foam.  The arrow in the pic is 0.305” diameter (just under 5/16”) tapered over 9” to 1/4”. 

The board uppermost in the pic is what I tediously used for tapering shafts with a thumb plane until making the rig on the bottom.   The board has a two 1/2” deep “V” grooves for holding the arrow shaft.  The lower groove has an aluminum shaft stop at the left end and is marked at 3”, 6”, 9” and 12” from that end.  To use it for a 9” taper: 
1.  Lightly pencil mark a line around the shaft at the above marks.
2.  Starting at the 3” mark, plane off all of the 3” pencil mark- i.e. take a swipe, rotate shaft a bit and repeat until all the 3” pencil mark is planed off.  Be consistent in the rotating and planing.
3.  Repeat step 2 for the 6” and 9” marks.
4.  Check nock for desired diameter.  If off much, remark shaft at the 9” mark and plane again from there. 
5.  Use the sanding block with P180 grit, A weight (i.e. thin) sand paper to round off the shaft.   Sand while rotating the shaft and, if needed reduce it to the desired nock diameter.  Be consistent in the rotating and sanding.
Total time per shaft about 15 minutes once one has a bit of experience but it quickly becomes very boring work when doing a dozen or more shafts.  It’s also aggravating when one raises a splinter with the plane!  Worse yet on a footed arrow!   >:(

The new rig is made from two 12” long pieces 1-1/2” x 1/8” steel angles bolted to a piece of nice 3/4” plywood with 1/4” carriage bolts.  The bolt holes in the lower piece of angle are slotted to allow for adjustment of the taper and nock end diameter.  P150 sandpaper is affixed to the angles with double sided tape.    Many holes are drilled in the plywood base to allow the dust to fall out when the the rig is clamped in a vise.  The drill bit pictured at one end of the rig is used to set the nock diameter and, with the clamp (not too tight!) acts as a stop.  Other bits of varying diameters are used at the other end to set the taper.    Works really well.   After the rig is used, the taper is sanded on the board affair with the sanding block and P180 paper.  Final sanding is done on the rig with P280 sandpaper then freehand with a grey Scotch-brite. 

Tips:  Angle iron is not necessarily straight or at an exactly 90 deg angle- check before buying and cutting.  Strengthen bolt holes and area under carriage bolt heads in the wood base with a soaking of thin CA glue.  A high drill speed isn’t needed for spinning the shaft in the rig- around 500 rpm works well for me.  Rather than use the drill’s  trigger to set its speed, I lock it on high and use a separate speed control box wired which is connected to a foot switch.  Straighten the shaft before tapering (DUH!).   I usually use a 3/4”  long piece of Tygon tubing over the point end of the shaft to keep from boogering up the end.  If the rest of the shaft is already finish sanded, I attach the point  and then use the tubing over it.   That also tests the point’s attachment to the shaft.   Downside is a 1/2 drill is needed.  I gotta try uklongbow’s top hat point trick tho’ since it seems very elegant

Finally, here’s my first stab at one that didn’t work out: 


The cut-apart 1” x 42” sanding belt requires glueing to the 17.5” long wood pieces- otherwise the belt moved up and down as the shaft was spun and the shaft jumped around in- and often out of- the rig.  Glueing would have defeated the intended ease of replacing the sanding belt or changing to a finer grit.   When I got around to glueing the belt in, the two maple wood pieces had warped a bit so I abandoned the rig and made the new one with the steel angles.   Looking at this again, maybe a piece of clear plexiglass over the slot would keep the belt from moving up and down…

I also fooled around a bit with using two files in a jury-rigged jig like those above but never got it to work well- couldn't keep the shaft between them and the finish was poor.

c.d.

Offline bow101

  • Member
  • Posts: 2,235
Re: Arrow tapering jigs???(arrow pics)
« Reply #26 on: June 10, 2014, 07:42:28 pm »
Nice arrows Okie
"The privilege of a lifetime is being who you are."  Joseph Campbell