Author Topic: ordered a blunderbuss  (Read 7881 times)

0 Members and 1 Guest are viewing this topic.

Offline amateurhour

  • Administrator
  • Member
  • Posts: 239
ordered a blunderbuss
« on: February 06, 2017, 03:08:50 pm »
I saw that Traditions has discontinued their .54 cal percussion blunderbuss and there were only two stores still selling it at a reasonable price with free shipping so I bought one.

 :o

I do not NEED a blunderbuss, but the next nearest kit is like $1000 and there's some pretty good videos on youtube of people that converted the Traditions percussion rifles to flintlock by just putting a bolt with a few holes drilled where the bolster goes and swapping the percussion lock for a flintlock so if I ever want to remodel it I likely can.


Offline osage outlaw

  • Member
  • Posts: 11,951
Re: ordered a blunderbuss
« Reply #1 on: February 06, 2017, 06:10:42 pm »
Those are cool looking.  I'm guessing that's a close range weapon. 
I started out with nothin' and I still got most of it left

Offline amateurhour

  • Administrator
  • Member
  • Posts: 239
Re: ordered a blunderbuss
« Reply #2 on: February 06, 2017, 09:25:17 pm »
hovey smith on youtube did a series of videos with his kit and he hunted deer, goose, squirrel, and turkey with it.

He made a custom sight for it and was getting a pretty good three inch group at up to 40 yards with just a round ball but since it's smooth bore it wasn't any good past that.

At 10-20 yards with bbs it was pretty good for squirrel

Offline Josh B

  • Member
  • Posts: 3,741
Re: ordered a blunderbuss
« Reply #3 on: February 17, 2017, 11:24:55 pm »
Did you get it yet?  Josh

Offline amateurhour

  • Administrator
  • Member
  • Posts: 239
Re: ordered a blunderbuss
« Reply #4 on: February 18, 2017, 09:28:07 pm »
I did!

I'll post some pictures of it Monday. I went up to Twin Oaks this weekend and worked on it a little but I left my hook knife at home and the caplock needs a fair bit of fitting as well as the trigger guard so I don't have it fit yet but the barrel is good to go.

It's going to be fun.

Offline Pappy

  • Global Moderator
  • Member
  • Posts: 31,765
  • if you have to ask you wouldn't understand ,Tenn.
Re: ordered a blunderbuss
« Reply #5 on: February 22, 2017, 10:10:22 am »
Ya I kept him to busy to do much work on a gun. ;) ;D I did get to see it and thought I took a picture of it but can't find it, pretty cool looking.
 Pappy
Clarksville,Tennessee
TwinOaks Bowhunters
Life is Good

Offline amateurhour

  • Administrator
  • Member
  • Posts: 239
Re: ordered a blunderbuss
« Reply #6 on: February 23, 2017, 12:49:11 pm »
OKAY I already messed up the stock. This one is a lot more difficult wood to work with than my Kentucky pistol kit.

Was trying to do some more inletting work on the lock because the trigger isn't tripping it and went OVERBOARD with the hook knife and exacto because I'm crud with fine detail wood work.

Pics attached, please let me know how to fix this Eric and Gun Doc and other professionals.


Offline Eric Krewson

  • Member
  • Posts: 5,311
Re: ordered a blunderbuss
« Reply #7 on: February 23, 2017, 03:21:37 pm »
I can't tell exactly what I am seeing, sloppy inletting for sure but where is the problem, too big an inlet, over shaped lock panels, I can't tell.

You should have removed wood from the belly and inletted the trigger and trigger guard much deeper to make contact with the sear. On fowler type stocks there is not much wood under the lock, you have a ton of extra on your precarve.

Here is my fowler;


Here is an original English blunderbuss and the shape you should be trying to copy;


Never work free hand, always draw your cut lines and work from a full sized picture or plan if possible.
« Last Edit: February 23, 2017, 03:26:58 pm by Eric Krewson »

Offline Eric Krewson

  • Member
  • Posts: 5,311
Re: ordered a blunderbuss
« Reply #8 on: February 23, 2017, 03:40:19 pm »
OK I get it, you cut away all the lock panel wood in front of the lock. Not an easy fix, the only way to fix this would be to flatten the former lock panel area and glue on new wood. If your glue line is perfect it won't show much, if not it will look like a neon sign saying "here is where I goofed up".

This goes back to "draw your lines first", no freehand work.

Like this;


More on lines; if you thin the belly you need to drill a small hole in the middle of the barrel channel at the breech and insert a drill bit to tell you where the bottom of your ramrod hole is so you don't cut through while removing wood from the belly.


Here is my high tech measuring device;


The same gun in the bottom two pics finished;

« Last Edit: February 23, 2017, 03:55:23 pm by Eric Krewson »

Offline amateurhour

  • Administrator
  • Member
  • Posts: 239
Re: ordered a blunderbuss
« Reply #9 on: February 23, 2017, 04:15:44 pm »
THANK YOU!

So you're saying I need to just go a lot deeper with the pre-cut inlet there?

I'll probably do a cover up on the wood rather than glue. I was thinking a copper or brass outline or maybe like horn or something?

Also no worries about the ramrod because the dumb kit doesn't come with one, which is insane. : (

Offline Eric Krewson

  • Member
  • Posts: 5,311
Re: ordered a blunderbuss
« Reply #10 on: February 23, 2017, 05:34:10 pm »
By deeper I mean 1/16" at a time, check your to see if your trigger is picking up the sear. Chisel and Exacto only, no  hook knife. The hook knife has no safe use in gun building, carving tools, rat tail files, and riflers get the job done along with lots of sandpaper. I frequently do my final shaping with sandpaper to keep from being too aggressive.

When inletting deeper you never work on the sides of an inlet, only the bottom. You can make a workable skew chisel out of an old screwdriver or fleamarket chisel to make working the bottom of an inlet easier. I use an 1/8" wide one more than anything.

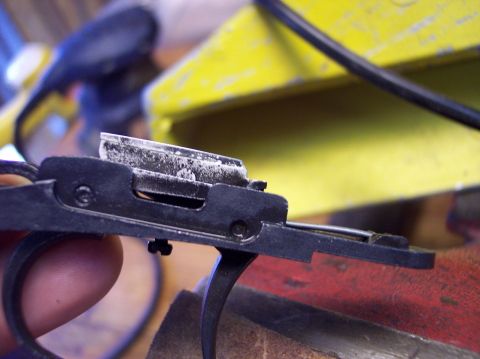
The first thing you want to do is pull your lock and see how far your trigger goes up in the lock inlet, then try to see where your sear is positioned in the inlet. If they are way off you can add more metal to the top of the trigger bar and leave your inlet alone.

Added metal; I have done it several times when my trigger didn't quite hit the sear enough to trip it.


Offline Josh B

  • Member
  • Posts: 3,741
Re: ordered a blunderbuss
« Reply #11 on: February 24, 2017, 01:00:18 am »
I'm a little confused here.  By the pics it looks like you gouged off the edges around the lock plate inlet?  Sort of chamfered the edge so that there will be a gap around the lock plate?  If so, that's gonna be a booger!  Josh