Author Topic: Turkey Wing Bone Call - Build-a-long (added Soup Recipe)  (Read 24525 times)

0 Members and 1 Guest are viewing this topic.

Offline ber643

  • Member
  • Posts: 530
    • Bernie Dunn's Home Page
Turkey Wing Bone Call - Build-a-long (added Soup Recipe)
« on: March 31, 2008, 10:59:59 am »
I have been asked/invited to do this build-a-long here and it is my pleasure. I had done one about a year ago on another forum and I want to see if it will transfer well. So I am going to start this one off with the same preliminary info I preceeded that one with. I will try to catch any corrections (between the two sites - three sites now) that are needed as they come up but, if I miss some, please bear with me. This transfer process should save a lot of time.

Well, good then, guys, it'll be my pleasure. I'll try to kick it off in the next day or two here. In the meantime here's some preliminary info:

A lot of folks like ones made from the bones of wild birds better but it really makes little or no difference, IMO. So you can buy a pack of just plain turkey wings at WallyWorld. They come in two, four, or six packs, I believe - or you can go whole hog, and buy the "Big Bird". Oh, generally speaking, the difference (because of size) is that the holes in the wild wings are smaller, so it makes for a lower volume, higher pitched call. I think that's why folks like them better. However, you can controll the domestic calls to produce the same results, by practice. The same folks also say Hen Turkey wings are better than Gobblers/Jakes - for pretty much the same reason, IMO. They may be right, I certainly would never argue the point - too many folks with way more experience than I, and the NH pair that I made and kept one of, is made from a Bearded Hen  so go figure. The best thing about any Turkey Wing Bone call though, is that not everyone has one - so you will make a different "sound" with one, than the birds in your area have gotten used to, and that therefore they tend to ignore. You can accomplish that same thing with whatever bones your call is made with. The more you practice, the better you get (and the more your wife and dogs will probably hate you - unless you go outside 
How do you use one? The same way you puff on a pipe to light it - as simple (and as hard) as that. Cup the bell (or end) of the call in your two hands and put the other end between your lips (I use the side of my lips). SUCK IN, making the puffing (or kissing, or like calling a kitty - whichever explains it to you best) action. You controll the volume and distance by opening and closing your hands around the bell - like using a Trap or hat on a trumpet (or whistling with cupped hands in that manner). Here is a pic of me using one, hope it helps (they are with my old camera though - sorry - the actual build-a-long will be with my newer camera.):


Here are the NH ones I mentioned above (with "The Old man In The Mountain", a long standing State symbol, painted on them - I don't usually get that fancy but these were special for me, and a surprise for the "Home Boy" who sent me the Bearded Hen wings):


OK, it looks like it is going to work well (with corrections - LOL) so, I will move along, shortly. with the actual Build-a-long and pics.

Also meant to tell you of another way to practice (and some folks even use them as calls), if (or while) you don't have an actual bone call. Use either a "sip straw"/Coffee stir stick (the ones made like a small straw) or an empty ball point pen barrel (thin pen) - use it as in the instructions above for the Wing Bone Call. Of course, what you are after is hen yelp sounds, BTW and I think rythm is perhaps more important than perfect sound.  Different hens sound different too. Also very serviceable calls can be made this same basic way with two or three graduated sizes of old carbon rod (arrows) pieces, or River Cane pieces. I'll try to remember to show one later.

My next post will be (or include) the start of the actual work. Thanks for looking and reading.

« Last Edit: May 05, 2008, 12:02:44 pm by ber643 »
"Hunters Are People Too" (My website Premise)
Bernie Dunn
Coastal NC

Offline ber643

  • Member
  • Posts: 530
    • Bernie Dunn's Home Page
Re: Turkey Wing Bone Call - Build-a-long
« Reply #1 on: March 31, 2008, 01:01:40 pm »
OK, I'm set to continue (or start). First let me say the beginning may seem a little slow, or overdone. The reason is, I had a little trouble with that (identifiing and getting the right bones), and apparently other folks do too. So, I am going to spend extra time and pics on this part. The first pic is of a pair of Domestic wings - they could be wild wings, with feathers on, and you would be looking at the underside, where the feathers are thin. You would open the wing meat the same way as we will here. You could also be starting out with bones that already have most of the meat removed (or have been cooked already). Just use the pictures where your parts fit in to start out.


Here you see the three sections that make up the wings. Remember you will discard the wing tip (except for soup making - it's great for that). The three bones you want come from the two sections at the top of the pic, or the two closest to the body of your bird (the top one is the part some folks tend to break or discard, or leave attached to the bird IN ERROR). That top section has one large bone and it will be the bell/trumpet of your call, if you use one. The second section contains two (parralell) bones and they are your other two bones (smallest is mouthpiece, larger is second/middle bone), or they will be your only two if you are not using a bell, or are using an alternative bell. You will see all of these things more clearly (hopefully) in later pictures.
 
 
Next - A sharp knife (I'm using one of my "yard sale specials", an Oldtimer sheath 1560T) to cut the meat along the top of the larger of the two parrallel bones in prepparation for de-boning:


Like so:


Sever the wing tip at the joint (to discard or toss in the soup pot) and open the meat more around the two bones in that second section:


Sever the joint between the Second and First (one that was closest to body - remember?):


and separate the two sections (Sorry it's fuzzy - Probably either Rose or I started to pass out - ):


Next you can slit the first sections meat on top of the single large bone, and debone (cut most all the meat away from) both sections - you'll end up with these two piles of meat and the two sections bones:

 
_________________

Now separate the two parrallel bones (cut and/or pull - but don't break either of these bones - you'll want the full length - more or less), and now you have your 3 bones for your call. The big one is the one that folks, or their "arrow", sometimes breaks - the good news is you don't need full length here so sometimes you can salvage a "bell" from a busted bone:


This next step you can do before you "cook" your bones or after - both ways have their pros and cons. You are going to cut the "bulbs" (ends) off both ends of all 3 of your bones (beyond you see the deboned sections of the second wing). If you do it before you cook, the bones are more slippery to handle with your hacksaw or Dremel Tool, etc., but it allows the boiling water to get to the marrow better, I think. The one end of the middle bone somehow snuck out of the picture frame - but it's there - honest!:


If you cut the knobs off after you cook, it's a little less messy (I do my cutting while reaching inside a tall kitchen trash can with bag inserted, either way - the wife appreciates it  ). Here I am going to tell you that I vary from a lot of folks with two things I do. Sometimes I cook twice (it's not so much cooking as cleaning and removing meat and marrow), and I don't even worry about getting too straight a cut with the Dremel the first time as you will probably have to modify the cuts later, for best fit, when you assemble the bones.

Now for the cooking: How and when you do this depends on if you are making (or have already made) soup or not, and if you like the bones whiter or not. Anyway, what I perfer is this way. once I get my bones ready for the final (sometimes second) cooking. You will only let them boil about 5-8 minutes this time in any case - that's a pretty good rule for any boiling except actually cooking soup. (So far, I don't see any problem with bones cooked longer in soup making, but with the hydrogen peroxide boilings - better safe than sorry). Put bones in sauce pan (that your wife says is OK to use ) cover with water and add a decent dollop (aprox 1/2 cup or less, depending on quantity of bones, of course) of plain old household hydrogen peroxide (the kind you clean the wounds you made on your hands, while you were deboning, with). It's cheap and safe. Bring to boil - watch it, so it won't boil over on the stove, cut back on heat a little and boil the 5 to 8 mins mentioned earlier. Drain and rinse well, then cover with water again and shake in a decent amount of Baking Soda (to stop any further bleaching) and let set overnight. Drain, rinse again (maybe two or three times), and dry. Now you will clean out the insides of the bones - the best way you can find to do it. I use a pocket knife (with lock-back blade), a bodkin (darning needle epoxied into a small dowel), my mouth (to BLOW - DO NOT SUCK - from force of habit because of practicing using these calls - ugh! You'll probably only make that mistake once - maybe twice if your real hardheaded - or forgetful), and pipe cleaners (large and small). There is some amount of fine bone "webbing" in some bones and ends of some bones. If this is stubborn, as it sometimes is, you may have to get inventive and use a Dremel tool with different bits, a chainsaw file, a stick of dynamite, you know - whatever .

Your bones should now look like this - no matter at which stage you boiled them, or in what state of dress, or undress, they were to start out; this is pretty much what you want at this stage. This is two sets (two wings, two potential calls) The messy part is pretty much done with now:


Sorry about the glare - it was late at night and I couldn't seem to controll the flash .

 (I'll be back and continue transfering the next stage later today)
"Hunters Are People Too" (My website Premise)
Bernie Dunn
Coastal NC

Offline Pat B

  • Administrator
  • Member
  • Posts: 37,482
Re: Turkey Wing Bone Call - Build-a-long
« Reply #2 on: March 31, 2008, 01:29:54 pm »
Cool Bernie. Not only are you showing us the build-along but maybe you have a recipe for turkey wing soup.  ;D  Looking forward to following this build-along. I made a switch cane call a few years ago just fooling around. Sounded pretty good too.     Pat
Make the most of all that comes and the least of all that goes!    Pat Brennan  Brevard, NC

Offline Otoe Bow

  • Member
  • Posts: 898
  • Mike Chase, Afghanistan
Re: Turkey Wing Bone Call - Build-a-long
« Reply #3 on: March 31, 2008, 01:59:00 pm »
Rats.  I was going to look at this while at lunch here at work.  For some reason, the pictures are showing up as boxes with little "Xs" in them.  Guess I'll have to wait until I get home.  Thanks for adding the build along. 

Otoe
So far, I haven't found any Osage or knappable rock over here.  Embrace the suck

Offline John K

  • Member
  • Posts: 1,936
Re: Turkey Wing Bone Call - Build-a-long
« Reply #4 on: March 31, 2008, 04:17:22 pm »
Lookin good Bernie !  I'll be following this one...... John
The only way to fail is to never start !

Offline ber643

  • Member
  • Posts: 530
    • Bernie Dunn's Home Page
Re: Turkey Wing Bone Call - Build-a-long
« Reply #5 on: March 31, 2008, 05:09:02 pm »
Yes, Pat, the cane ones do sound pretty good, I think. My wife makes outstanding Turkey soup (everyone says so) with wings, Pat, but i don't know if she uses an actual "recipe" or not. I'll ask her though -  :)

Thanks, guys, and I will be back on, this afternoon, to post (probably finish up) again.
"Hunters Are People Too" (My website Premise)
Bernie Dunn
Coastal NC

Offline DanaM

  • Member
  • Posts: 9,211
Re: Turkey Wing Bone Call - Build-a-long
« Reply #6 on: March 31, 2008, 05:23:51 pm »
Thanks for posting this bernie.
"Prosperity is a way of living and thinking, and not just money or things. Poverty is a way of living and thinking, and not just a lack of money or things."

Manistique, MI

Offline ber643

  • Member
  • Posts: 530
    • Bernie Dunn's Home Page
Re: Turkey Wing Bone Call - Build-a-long
« Reply #7 on: March 31, 2008, 06:12:11 pm »
My honest to Pete pleasure, Dana.

The next stage will be assembly (what some have been waiting for, I suppose), and then the final stage will be decoration - where you can go wild   >:D

For the Assembly Stage - you will need your cleaned three bones (or two bones and a alternative bell, or just the two top bones) and some tools for grinding, shaping, fitting i.e. Dremel Tool (what I use mostly), hack saw and files, etc. and super glue/gel, also plumbers putty or something like that.

... and we're off, like a "herd of Turkeys" - Yuk, yuk, yu-uck!

Stage two - Assembly:


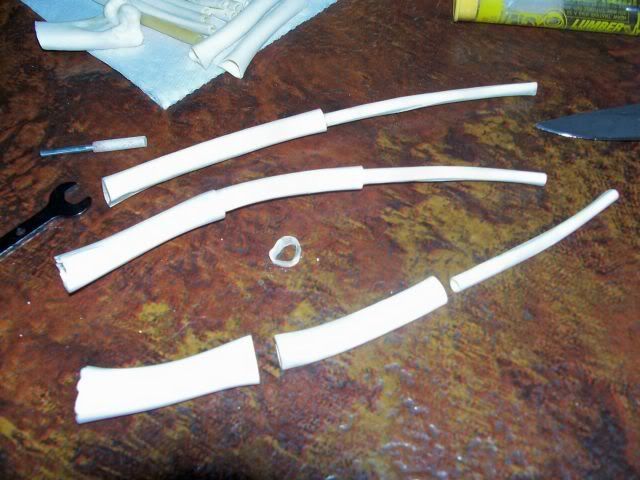
As you can see in this (above) picture, you match up your left and right wing bones, as best you can. Not sure it is all that critical, but it does seem to help in the layout. I have the two sets from our Domestic wings we just worked up, and behind those, I have set up a two bone Wild Turkey set. In this case, it is unusual but this domestic was smaller and the wild ones I have are from larger birds. Also as you can see, sometimes you get lucky and some bones half-way fit together. Most times your not so lucky, and while they match up , they don't fit into each other. So, now you must attack them with your Dremmel Tool, with cut-off blades & grinders, and/or other types of saws, files, knives, whatever you have:


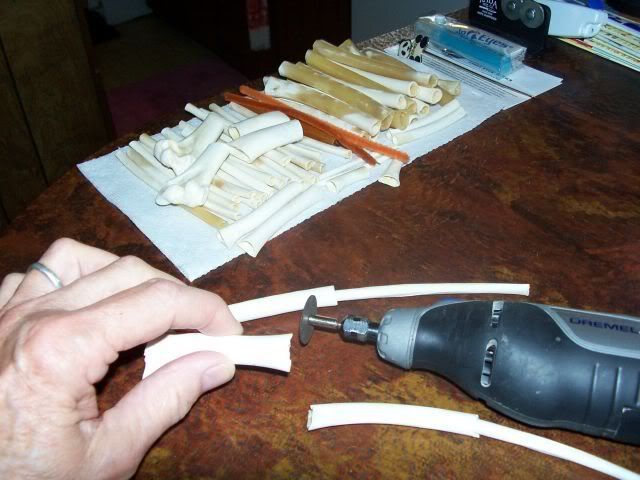
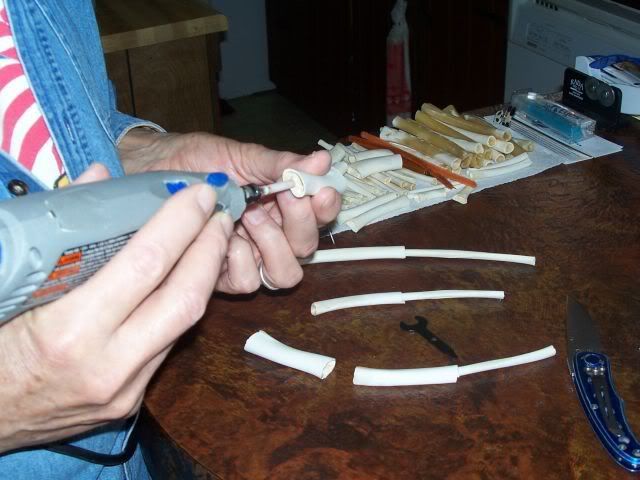
Squaring the ends (above), and grinding the membrain Honeycomb-like areas inside the larger ones (below). You also usually have to grind the outside edges to slip the bones into each other:


Once you have them pretty well fitting into each other (it is not an exact fit - it doesn't work that way - hardly ever) I resort to super glue to quickly hold them in place (I use the Gel type mostly - not quiet as quick, so you can adjust, and also fills in more). I usually try to wrap something around the joint(s) (temporarilly) to keep them from sucking air long enough to let me "tune" the call in case I didn't get it just "right". I'm not at all sure there is a real "right", because so much of the sound at any given time, depends on you (the caller), the day, the weather, etc. Experience will help with the sound you want.

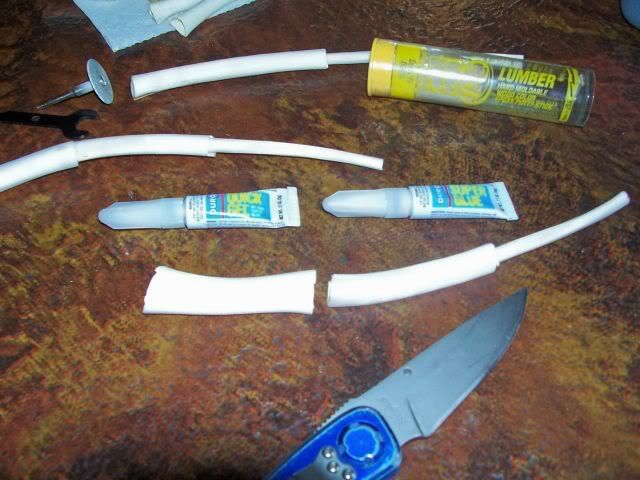
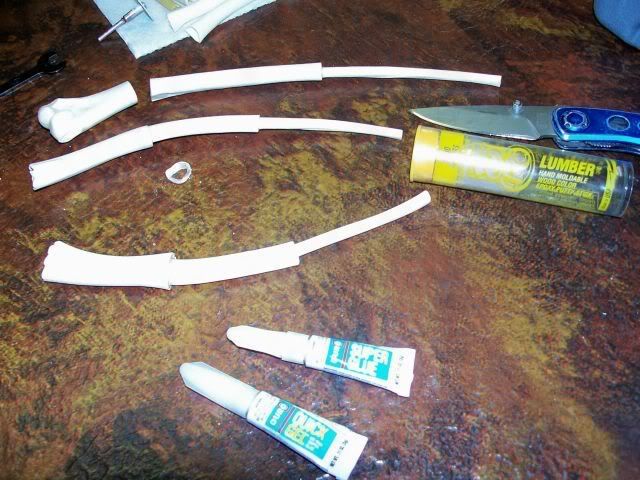
Then I go to some kind of Putty to seal the joints permanently (you don't want to be sucking air at the joints). I started out (my first few) with Plumbers Putty - a kind of gray clay sort of stuff that works well. I then found this "Lumber" epoxy type in a stick that you nead into a slightly adhesive type of plastic wood (only better), and it comes out wood colored - a closer match to the bones, I think. Both products are soft sticks that come in plastic cylinders and are moldable until they dry, and then sandable. You usually find them in with adhesives and/or fillers in the stores. Any similar product that you like and like to use should do the trick for you.


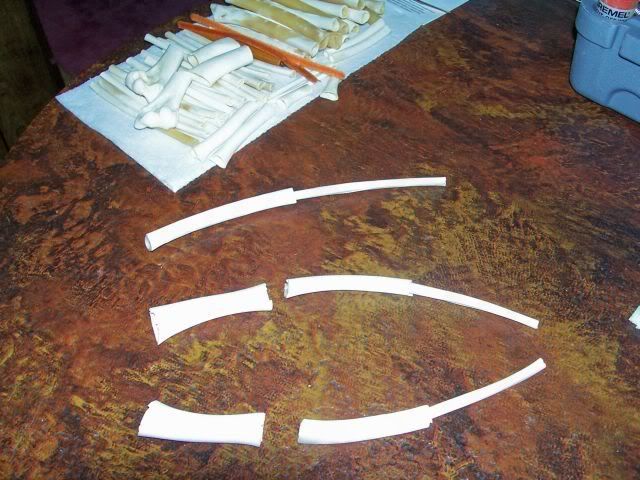
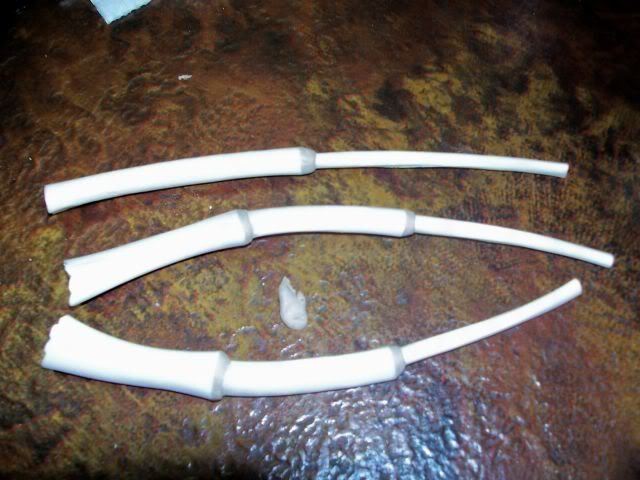
Below you see a cut off end (from squaring up) and one set fitting and glued together (as well as the Two Bone call glued, which fit together with minimal grinding), and the other set ready to be glued:


Unglue yourself from any bones, paper towels, tools or counter tops you have inadvertantly become attached too (Acetone, or your wive's fingernail polish remover, will "set you free"), and then proceed to seal the joints with worked up putty products. You can also see (below) that I have placed an uncut "Bell" bone at the end of the two bone model to show the possible use of that type of end. you have to make a couple holes in it but it does tend to keep the overall air passage low, and thus a higher pitched call - if you don't get carried away with the holes:


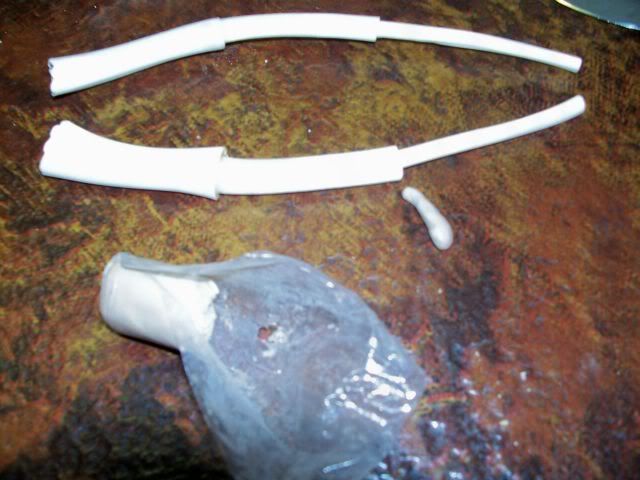
Below you will see the putty product (it is wrapped in plastic for freshness, inside the tube), and a small bit of it I have neaded up and placed near a joint I will apply it to. I usually form and push it around and into the joints and then smooth it down with my fingers and fingernails - to make it neat - less sanding later - (I like that):


Here you see some joints sealed with the putty, some still to be done. You will also see I like to scallop the ends of the bells - sometimes. My friend Guru came up with that idea on his first one, and I thought it was neat, so I kind of adopted it:


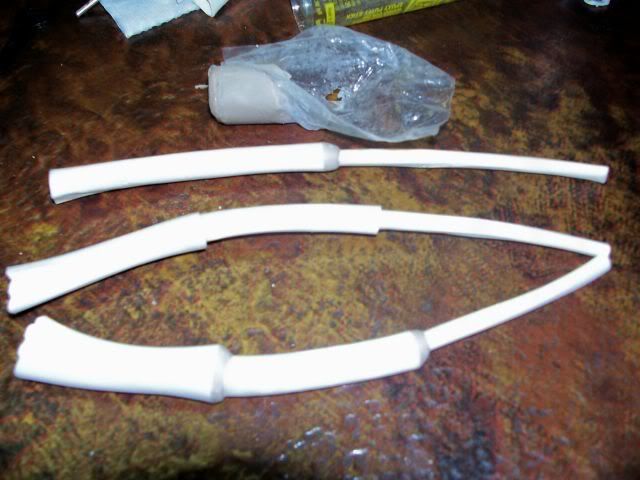
Here are all three calls, (2 Domestic three bones, 1 Wild two bone) compleated, ready to use (I tried them and they all sound good to this tone-deaf ol' hoss), waiting for the putty to dry - and then sanding, if needed. You also see a piece of the left over putty :


Next is the 3rd and final Stage - Decorating. I'll give you a few ideas that I, and others, use but basically the sky is the limit, and your imagination is the only barbed-wire fence to hold you in -    :D

(Now let me see how many edits I must do - LOL) Ah - only 101 - in three increments - sheesh. I could edit 20 times, and still find (many) errors in my "stuff".)  ::)  ;D

« Last Edit: March 31, 2008, 06:15:31 pm by ber643 »
"Hunters Are People Too" (My website Premise)
Bernie Dunn
Coastal NC

Offline ber643

  • Member
  • Posts: 530
    • Bernie Dunn's Home Page
Re: Turkey Wing Bone Call - Build-a-long
« Reply #8 on: March 31, 2008, 06:59:39 pm »
I thought that I would again take time for some "pre-info" That will start us off on Stage three. I'll give you some facts and ideas as they come to me, and pics of earlier calls I did just for ideas. Then (hopefully) I will start on the three we just assembled together, and cover those as I do them. One of those three will be the one Mike Miller picked for his Outdoor Core Aniversary Drawing call (on another forum).

Here are some early ones I did including my first two (remember some of these pics will be with my old camera):


The two on the left are my first two (wild bones) and one bell was shot up pretty bad so is short. Both of these calls are decorated with Scrimshaw. it takes time but is neat. One of them went to the Marine who got me the wings, and the other went into the first wing bone call trade I was in.

Scrimshaw is interesting and can be as pritive or as classic as you have the talent for. It is accomplished by putting India Drawing ink on the area you wish to decorate (by brush, rag, cotton ball, sponge - whatever). Then as you scratch your markings into the bone they will show up as white - so you can tell how/where you are marking and progressing. Then, when you are satisfied, you re-ink the whole area again, and then you buff it with 0000 steel wool. Thus removing ink from everywhere, except where it stays in the scratches. Viola! Your Scrimshaw picture/design appears in black. The more you do them the better you will get. It is , of course, an art all in itself. As I recall most of the others in this pic are decorated with indelible felt tip pens (a lot quicker/easier). I think you can see I drew Bows, feathers, a knapped arrow head , turkey tracks and lightening bolts for symbols and decorations - let your imagination be your guide.
The wrappings at the joints are primarily decorative but also hold the lanyards in place. The first two are with imitation sinew, the rest I believe are all flytieing thread (silk and rayon). The lanyards are what they call Round Rawhide ( in craft stores, WalMart, catalogs, etc.) I keep it on hand in black and also tan. As you will see I collect beads, trinkets, geegaws and any cording I think will make usable lanyards - either short hand lanyards (like these) or long ones (to hang around the neck).

I always spray the compleated calls with Krylon Crystal Clear, in Satin (as opposed to Gloss). It is a clear acrylic spray used to protect crafts and artwork, and I have been using it for many things, for many years. You can get it at WalMart in the paint area and sometimes in the craft section, or at art stores. One caution - don't get two close to the felt tip markings when spraying or it will dilute and blast them off the bone - *poof*. If that should happen to you, steel wool it clean and start over - it's better than throwing the call through the window. Also use two or three light sprayings, rather than one heavey one. You can do the succesive coats in quick order, as it dries quickly. The Crystal Clear will also protect the bones and it makes everything stand out and look better - especially when you look at it a couple or so hours later (I don't know why - it just brightens colors and improves contrasts - trust me.) More pictures, for you to get ideas from, follow:


Above and below are the two sides of ones I made for my twin Grandsons in Maine for their Birthday.


And above and below here is the one I did for their older sister for her Birthday - her folks had remodeled her room in blue and pink for her Birthday.


Hope these may help you with varied ideas and trigger your own creative juices - mostly I hope it wasn't boring.
"Hunters Are People Too" (My website Premise)
Bernie Dunn
Coastal NC

Offline ber643

  • Member
  • Posts: 530
    • Bernie Dunn's Home Page
Re: Turkey Wing Bone Call - Build-a-long
« Reply #9 on: March 31, 2008, 07:18:26 pm »
(The real start of ...) Stage Three - Decoration:


This is where what n' how I go about it (there are as many ways as there are roads to get to CA from NC). You see above my ol' metal tool/tackle box that I have dedicated to storing my WBC making gear (that I also use on other projects - LOL). You'll note the bodkin I mentioned earlier, a pair of fly tiers scissors, hemostates. Also a large collection of beads, jewelry parts and findings, trinkets, cords, shells, bones, you name it - it might be in there. Paper towels (I use a lot of those). Finally a bunch of adhesive coatings - super glue and gel, Hard As Hull (blue bottle) fly tiers coating to afix and bring out colors of materials as well as protect them, and Zap-A Gap (also a super gel/liquid). Some I'll use in this teut, some I may not but I do use them all (and other "stuff") from time to time - You will too, if you make more than one call 

You need some way to hook your Lanyard on (if you use one). You may just tie it on, or use a metal/wire hook of some kind. A hook keeper, like fish rod builders use is good too. I take a small wing bone (extra, short piece, damaged one, etc.) and make little slices off it, with my Dremel cutting blade, and store them in a little zip bag to use sometimes, as i will in the pics below. However, lately I have worried about the little bone rings breaking later - so, i have started just gluing the lanyard material under the top (or only) decorative joint winding.

So my first step this time is to glue the little lanyard keeper onto the call:


I usually at this stage (as you see) work on about 3 calls at a time (or less);


I am using sinew this time as opposed to colored threads (our more serious trad hunters seem to prefer the natural look). In my case it not only decorates but also helps hold the keeper in place, as I thread it through the hole in the keeper bone 2 or 3 times also - so I apply that wrap first by gluing the beginning down, and then wrapping around, and through, the keeper:


Then I glue the tip of another piece of sinew above the other joint, wrap it, glue down the end, and coat the wrap with glue, or one of the other adhesive coatings:


I continue untill all wraps are done and coated in place.
As I finish each one, I make sure it is leaning up to dry, where it won't stick to something else. That doesn't take long but I'd rather be safe than sorry:


Next I will either do the "drawing and lettering", or selecting and attatching of the lanyard. (Depending on how artsy-partsy I'm feeling .) It doesn't really matter which you move to next.


"Hunters Are People Too" (My website Premise)
Bernie Dunn
Coastal NC

Offline ber643

  • Member
  • Posts: 530
    • Bernie Dunn's Home Page
Re: Turkey Wing Bone Call - Build-a-long
« Reply #10 on: March 31, 2008, 07:27:41 pm »
Decided to do the "Writing/Drawing" before the lanyard. I have recently started spraying one light coat of the Krylon Crystal Clear on the "bones" before going to the Felt tips and/or brushes, inks, whatever. That way if the bones have been scraped, or roughed up a little, it won't make your ink or whatever run out, spread, or feather from where you are trying to mark cleanly. Kind of acts like a base coat before attempting to write or draw.

Gather your writing/drawing instruments and your call(s) and just start putting what you (or someone else) wants on there:


When you think you're done, is when you should stop - or maybe a little bit before that . I don't normally show pics of ones I'm sending out ahead of time (a surprise, you know?) but for this teut I will. Here is one side of all three calls, one call for Mike Brooks (helped me with my bow building), one for Mike Miller (OC 1st Anniversary Draw and well thought of chap), and the two bone call which will be sent to Chuck Bunn (sent me his Dad's old Marine knife):


The other side of all three calls:


I will now spray a couple more coats of Crystal Clear on (Remember - don't get the can too close and wind up blasting your markings away!), and then we'll see about lanyards and gee-gaws, if any.
....................................................

Now, Putting the lanyards, and whatevers, on depends a lot on what you have, and/or want to put on, what kind of "hook-up" you made, etc. So all I am going to do is show you the end results of my putting mine on these three - just as f''rinstances.

Crooked Stic's, with a carved whitetail antler tip, on round tan rawhide (kinda like "wing and hoof", as opposed to "surf and turf"):


Mike Brooks', with round black rawhide, a metal spear/arrow type charm, like I have on my walking/exercise stick (that he liked), and stopper beads:


Chuck's, on a black cord, with beads, and one of my dog tags - because I saw (in a picture) that he has saved his Dad's dog tags, and I thought he might like this one to remind them where the knife went:


This is a (novelty) bonus pic, just for kicks. The coin is a Silver (Metal) Dollar (from the year I retired from the USMC that I carry) for size reference. The calls are novelty WBC made from chicken bones (they work but aren't the strongest things in the world -  . I made one for Dano's Grandson when he was born - to match Dano's "adult" one I had made earlier.


OK, we're Dunn ... er, I mean done, here. Hope you enjoyed (and learned a trick or two from) the teutorial.

"Hunters Are People Too" (My website Premise)
Bernie Dunn
Coastal NC

Offline ber643

  • Member
  • Posts: 530
    • Bernie Dunn's Home Page
Re: Turkey Wing Bone Call - Build-a-long
« Reply #11 on: March 31, 2008, 07:49:35 pm »
Pat B, my friend, Rose tells me she never used a recipe and that it never tastes the same twice in a row. I say it always tastes the same ... Dad-burned Tasty! Anyway she says it varies by how much meat you are using - then you have to season, noodle, and broth to meet the meat, so to speak - LOL. However she also said she will write it down for me next time. That won't be too long from now as i already have about 4 or 5 more folks in mind to make calls for soon.

If you folks enjoyed this and haven't seen my thread on the Primitive Skills forum, you might want to go take a look for the thread, "To Those Promised ..."  and you will see some more real recent Turkey WBC examples there.
"Hunters Are People Too" (My website Premise)
Bernie Dunn
Coastal NC

Offline Otoe Bow

  • Member
  • Posts: 898
  • Mike Chase, Afghanistan
Re: Turkey Wing Bone Call - Build-a-long
« Reply #12 on: April 01, 2008, 02:03:40 am »
Bernie:  That is fantastic.  I'll have to study it in detail later.  Thanks for sharing.

Mike
So far, I haven't found any Osage or knappable rock over here.  Embrace the suck

Offline Pat B

  • Administrator
  • Member
  • Posts: 37,482
Re: Turkey Wing Bone Call - Build-a-long
« Reply #13 on: April 01, 2008, 03:02:33 am »
Bernie, Your wife cooks like me. By taste. ;D I very rarely use a recipe except for the ingredients.
   Thanks again for posting this build along. Very informative!  8)   Pat
Make the most of all that comes and the least of all that goes!    Pat Brennan  Brevard, NC

Offline ber643

  • Member
  • Posts: 530
    • Bernie Dunn's Home Page
Re: Turkey Wing Bone Call - Build-a-long
« Reply #14 on: April 01, 2008, 10:01:52 am »
I am pleased to be able to do it, gents.

As promised earlier in the thread, here are a couple pics of a Turkey Yelper Call similar to the Wing Bone call but made simply by fitting graduating sizes of Cane pieces together until you get the sound you want. Then you glue the pieces and decorate it however you care to. Same principles as with the Wing Bone Calls.


"Hunters Are People Too" (My website Premise)
Bernie Dunn
Coastal NC