Author Topic: Fiberglass takedown sleeve  (Read 42472 times)

0 Members and 1 Guest are viewing this topic.

Offline madcrow

  • Member
  • Posts: 1,531
  • Swift, Silent, and covered in wood shavings.
Fiberglass takedown sleeve
« on: August 12, 2008, 08:39:26 pm »
Here is the build along that I promised earlier for a fiberglass mesh and epoxy takedown.  I got the
idea from RyanO and he got it from another bowyer.  It really works like a charm.  The first thing you
need is a bow to practice on.  I would not do it to my favorite bow the first time, just incase something
goes bad.  For this one I am using a hickory backed pecan bow that I got in trade many months ago.
You are going to need the following:
2 ton epoxy
Fiberglass mesh ( auto body)
plastic wrap
masking tape
2 wood or sheet rock screws
small drill bit with drill
the sacraficial bow


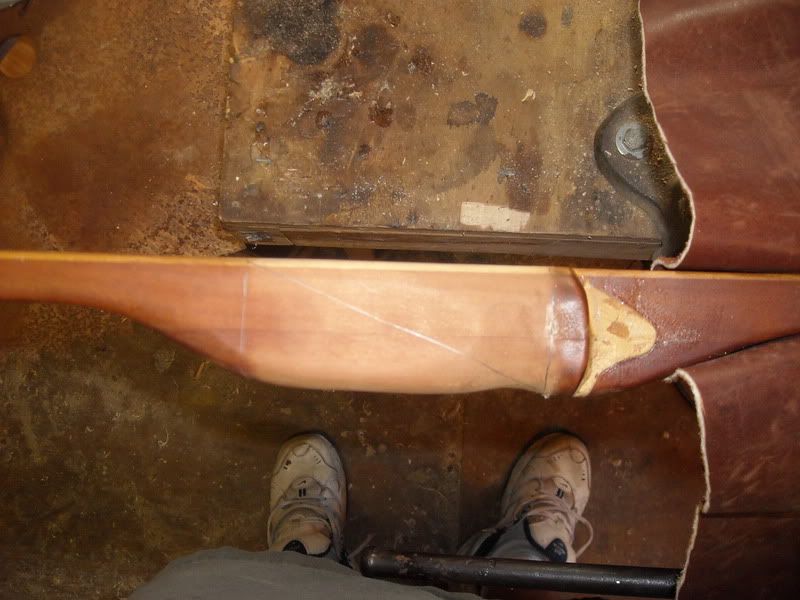
Take the handle wrap off and save it if you want to for another bow, because it will not fit this one anymore. 
Once it is gone, cover the upper limb with leather to protect it and lock it in a vise, but not too tight, then
mark out a four inch handle, wherever you want the take down to be.  Now make a diagonal line from the
lower line at the back of the bow to upper line on the handle side.


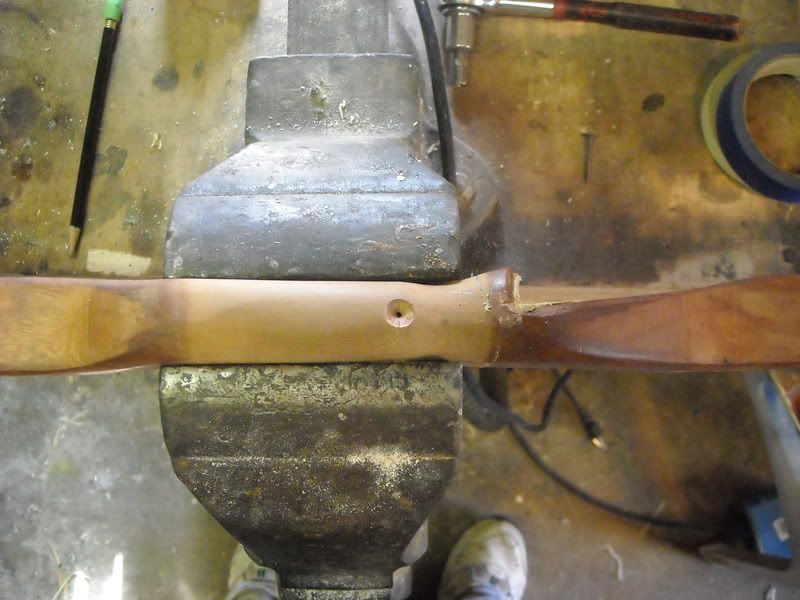
Now flip the bow in the vise so the handle in facing up.  Measure down 1 inch from the top line and mark the
spot to be bored.  I know someone just said, "Do what?  Bore?"  The hole needs to be a little smaller than the
wood screws you are going to use to hold the bow together temporarily.  Yep, there is a good reason for this. 
Using a small bit drill a hole straight into the handle, then counter sink it.  Later on, the countersink will fill with glass
and epoxy and form a nipple which will help lock the lower limb into the upper limb.


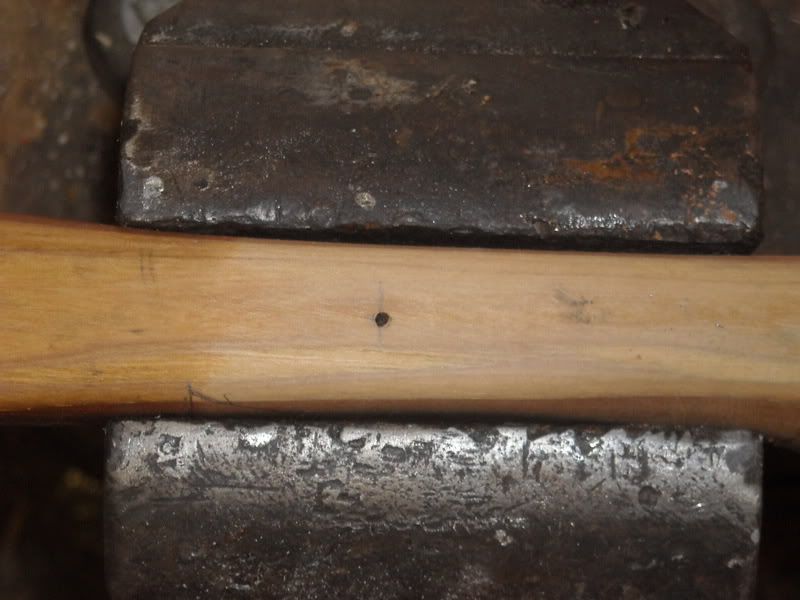
Now flip it so that the back of the bow is facing up in the vise and bore a small hole 1 in from the bottom line. 
Do not bore all the way through the bow.


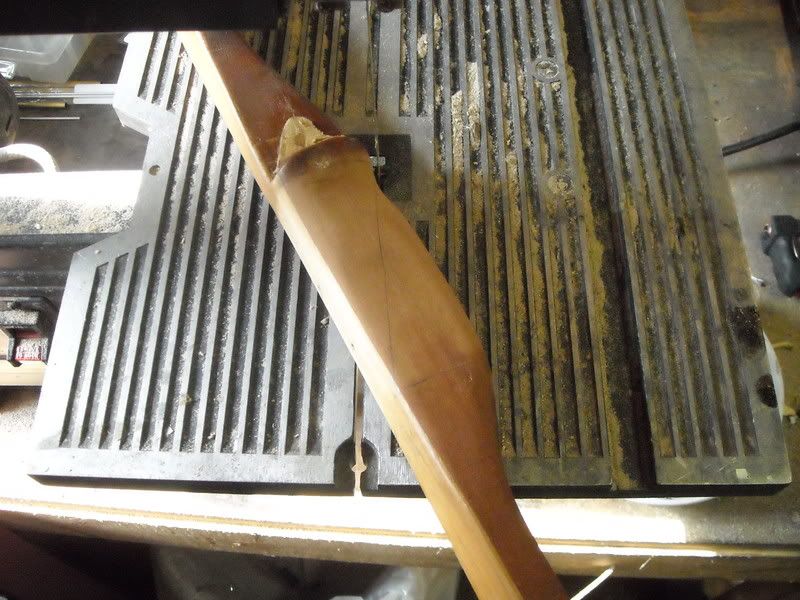
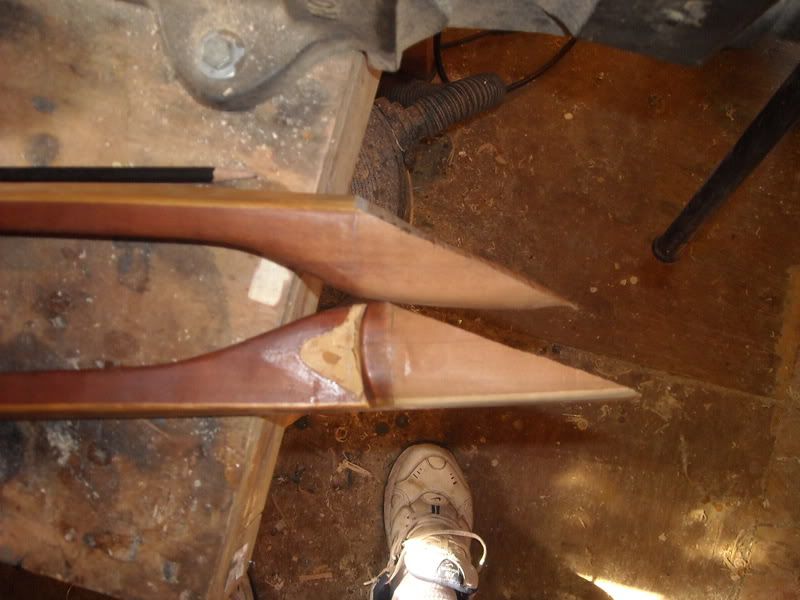
Now for the scary part.  Cut the bow in two on a bandsaw ( Somebody just Cringed)  being careful to stay on the
line as much as possible.  You got one chance, so don't mess up.


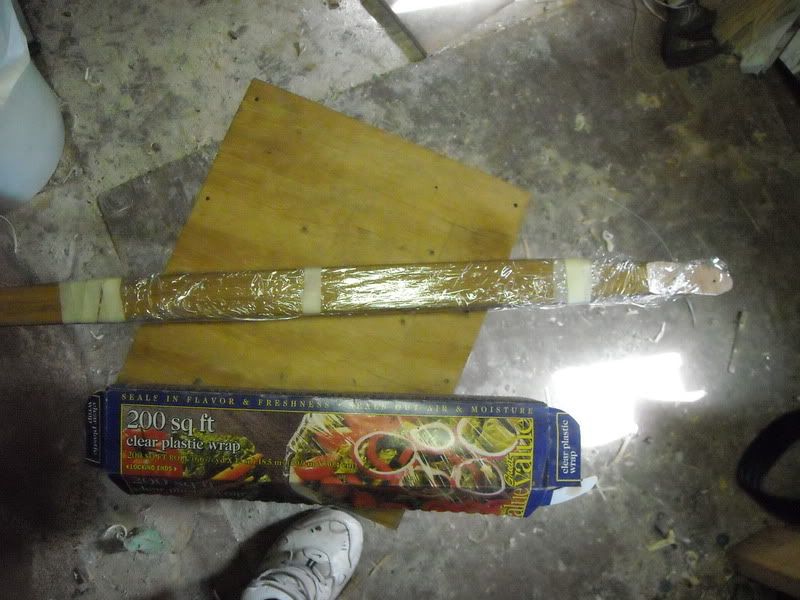
Now go grab some plastic wrap from the kitchen and some masking tape.  Put a few rounds of tape just above the
top line and just below the bottom line, then rip off a foot or so of plastic and tape it to the upper limb where you put
the tape earlier.  Then do the same for the lower limb.  This will keep the epoxy from getting all over the bow limbs.


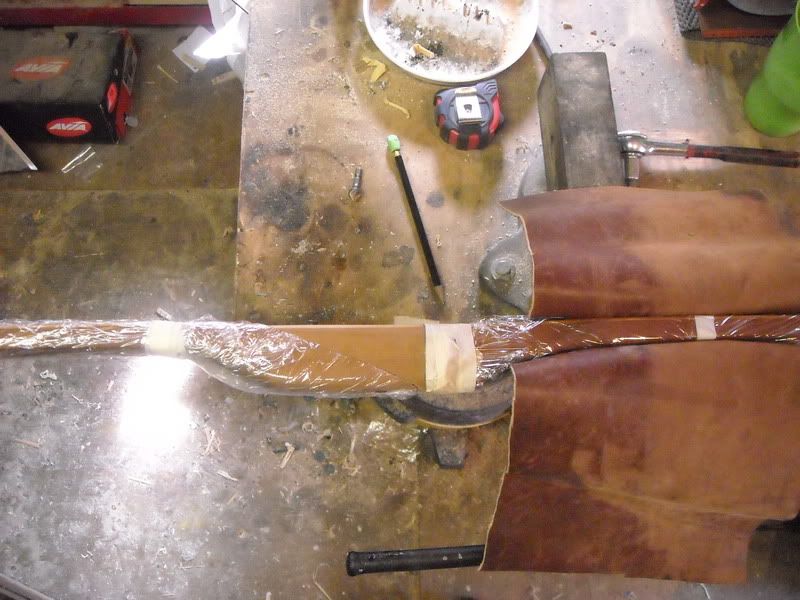
Check the alignment with some string to make sure the limbs are aligned.  Insert the screws tight enough to hold
the bow together, but not tight enough to crack it.  Now you need the fiberglass mesh used for auto body repair
and some 2 ton epoxy.  I forgot to take a pic of the alignment, but I am sure you can figure that part out.  Before
applying the epoxy, give the plastic on the lower limb ( covered in plastic) a good coat of mink oil,
crisco or anything really greasy where the handle will be.  You do not want the bottom limb to stick to the epoxy, just the top.If the bottom
limb gets adhered to the inside of the handle, you will have to grind it all off and start over.


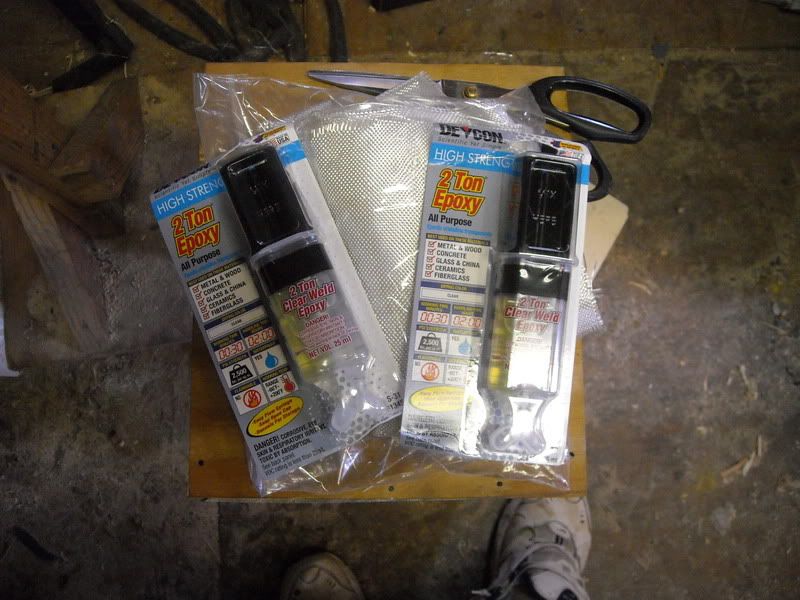
Now squirt out about half the tube of epoxy on some thick paper like this file folder and mix really good.


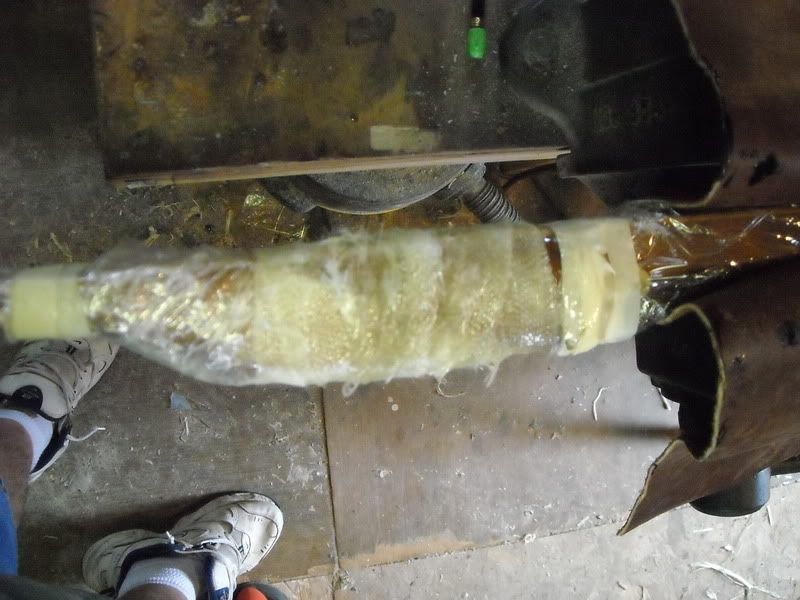
Now cut a few two inch wide strips of the mesh and fold them lengthwise.  OK, the messy part.  Put on latex gloves
and get a mess of the epoxy on your hand and smear it around where the new handle will be.  Now grab one strip of
mesh and wrap around the handle, keeping the fold to the outside of the handle.  This will help keep the raveling mesh
to the inside of the handle.  Wrap in a spiral until it runs out, being careful to stay away from the screw heads.  They
will be removed later.  Grab another strip and keep wrapping until the handle is pretty much covered except for the screws. 
Use the rest of the epoxy to coat the outside of the mesh, giving it a little twist once in a while to keep the wraps tight.

After 3 strips about 18 inches long, it will look something like this.  A mess.


Now set it up to dry.  It will be cleaned up and finished tomorrow.  Most of the mess can be cut or sanded off before the
final layers are added.  For a 55 to 60# bow it will need to be about 1/8" thick.  Lighter weight bows around 35# can be
about 1/16".

Offline Ryano

  • Member
  • Posts: 3,578
  • Ryan O'Sullivan, North Western Pennsylvania
Re: Fiberglass takedown sleeve
« Reply #1 on: August 12, 2008, 09:19:08 pm »
So your wraping the cloth right over the plastic wrap? Never thought about that. I was just taught to use a couple coats of wax on the bottom limb. That works too.
Its November, I'm gone hunt'in.......
Osage is still better.....

Offline madcrow

  • Member
  • Posts: 1,531
  • Swift, Silent, and covered in wood shavings.
Re: Fiberglass takedown sleeve
« Reply #2 on: August 12, 2008, 09:33:37 pm »
I had the first two get stuck and I could not pull them out, so I decided to adapt a little.

Offline The Burnt Hill Archer

  • Member
  • Posts: 513
  • Potter County, Pennsylvania
Re: Fiberglass takedown sleeve
« Reply #3 on: August 12, 2008, 09:44:52 pm »
great! ive been waiting for this. good idea about the plastic wrap.

Phil
stalk softly, and carry a bent stick.

Offline Ryano

  • Member
  • Posts: 3,578
  • Ryan O'Sullivan, North Western Pennsylvania
Re: Fiberglass takedown sleeve
« Reply #4 on: August 12, 2008, 11:45:39 pm »
Really, what kind of wax did you use? I used turtle wax brand car paste wax and it poped right off for me.
Its November, I'm gone hunt'in.......
Osage is still better.....

Offline madcrow

  • Member
  • Posts: 1,531
  • Swift, Silent, and covered in wood shavings.
Re: Fiberglass takedown sleeve
« Reply #5 on: August 13, 2008, 09:39:07 am »
Plain turtle wax.  Maybe I did not put enough on it, or I applied the strips too tight.  Anyway, I decided not to take chances and started using the plastic covered with a layer of mink oil.  It was handy at the time.  The plastic does not take up enough room to cause any looseness in the finished handles and they all click in and click out.

Offline mullet

  • Global Moderator
  • Member
  • Posts: 22,884
  • Eddie Parker
Re: Fiberglass takedown sleeve
« Reply #6 on: August 13, 2008, 11:12:50 pm »
  This is a good build-along. This is exactly the way it was done in the article in a back issue of Primitive Archer.
Lakeland, Florida
 If you have to pull the trigger, is it really archery?

Offline madcrow

  • Member
  • Posts: 1,531
  • Swift, Silent, and covered in wood shavings.
Re: Fiberglass takedown sleeve
« Reply #7 on: August 14, 2008, 09:26:44 pm »
Now that it has dried, it is time to sand down all the rough stuff and get ready to add the final layers.  You will need some safety glasses and a mask or respirator because the glass is rough on the lungs.


I lock it in the vise and rip off a strip of sandpaper and rough sand all the way aroung the handle to smooth it out.


Smooth enough to continue.  It is also a good time to take the screws out and give it a yank to seperate the two pieces.


For a four inch handle, I cut the strips 5 inches wide and around 18 inches long.  I know, somebody just said that I
messed up and cut them too wide, but let me explain.  When the sheet of fiberglass is cut, it unravels.  To help stop that problem and to keep the edges smooth and clean, I fold under 1/2' on each side of the glass.

For this bow, four more strips should do it.


I was the only one here, so I could not take pics of me putting the strips on the bow.  Basically, I started with a big
glob of mixed epoxy, smeared it all the way around the handle and started applying the glass, folding the sides in as I go.  I also pull it tight and smooth it out as I go.  When the first layer is done, I repeat the process until all the strips are used.  The final amount of epozy gets smoothed out around the handle, making sur there is good coverage.  This is the final result.


Once dry, the handle is ready for your favorite wrap or laced handle material.

One other thing, the limbs that are wrapped with plastic are a good place to stick all of the fiberglass pieces as they unravel, which they will do.


When all the nuber crunching was done, I spent $4 on two tubes of epoxy and $4 on glass, but only used half of it, so here a takedown handle for $6 plus some of Uncle Sams Taxation.


radius

  • Guest
Re: Fiberglass takedown sleeve
« Reply #8 on: August 17, 2008, 06:20:56 pm »
so you use epoxy instead of fiberglass resin, eh?  ever tried using the resin?

Offline madcrow

  • Member
  • Posts: 1,531
  • Swift, Silent, and covered in wood shavings.
Re: Fiberglass takedown sleeve
« Reply #9 on: August 17, 2008, 09:14:24 pm »
I have never used the resin on one of these.  It would probably work, but I like the 2500 # strenght of the epoxy.  Sounds like another experiment.  I was going to buy some resin to make some micarta for knife scales anyway.

Offline Ryano

  • Member
  • Posts: 3,578
  • Ryan O'Sullivan, North Western Pennsylvania
Re: Fiberglass takedown sleeve
« Reply #10 on: August 22, 2008, 11:31:47 pm »
Skip the resin Idea. I tried it it doesn't work. Epoxy is the way to go.
Its November, I'm gone hunt'in.......
Osage is still better.....

radius

  • Guest
Re: Fiberglass takedown sleeve
« Reply #11 on: August 22, 2008, 11:43:18 pm »
k thanks

Offline nugget

  • Member
  • Posts: 1,995
  • I see, I hunt, I shoot, I eat
Re: Fiberglass takedown sleeve
« Reply #12 on: August 23, 2008, 09:54:56 am »
nice job man. I kike it
Life is not a journey to the grave with the intentions of arriving safely in a pretty and well preserved body. But rather to slide in sideways, thoroughly used up, totally worn out and loudly proclaiming....WOW WHAT A RIDE!!

Offline Talin342

  • Member
  • Posts: 3
Re: Fiberglass takedown sleeve
« Reply #13 on: March 20, 2009, 11:52:38 am »
I'd like to see the final finished product and how well the pieces mate and shoot, aside from that great build along

Offline madcrow

  • Member
  • Posts: 1,531
  • Swift, Silent, and covered in wood shavings.
Re: Fiberglass takedown sleeve
« Reply #14 on: March 22, 2009, 11:03:36 pm »
Sorry, I don't have pics of that bow finished and can't remember who I sold it to.  But here are some pics of a Holly bow that I made and used the same grip and wrap on.  I actually had to use the take down grip on this because it was trade in a "bow in the hat" on Paleo and I had to ship it to Norway.  If the leather handle is done right, it will completely cover the fiberglass.