Author Topic: My First Holmegaard Bow - Hickory Stave (Compleated)  (Read 26722 times)

0 Members and 1 Guest are viewing this topic.

Offline ber643

  • Member
  • Posts: 530
    • Bernie Dunn's Home Page
My First Holmegaard Bow - Hickory Stave (Compleated)
« on: September 15, 2008, 10:48:25 am »
OK, trad bow friends - I have been posting the following (long thread) on a couple other fine boards (paleoplanet & tradgang) and was going to just transfer my posts without the added comments. However - it could get confusing, and I know none of those folks would mind their posts being on here - plus some of them are members here, anyway. So I decided to split the difference and post the ones that add info or continuity (IMO) but not perhaps all of the glowing accolades ( ;D) and/or abuse ( ;)). OK? OK.

I'll be posting quite a bit of stuff (and pics), in different entries, so you may want to wait 'till I finish up (I'll let you know when - in case you fall asleep) before posting (but on the other hand, waiting is not mandatory - if you can get a word in edgewise  ) The main thing is - please enjoy, and learn with me, or just watch me learn. At this point it is going well but I made some "side trackings" along the way, as you will see. I am now compleatly finished with the bow. I didn't post this thread here earlier as I had an idea it would last even longer than the couple of months that it did last - and I didn't want to drive poor OldBow crazy -  :D Lord knows he has enough to try to figure out "who's ready" as it is. Now I would really like to share it all with you though.
 
BTW - I have applied finishing steps/proceedures to a few other bows but have only actually made two compleat bows prior to this attempt, a wood lam and a self Osage, both previously chronicaled on here at PA.

I really wanted to post this thread here all along but just wasn't at all sure if I would make it all the way???

 ...

So here, from the beginning to the end (perhaps with some breaks), is the "Epic Tale". Beginning with the ( sort of false) start:

Well, I decided to at least make a stab at starting on my first Hickory stave (a nice one, I think, a cyber-friend from PA gave me as an extra, in a knife materials trade). I hope to turn it into a Holmegaard (another first), when I get going but for now I am just trying to get it ready to outline the bow on. What I would like to know is, does this look like a proper way to start working up a back for the bow. The only stave I've worked before was an Osage with nice wide rings. This Hickory's rings are closer than skeleton skin. (I think) I want to not go any deeper than needed on the back - to give myself room to - well, you know - do dumb moves - especially when I start working on the belly of the Holmi. Maybe only one or two rings removed - make sense?

I got set up out in the car port and had my wife take a couple of pics of what I was up to:


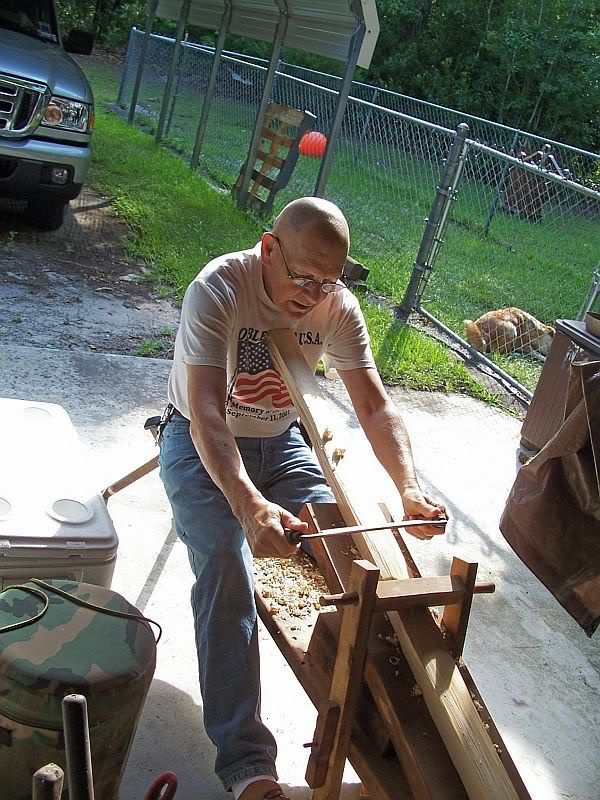
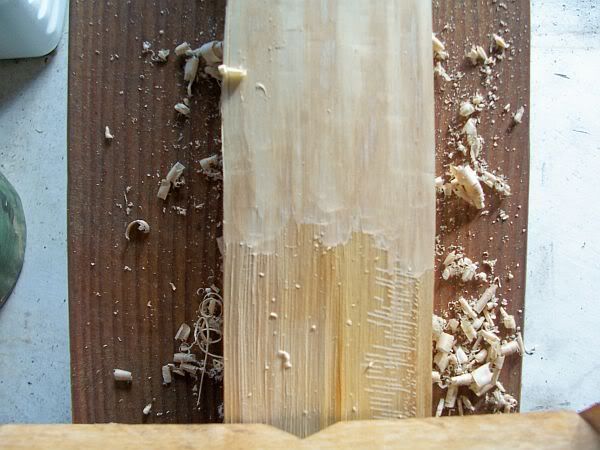
This shows (I hope) where I have started taking off the kind of rough under bark surface with the Draw knife, on one end:


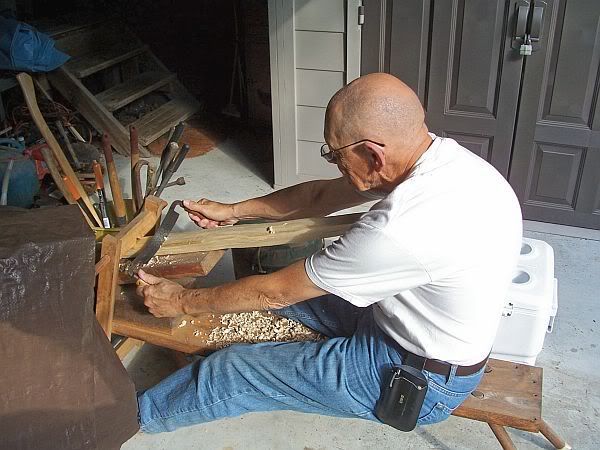
A pic taken from the other end to show the stave before using the draw knife and the portion that was worked, at the far end:


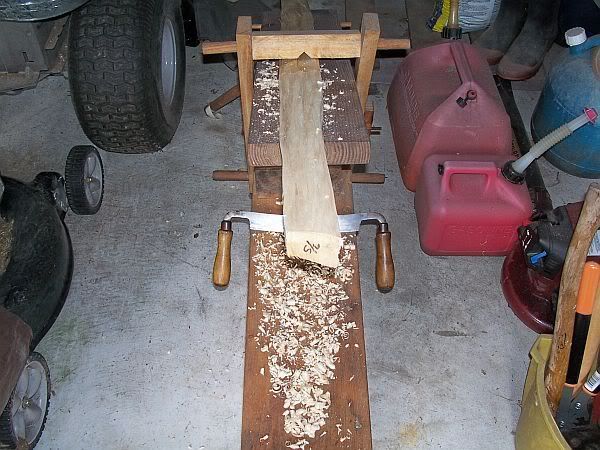
Here is a close up of the back, untouched - it's sort of smooth but with little longitudinal ridges and scratches (probably tool):


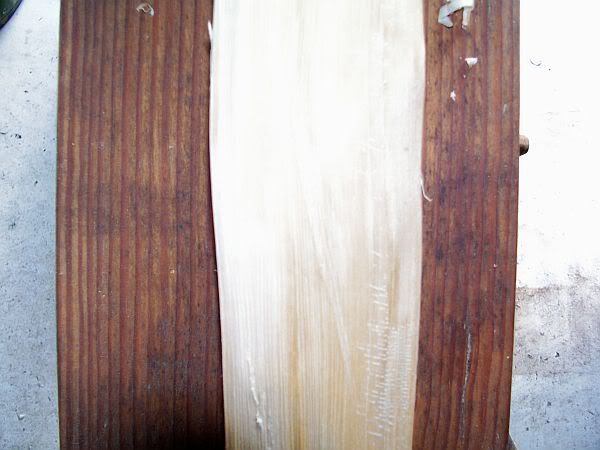
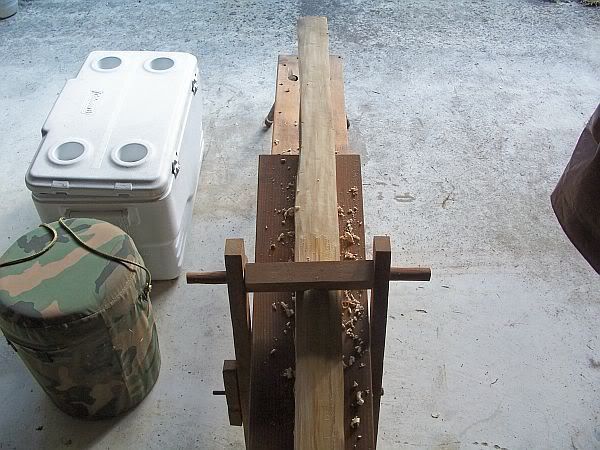
And here is a close up showing the area I have worked against the part I haven't worked, for comparrison. Wadda ya think, guys? I didn't go any further than this, until I get some input: As I mentioned earlier, in another thread, my bowyering mentor, Mike, is tied up tighter than a snare drum these days - and he hasn't ever got into Holmegaards anyway.


Toxiophileken posted:

Bernie, I'm not sure why you are chasing a ring on hickory. Normally, you can just use the first ring under the bark, unless there is a problem with that ring. Looks like you are doing a good job, though. More power to you, if you are diligent and patient enough to try it!

With thin white wood rings, I like to use a scraper instead of a drawknife or spokeshave. I used a couple of sort of "bowyer's edge" like tools in Bulgaria, that Juri made, and they work just great! Faster and with less hand pressure (and fatigue) than a scraper, but still with the control to stay within a thin ring.

You might want to finish your stave the way you are going, then take it carefully down one more ring, using a such a tool, or a scraper.

Correct lighting is key when chasing a growth ring. Have the light bouncing off the stave into your face, as if the back of the stave was a mirror, and you wanted to look at the light in it (the light, the stave, and your face, all in a line). This will show the early wood and late wood off against each other much better, as they reflect the light differently. Sound is also your clue as to which ring you are cutting. The earlywood will be crunchier than the latewood. Don't know if all that applies to hickory, but it has worked with osage, BL, and several whitewoods for me.

Iktomiwicasa said:

Bernie, are you chasing a ring or just scraping off the cambium layer?


I replied:

Thanks for the input, Ken. I didn't really want to chase a ring, like with Osage, but wasn't sure if I could just get away with only taking it smooth - so to speak. So I guess the answer would be, "cause I don't know any better" LOL. I probably will finish as I'm going then - to get rid of the longitudinal ridges (and tool scratches) you can see in the pics. Then I will do whatever is needed, probably with my K-Bar (don't have any good scraper otherwise), to smooth it to a good back. (Had a set of three scrapers but can't find where I "hid" them.) I recall the "noise and crunchy feel" of the earlywood with the Osage (and loved it) but sure didn't feel, hear, or see anything like that today witth this old dry (harvested in '06) Hickory. I also remember kneeling/stooping to eyeball down my Osage stave to see where I was and where I wanted/needed to go (as I saw you doing in one of the Bulgaria pics also). I did a little of that today but again wasn't seeing it as plain as with Osage. (I knew I loved Osage - shoulda stuck with it - LOL). "Correct lighting" is probably something I don't have when working here at my place but moving around to eyeball it from different angles, as Mike taught me, certainly helped get the different light plays and bring out things.

The guy who sent me the Hickory stave, put on the note, "Have fun - This stuff is Hard!", and Mike told me Hickory would be a lot tougher on my arms to use the Draw Knife on then the Osage was. Funny part is it seemed to respond pretty well to my "shaving" today (felt good too) - but then that isn't like the work I will have to do on the belly - especially when I take the working limbs of the Holmie down so thin, and the outter limbs so narrow. Oh well, I didn't join the Marines, take up trad (and then primitive), or get married a second time because I thought any of it would be easy - LOL Thanks again, Ken, my friend.

Ooops, hope that also answers your question, Iktomi - didn't see it 'til I finished posting. Again, I'm not sure what I am doing, I reckon.

Jawge chipped in:

Bernie, don't smooth up the ridges or chase a ring. Just make a bow. Do take out the nicks and make the back glassy smooth. Sand with medium (100 grit) and then fine (220). Easy does it. Let the wood guide you. One step at a time. No need to restrict yourself to a certain design or one that is difficult to accomplish like a homie. For example, I often lay out my bows full width to just past mid limb. As I tiller, in addition to removing wood from the belly, sometimes obstinate staves do not respond to belly removal so I begin taking woods from the sides to bring the tiller home. I know. I know. you have your heart set on a homie. Jawge

Again I replied:

LOL - Yeh, Jawge. Originally I figured the Hickory would make another good Flat/NA type bow such as I made "It", my Osage, and I really like that style. Then I got to thinking that I had just done that. Then I got to thinking about Holmegaards and didn't see why that couldn't come out of that stave with any luck, and some careful work. So that's what I set out to do with it but I do realize that the stave/wood may tell me, "Huh-uh, I ain't playin' that game," and, if it does, I will be quick enough to let it lead me, as I do my knife handles - I'm easy that way ;^). I know your advice is good (and sound) but I really didn't know you could just sand the back. Shouldn't have started what I did with the draw knife, I guess but probably better do the other end too (now) and then go from there with the sanding. I wouldn't want to have to sand out all those ridges - but I don't think I would really want them left there either. Is that wrong thinking?

Jason said:

I left the ridges on the hickory bow I made. I simply used a scraper to remove all the cambium I could without scraping too much off the ridges, then sanded it. The cambium left on made a nice dark on light pattern on the back. Im not sure you can do too much to destroy hickory. I had pieces left on the ground after the hatchet work that I played with. It was very hard to break them. They just kinda keep bending no matter what.

I'm looking forward to following your work in a build-along again Bernie!

Jason

And then i waxed eloquently (ha-ha):

Wow, guys - I have always been a heavy reader and had the benefit of relatively easy understanding but, I swear, after the above posts and as much reading as I have done in the TBBs, especially volume one, I couldn't believe I had missed that important info. Particularly so, because it was what I was specifically looking for in my latest re-readings. Blah! Double Blah!! Early this AM I went back to Vol 1 and rececked in the chapter on Osage to see if maybe it had mentioned there (for instance) the important words "unlike whitewoods". Well, not really, but it did say enough to send me scurrying back to the next chapter - on "Other Bow Woods", with the growing feeling I had missed something very important there because I had the Osage procedure so fresh and implanted in my mind (and had enjoyed it so much). Sure enough, where I had read over it a number of times and at least twice in the last week - right there on page 154, about 2/3 of the way down the page - some dirty scoundrel had surepticiosly inserted in my copy, the following two magic passages, that obviously were not there before. (Forgive typos in quoates, please. I know "you" have full knowlege of this info but I need to re-impress it in my poor ol' brain.)

"Here's another point worth mentioning . Almost everyone removes the sap wood from Osage orange. Working their bows down to an interior growth ring."

Of course, I got that!
In the next paragrapph it goes on to state:

"With healthy hickory, ash, elm, walnut, oak, and birch, you don't have to remove the outer wood" (What? Where were you when I was looking for you???) "You can make the bow's back out of the wood imediatly under the inner bark." (Oh sure, now you say that!) "If you pull the bark off in the summer, taking the inner bark off with it, the wood you are looking at on the outside of your stave is the back of the bow." (Get out of here! I will find the knave that stole these passages from my book in the past, causing me to make a fool of myself, and has now replaced them. BUT wait, what's this?) "And you don't have to do a single thing to it. The only exception is when the wood has suffered ..."

There is more of course, but you get the idea. Is my face red? You betcha bippy!Last night my dear responders, friends that I respect, all, must have thought, "What kind of a medevil dolt are we dealing with here? Surely the ol' fool has never read a single thing about building bows!

Ken, Iktomi, Jawge, Dirty Harry, forgive my lapse in cognizant reading, and my burdening of your minds with this conundrum in futile non-thinking - LOL. I'll bet you one thing though - I bet it is NOW implanted in my mind as well as the Osage part - DOH! I just hope I haven't confused or led any other poor unsuspecting beginner down a rose strewn (thorny) path with my digressions. Well, I must now supply my poor, violated Hickory stave with a new back, and ask it's forgivness, before I proceed. Bless it's poor heart(wood) - perhaps I will dub it "White Osage" or "Shaggy Bark Orange"
......................................

(saga continued.....)
« Last Edit: September 15, 2008, 06:53:27 pm by ber643 »
"Hunters Are People Too" (My website Premise)
Bernie Dunn
Coastal NC

Offline ber643

  • Member
  • Posts: 530
    • Bernie Dunn's Home Page
Re: My First Holmegaard Bow - Hickory Stave
« Reply #1 on: September 15, 2008, 10:55:43 am »
Jawge came back with tis sage anecdote:

LOL, Bernie, I went merrily along for years thinking I didn't have to remove the sapwood on black locust. Well, you do. Get the back to one ring now. I bet the rings are pretty thin. Have fun. Jawge
..............................................

Did a little scraping today to see if I could make a (new) back (since i had "chewed" at the one end a little) with out taking too very much off. Took some pics when I finished, just for reference (and/or consideration). I'll post em in a few minutes.

After my "False start" LOL - Here is how the back looks now:


A close up at the center of the stave back :


and close ups of both ends:


Bernie, go out side tomorrow and look at it under sunlight. You'll be able to tell better. Looks like you've been a busy bowyer. Jawge


Uh- Jawge, (I'm a little gun-shy about missing meanings now - LOL) I'm not sure if we are going to have any sunshine in NC today but if we do, and/or when we do, and I take the stave outside for a better "relief" look - Are you seeing something I am not, and you want me to look closer, or are you just reminding me that is the best way to "scan" one's work??? ber643

Sorry, Bernie. No I'm nor seeing anything bad. Looks good. Looks like you did it. But I can't see much in that photo. You'll see better in the sunlight. Jawge


(Whew! - LOL) OK, Jawge, thanks for the continued interest, I mean that - always. ber643

From what I can see, not much admittedly, it looks like you might be into a decent back.

Carry on ! Iktomwicasa

All help counts, Iktomi - mostly I was concerned if I had kept the back thick enough, and was hoping the ends might help show that - but I feel pretty good about it (for now anyway - LOL) ber643

Good stuff hickory, bernie. As you work you'll come to realize it. Take a long thin saving/split of it and try to break it. LOL. Pretty hard. You have a lot of help here. I wish this site and the other 3 are frequent multiple times daily were here when I started. Jawge

It's kinda like exercise, for your back, triceps and your eyes..chasing rings that is.. Rich Saffold

Yep, I get that exercise bit, Rich - LOL. I wake up stiffer'n one of Jawge's Hickory splinters myself but I sure enjoy it, and the results blow me away. I am still chomping to get to a BBI, and to more Osage bows. Not sure which I'll do first after this one but those two will be next ones in line, Lord willing. ber643

(Saga continues ........)

"Hunters Are People Too" (My website Premise)
Bernie Dunn
Coastal NC

Offline ber643

  • Member
  • Posts: 530
    • Bernie Dunn's Home Page
Re: My First Holmegaard Bow - Hickory Stave
« Reply #2 on: September 15, 2008, 11:09:48 am »
Please, everyone, know that I appreciate any help and corrections that will help keep me somewhere's close to on the straight and narrow in this new hobby I enjoy so well. That is why I like to show what I am doing, while doing it - so that I may learn more, and perhaps help others learn and prevent them from making the same erors that I might/may.

I have now outlined (especially because it is such a strange shaped bow) the bow I hope to make on/out of that stave and just before lunch I did quite a bit of preliminary shaping with Draw knife (rough) and Farrier's Rasp (Man, I love that thing). I will throw a couple more pics up here
in a minute or eight ;^). I may not go at it quite as others would but I do have a basic plan in my head-bone, based on others sound principles. Or perhaps i better say, my understanding of their sound principals - LOL

The Outline of My intended Holmi:


It's a start - with draw knife and farrier's rasp, used on the side areas that require the most reduction to start out.


Then to the other side of the non-working, outter portion of the limb:


Next I will do the same rough-out of the Non-working part of the other limb.

I did the other non-working tip (sides) last night (I'm not as lame as I expected to be this AM - LOL, probably get to me tomorrow). This AM I laid out the belly side of the bow so I (hopefully) won't get confused about where the crazy thing goes "in", and where it goes "out" - or is that "up" and "down" ;^)?) I wanted to keep working on it but I had to get ready to leave that Thurs. for WV and ATAR (my Ride was to arrive on Wed.).

.................................................................................

My next step will be to take some of the not needed excess off the belly surface of the wide, working sections of the limbs and get the belly rises from them to the tips, and to the handle, headed/beveled in the right directions. Then I think I can safely/reasonably get to serious tillering.


OK - Back to "work" the last two days. My Holmegaard is still pretty rough but have done a lot of shaping (and fussing at myself), using most all of my hand tools, and my belt sander. One end, and the handle, is shaping up pretty good. About to play catch-up on the other end now, and shape the handle a little more. Like Boomer in his Holmi thread, I may have to add a piece to the handle, not sure yet but there is a side that isn't as deep as the other edge. Also the "first" end has a bit of "propeller twist" (I'd call it) that I may have to heat out, before starting any serious tillering. Are we having fun yet? YEP! (it says so right here in fine print)


I read what they said about the original artifact Holmegaard in the TBBs, and what they had to say about later bows, made in that style, both as "replicas" and ones to improve performance of a sound design. Then I read what I could find about ones made by folks on this forum and PA (as well as an article in PA, pluse checking out a How To web site devoted to the Holmegaarde, that another member gave me the link to). Then I put all of the info that I understood, my particular stave characteristics, the dimensions I most wanted (and/or saw repeated the most often) together, and picked/made my layout from that and called it a Holmegaard "Attempt",or "Style", bow - interchangably. Please understand I am not trying to sound argumentive (I don't know enough about bows, and making them, to do that intelligently - LOL), just explaining how I got to where I'm at. It remains to be seen if it works, or not, for me and mine but I've seen/handled some "Holmies" that have characteristics I like, i.e. string angle for no finger pinch, little to no hand shock, good caste, etc. Besides I think the shape is neat, and as I've said often in other threads; I started out thinking they were "ugly" bows but the more I saw them in threads and read about them, the better I liked both the looks and touted performance. Who knows, it may break/blow in the attempt, or wind up as just a "wall hanger", or it might just fool me and be a shooter (that'd be nice - LOL). In any case I'm having fun, with a liberal sprinkling of frustration of course, and learning more about bows and bow making in general while I'm at it.

I worked on my bow some more yesterday PM, and some this AM. A little more basic width and thickness scraping/shaving. I think I now have the basic shape I want but I still have a fair share of thinning to do, especially in the working and non-working limb areas, some handle shaping (later), and of course the nocks. I plan to do pin nocks, more or less, if I can. Here are some pics I just took.

Back:


Edge:


Belly (in this one I had it turned a little but what makes the shape look uneven on the top limb the most is the slight twist it has - I believe):


(Saga continues ........)
"Hunters Are People Too" (My website Premise)
Bernie Dunn
Coastal NC

Offline ber643

  • Member
  • Posts: 530
    • Bernie Dunn's Home Page
Re: My First Holmegaard Bow - Hickory Stave
« Reply #3 on: September 15, 2008, 11:23:22 am »
Still making progress but this tough ol' Hickory is tearing up my puny li'l ol' arms. Having to scrape so much on (or "off" ) the working parts of the limbs. Now I wish I had started with a square-edged piece (and a band saw - if I had one ). The durn thing isn't even thinking about bending yet! I also do some work on the bow in my carport, as I am in the process of cleaning that (mess) up and making a new work area. Hot out there though these days but did get a floor, standing fan the other day to help some.

Pic this AM, "fresh" from yesterday's labor (Is it even changing any? ):


All of the sudden last evening something changed (perhaps technique - or perhaps my arms just woke up from a long sleep - LOL). In any case I actually made some decided progress on scraping both (working) limbs. Perhaps I was just being a little too timid in my approach. While I am not just ripping away at it, I am gaining on it now, and in a relativly short period of time last evening I did two sessions on each limb that I actually could see some distinct progress from. I think I have a handle on it now and actually feel like I can see some light, at the end of the tunnel, towards reaching a state of "bending the bow", if this keeps up. It may be a little premature to yell yippee but I do feel good about last evening. (Could it be that it was the little "reward" I gave myself? - LOL)

A gent called Griffin offered this sound advice:

Looks good.

I have an advice tho.
When you start to take of more wood, be sure to get rid of those dips very carefully.
You don't want them to be bigger.

I'm talking about where the handle meets the limb, and where the limb meets the thick tip.
Just there, you have a dip - a section where you have less wood.

From the handle it should become thinner and thinner. Not thinner wider thinner.

I broke a bow because i had a dip like that.

I replied:

Yes, I think that is very good advice, Griffen. I Also was getting worried about that, as I was having a hard time getting the dips to go away - and stay away. I did know I had a lot of wood to correct it in but wanted to catch it sooner, rather than later. I think I am getting a handle on that too now though, and thanks for noticing. I definitely want those areas level/flush before I start bending it.

here is another pic. Still not bending - LOL - but, between yesterday eve and this AM, I was able to thin the working limb areas some more and get them a little more level, I believe. I also worked on the bevel angles at each end of the wls, to keep them more even. Thicknes of working limbs is now at 6/8" (measured from the crown) but about 5/8" on the edges. When I start back up I will be checking her on the floor often for bending and then for floor tiller, so she doesn't sneak up on me ;^).


...

One thing I should point out at this juncture was brought up to me by my friend, and fellow "traveller" in this excursion into daring-do of bowyery - ;^). Please be aware, folks, that my outer limb sections have only been shaped in the barest sense of the word and are a lot thicker, and more cumbersome looking (and feeling - BTW), than they will be in the end - (if all goes well) while still maintaining the prerequisite of stifness, to act as a "lever" . (I hope, I hope, I hope!)

Still scrapping away whenever I get the chance. Going slow but I have the two working limb areas down to about 1/2" thickness now. Still not bending but they do feel a little different now - like they might be considering it (perhaps if I had more oomph - LOL - I don't think so though. Probably just break it). The overall look hasn't changed enough yet to warrent another picture but soon hopefully. Getting a little more done on my carport/shop each day - whew, what a chore in this heat/humidity.

Well I guess the half inch measurment was really just on the edges - not true thicknes from crown to belly - but anyway - I've scraped some more (working limbs), and I did a little decreasing on the (stiff) outter limb sections to keep them from looking sooo overbearing in size, and here are a couple pics taken this AM (didn't take one of the back). Hope it shows some change from last pics. Took the bow outside (for some air - LOL) so at least the pics would be different. I'm still pleased with how it's coming but do wish I was making a little faster progress. I actually can feel a tiny bit of give to the limbs now when attempting floor tiller.


Couple more waste baskeds of shavings made - and still changing slowly - I know, you wish I'd get to tillering (so do I - LOL). Anyway, if you look carefully, you'll see changes in the outter limbs, fades, and handle - also thickness of working limb sections, though it's harder to notice. I also wanted to show a little thing I found to help me support my limb tips so they won't bend out from under the tool. It is of course one of my old, full size, adjustable, camera tripods - top is even pre-padded - ha. It comes in really handy on a thin limbed bow where you don't want, or can't, shorten the distance from the vice without perhaps crushing the edge wood. The second picture concentrates more on the tripod use. So easy to adjust and use - probably everyone else has already discovered this handy aid - LOL. That's what you get for listening to beginners - we're like kids, discovering "new" old "stuff" all the time.


(Saga continues ........ )
"Hunters Are People Too" (My website Premise)
Bernie Dunn
Coastal NC

tpoof

  • Guest
Re: My First Holmegaard Bow - Hickory Stave
« Reply #4 on: September 15, 2008, 11:28:31 am »
Bernie  :),   I have been following this project for some time over on Paleo..
your willingness to take suggestions/criticism has givin you a fantastic Holmey!
Live and learn they say... I see parallels ...  :D

Hats of to you friend, for you steadfastness in staying with this project when at times it seemed so grey!
Surely there is a lesson in that bow!  or two..  ;)
Congrats Bernie on a fine project and a fine finish!

Offline ber643

  • Member
  • Posts: 530
    • Bernie Dunn's Home Page
Re: My First Holmegaard Bow - Hickory Stave
« Reply #5 on: September 15, 2008, 11:39:35 am »
So far I'm sticking with my Holmie Type (and saving/savoring my BBI - LOL). I'm going to show you some pics this AM of a little more visible progress. However, first I want to talk about something that amuses me. I think I mentioned before that a friend (at ATAR) made me a most welcome gift of Dean Torges' book, "Hunting the Osage Bow". I make it a practice to (most always) read while I am lingering over breakfast, and I have been really enjoying said book, and learning a lot (I hope). Now, what I am going to say next is in no way ment to be deprecating or argumentive, (because being a true Libra, I am blessed, or cursed, with the ability to see both sides of most any argument, discussion, or opinion), I'm just saying ........ making an observation, as it were. Unless you really can separate the two things, perhaps it is not the best ,or wisest thing to read that particular book, while at the same time attempting your first Holmi type bow. Now I realize the great (IMO) author is talking about mostly short, simple, primarily Osage, Hunting bows - as he openly states. I also discovered a number of things in there that have helped me along on my Holmi, such as how to clear up ripples from scrapping by (quickly) filing the tops back flat - before they become uncorrectable and hingy. Also how not to cause them when scraping, in the first place - perhaps. BUT - One might find Mr. Torges firmly stated opinions/statements regarding such undesireable things as flat bellies, wide limbs, and non-working limb tips (that act more as levers) a bit disconcerting, and contray to the descriptions and (dare I say) requirements of a Holmi type bow, if you are in the thros of struggling to produce one. Now, I can and have separated the two - and am still enjoying the book and the building of the Holmi Type project, at the same time. I also am relatively sure that if I read his book while attemting an osage bow of the type discussed in the book, I would accept his findings as near gospel and follow them as best I could, without a second thought. In fact, I probably will do just that, more or less, after I am done with the current Holmi project, one way or the other . I'm just saying (again) ..... it might not be advisable to read or recommend the reading of that fine book, while attempting a Holmi - at least not without being exposed to this disertation (or friendly warning - ) Nuff, said (I hope I haven't stepped on any toes - I didn't intend to - Now to the "progress" pictures. My first shaping (and also attempt) of Pin Nocks on this bow, with a couple more close-ups. I probably will shape them a little more but they should be usable now, when needed (which I hope is soon ):


... and after more scraping, shaping, and muscle aching - here is proof that my Holmi type actually is beginning to bend a little, in floor tiller attemps (and even looking more like a bow - of some kind, I hope):


If you can see the strip of blue masking tape on one edge, and part of, the top limb, that is an area I want to steer clear of, until I catch the rest of the working limb sections up with it. (If you can't see the tape - it isn't even there, and everything is as it should be - LOL)

..................................................................................

The following suggestions were made by a couple of gents:

keep a pencil handy when working on your bow and mark the limb with XXXXXX where you don't want to touch,, say a potential hinge for instance.
at least that's the way I do it.
simply a suggestion Bernie...

It gives a better perspective of how long that bow is in that last pic...unless you're only 4' tall ..in which case the bow is still plenty long. Sonny

and

looking good Bernie. i might be wrong, but it looks like on the lower limb in the picture the transition between your handle and the limb is a bit sharp, might cause you problems later...

please understand im not being critical, just observing some preventive maintenence. :

Phil

My following post:

Perfectly all OK guys - observations help everyone see more things (IMO), and I truly appreciate the observations and/or comments. In most everything I do/learne, I take all the input handy - use what works (or makes sense) for/to me, and don't use what doesn't work for me - sometimes to my grief, I must admit - but I still always appreciate all input. Please, never worry about that.

I'm not just making excuses (just explanations) but the "How To" I am using as my guide the most, tends to leave the final diminishing of the tips until After tillering - then take them down to as light as one can without them bending (although some respected bowyers/folks do profess to prefer some varying degree of tip bending in "Modified Holmis"). On the fades/transitions I find that each time I get to a new level on the working limb thickness, then I have to rework the transitions, as well as the tips (so you can see I do deviate a little - I've reworked the tips 3 times already). My Opinion (formed as I read/research/and progress with this bow) is that I will wind up with the outer limbs quite a bit smaller than they are now, and the transitions flatter/less of a steep grade. I also am still a long way from final shaping of the handle and those fades to it, as well as the fades to the tips, and size/stiffness of the tips.


I do use a pencil as you mention (a bunch) in working with wood, Sonny, but if I get a little carried away in a specific area (by dumb mistake or overzealous effort) I slap a piece of that bright blue masking tape on it (I also use it in making knives), to really flag it for me, for a while. It's like, "Here's yer sign, Bernie!"

I am a little taller than 4' - but only 5" 10 1/2" (used to be 5'11" until I started "age shrinkage" - LOL) The bow ("pretender") is 66 3/16" TtoT, I just measured it. Don't ask me where the 3/16" came from (I thought it was 66") - perhaps it is "age growth" - Ha-ha


Hi Bernie, I so know what you mean about having to re-work those tips each time you reduce the limbs. I love these style bows, my question is do you think this one more tricky than your osage bow? To me it was great fun making and I learned a lot about shaping the transitions of the different parts of the bow. I am looking forward to seeing this one shooting! What style are you looking at making next?

Nat


It certainly has been for me, Nat. A big part is, I have been on my own on this one, as far as personal, one on one guidance (like Mike was able to give me on my first two - a HBM and my Osage, "It"). He has been really busy with work, and home improvements, etc., plus he never was real interested in Holmegaard Types before, anyway. We have phone talked once or twice, and e-mailed a couple times, but mostly just Mike commiserating with me for having to scrape so much tough Hickory - LOL. Also I know it would have been a lot less work (and less tricky) if I had a bandsaw and the stave had been squared off so that I could have cut a lot of the excess tough Hick away - but the trade off is I probably wouldn't have learned near as much. Even should this bow fail (heaven forbid), I still will have learned much, and got more practice at making shavings and sawdust, with pretty much hand tools, than the law allows. Best of all, I have really enjoyed it, and still am. Thanks for asking.

My next will be a BBI longbow for which I already have a beautiful glue-up on hand from Rich Saffold's shop in CA. Should be considerably easier - but with me, I never know. I wanted a good head start on that one, because I want my, probably only, BBI to have every chance to be as good a bow as I can possiblly make. I'm really impressed with the look of the glue-up. After that, it will be back to my first, and abiding, love in self bow woods - OSAGE. I am keeping my eyes and ears open for a good Osage stave all the time - you know, one that "speaks" to me, for some reason - LOL. I love the Osage bows, and I love working the Osage wood. BTW, I won an Osage bow Friday night in a (free) drawing on one of the forums. Blew my mind, and I am quite excited about it. (Bowyer unknown - so far.) It should arrive this weekend, or first of next week.
My wife says, "Just what you need - another bow." (She pretends not to understand - LOL - but she knows me.) ber643

The last couple of days (as often as I could) I have been working on, and refining, the shape and floor tiller of my Hickory, Holmi Type bow. I've decreased and evened the thickness (and width) of the working limbs, decreased and shaped the fades/transitions (all 4) more, and did a little more shaping on the handle and the pin nocks.

I then did another floor tiller - outside, to better compare with the last pic - this time I put down a foam pad to keep from getting the tip wet and smudged from the old steps:


...

Thank you, tpoof - that is more than I could possibly have hoped for - your comment is worth more than than you know.

(Saga continues ......... )


"Hunters Are People Too" (My website Premise)
Bernie Dunn
Coastal NC

Offline Pappy

  • Global Moderator
  • Member
  • Posts: 31,756
  • if you have to ask you wouldn't understand ,Tenn.
Re: My First Holmegaard Bow - Hickory Stave
« Reply #6 on: September 15, 2008, 11:50:42 am »
Looking good so far Bernie,Can't wait to see the Progess.Keepus updated. :)
     Pappy
Clarksville,Tennessee
TwinOaks Bowhunters
Life is Good

Offline ber643

  • Member
  • Posts: 530
    • Bernie Dunn's Home Page
Re: My First Holmegaard Bow - Hickory Stave
« Reply #7 on: September 15, 2008, 11:53:43 am »
A long time friend asked:

Bernie,
What exactly is a Holmegaard bow anyway?


I answered as best i could:

Tom, the original Holmegaard is an artifact bow found in the peat bogs of Scotland/England. TBB III has this (and a lot more) to say about it:

"The Holmegaard is the oldest artifact definitely identified as a bow. It arose from a pre-agricultyral, pre-warfare culture. It's maker was a member of a band which gathered and hunted for a living, without benefit of writing, pottery, cloth, smelted metal, the wheel, or settled communities. It was likely just an average bow of that time and place, but is superior to the average wooden bow of the present day."

LOL - thus the enduring interest and even fascination with this strange looking bow of special design and performance characteristics.(That last is my observation, big buddy, thanks for asking.)

...

After that, I got my "long String", that I made early this AM, on it, and worked the bow by hand (only drawing about 6-8") aprox. fifty times. Then I went out to the carport, were I have (newly) set up my tillering tree, and put it on that, with the long string, for the first look see. Again I exercised it bout fifty times, drawing only from 6" increasing to 10" this time. Finally, I drew it 12" three times just long enough to have my wife take quick pictures. The weight at the 12" draw was 35#, BTW


The first pic that Rose took for me, she was a little to my left, behind me:


I had her move over opposite the "tree", while I moved a little to the left with my pully rope, to take the next two. The second one, the camera was tilted a little but I will post it for more views anyway:


As you all know, I am a rank amature at this but I was quite pleased with the way it looks for the first long string pull. Guess I'll start tilleriing in earnest now, and I better make a regular (proper length) string for it. as I think I'll be needing it soon. I'm really getting excited now - but I'll still go careful - if I have to hit myself in the head - LOL.

Gotta start being more careful of how much at a time I take off the working limb sections, now. Still a lot of wood (almost half, again. I'd say) to come off the non-working tips, near the transitions, and tapering to the (already at) 1/2" tips. If I was to put a regular string on now, and brace it at 51/2" (If I could - LOL), the string would probably hit the transitions there.

I've been rather busy the last few days (getting bows ready for deer season, etc.) but have done a little refining as i think of it, and hope to get back to the Holmi Type soon. This catches the thread (and progress - or lack of it) up to date. I will continue as i make more progress

Hope you like it so far.

...................................................................

Thank you, Pappy, you are always so encoraging and i appreciate it.

(Saga continues ....... )
"Hunters Are People Too" (My website Premise)
Bernie Dunn
Coastal NC

Offline ber643

  • Member
  • Posts: 530
    • Bernie Dunn's Home Page
Re: My First Holmegaard Bow - Hickory Stave
« Reply #8 on: September 15, 2008, 12:15:29 pm »
BTW what I am working on is often referred to as a "Modified Holmegaard", by some, as folks only occasionaly attempt to make replicas of the original Holmegaard but instead have studied, improved, changed, the Holmie in the process of learning and researching. I (and some others) simply refer to our attempts as "Holmegaard Type" bows, drawing on what others have learned and/or discerned about their design, and later designs.

Another question posted:

Bernie, how long of a selfbow would I have to make in order to withstand my draw? 'Bout 7 feet?

I answered:

Naw, Tom you can have a short bow and still have draw length, although you would have to be aware of finger pinch possibilities. (lack of that is one of the benefits of a Holmegaard, BTW - Due to the stiff outter limbs). However, I would think the 66" or 67" bows I like to make would work fine for you, but it wouldn't hurt to make it more comensarate with your height, if you wanted to. Longer bows are generally smoother, as you well know. Hope that helps but Pat, Dano, and any number of others could tell you more/better.

...............................

Back to work on 'er today. (I need to stay busy right now.) A little different setup this time, so I can do some serious decreaseing of outter limb size:


If you look carefully you can see the line I plan to decrease the thickness of the non-working limb tips too, for now:


Almost there, using the Farriers file, then I'll scrape it a little cleaner:


Got the one end done and you can compare it with the other one in this next pic. Now I will do that end the same way. After that I will decrease the width of both tips a commensarate amount also, and then continue with decreasing thickness of inner limbs for tillering. This of course is a side/edge view:


...................................................................................................

Still isn't done - but -

I've done some tapering and shaping all around and have the shape pretty close to what I want in the end now, I believe. I also did a little tillering by virtue of tapering the width and thickness of the inner/working limbs, so I figured I'd take another look on the tillering tree, with the long string.

Here it is at rest, and you can see the little natural curvature in the tip of the right limb:


Here it is drawn (after exercising) to 15" (read about 42-43#). I like the way it is looking, especially right out of the handle fades, and all the way (so far) on the left limb. To me, the right limb looks pretty good (for this early) also - but you can see it isn't bending as much out near the end of the working limb as the left one is, it's still a little thicker at that end, and has a couple of uneven places in the thickness. I was going to get right back on it but had important/unexpected family matters to tend to ( a lot of that right lately unhappily). I hope to get back on it tomorrow, if all goes well. Maybe even a little before I turn in -


(Saga continues ........ )

"Hunters Are People Too" (My website Premise)
Bernie Dunn
Coastal NC

Offline ber643

  • Member
  • Posts: 530
    • Bernie Dunn's Home Page
Re: My First Holmegaard Bow - Hickory Stave
« Reply #9 on: September 15, 2008, 12:28:25 pm »
Worked a little more (a lot of time, a small progression of scraping) and the right limb is now bending more like the left, however it is still behind it's mate a little. Will continue to even them up (hopefully) and get another picture up soon. Getting close to regular string now, I think. Reading is now at 40# @ 15" (still a strong bow, for me - LOL)


Got on the scraper a little more this afternoon and the right limb is looking more in tune with the left, but still a little behind, I'd say. I'm liking the way the bow is responding to both the scraping and the exercising - so far, so good - ;^). Scale indicates 38 1/2# @ 15" in this picture. Still a lot to go to get to 40-45# @ 25" but things can change fast, and miscues can be costly, at this stage, I would think.


...

I decided it was time to get (a temporary fix) a pair of Foam Core Boards up behind my tillering tree (for better pic background and easier eyeballing of the bows, I hope). They are mounted with velcro. Those 2x2 uprights are not even so it is hard to mount them well, and exactly where I need them but they'll help some for now. Soon I will be replacing the 2x2s (and the tarp behind them) with outdoor siding board, and will be able to mount the FC boards better. I think then I will use four FC boards and turn them the other way for better coverage of the background. In this first pic you can see I tried to make the right limb catch up with the left one, and overshot the landing a bit. That's OK though, as they need more thickness reduction still anyway - but I'd rather keep them even. It did serve to remind not to do too much at a time now before checking.


I took the bow back in and took after the left limb to bring it up with the right one - think I did a little better judgement this time. My wife wasn't available to take the pic on this one so I set up a tripod and used the timer while I pulled the rope. That is why the angle is a little different and the bow appears a little above the foam core boards. I'll get it all where I want it eventually, with all the times I'll put it on the tillering tree - LOL.

I know that these readings on the bow scale haven't carried too much meaning since I am still on the long string but in this pic it was 40# @ 16". You can see that I should be able to put it on the short (regular) string soon, probably for next pics.


................................................................

Today, due to the unevenness of my carport "wall", My FC boards wouldn't stay hooked to their velcro. I had to staple them on to the uprights. That's alright Though, they don't cost enough to preclude new ones when the siding is up. You will see they are not quite even but very close.

After more thining of the inner limbs this afternoon, since I couldn't string the bow properly yet, after the AMs thinning session, I put the bow on the long string again and "treed it" . This time it was curving enough to pull the string down to the 20" line, and the scale read 43# at that point. I was very pleased with the curves of the inner limbs (unless I'm fooling myself, or going blind from looking  ). It should put me closer to the short string anyway -  :


(Sage continues ........ )

"Hunters Are People Too" (My website Premise)
Bernie Dunn
Coastal NC

Offline ber643

  • Member
  • Posts: 530
    • Bernie Dunn's Home Page
Re: My First Holmegaard Bow - Hickory Stave
« Reply #10 on: September 15, 2008, 12:50:40 pm »
Glen Newell of Australia said:

Bernie I would be trying to draw that bow down on the tiller board from where you would be nockig the arrow, you will see the limbs bend differently then...Glenn...

And Dano Gren posted:

I agree Bernie, once you get real close to final tiller I would put your rope as close to where you'd be drawing the bow, there's more to it but you have enough on your mind right now I'm sure.

I posted:

Glen and Dano, You know, I am glad you two mentioned that, because I must admit that I hadn't even thought about it. It (of course) makes perfect sense to me but remember that I did my tillering on my other two bows on Mike's tillering tree and under his guidance, not on mine (untill at the very end of my bow, "It"). I must also admit, I don't recall if mike's hookup for the rope pully at the bottom is offset or not, or if he offset the bow in the holder of the tree. So, should I offset the eye bolt I have my rope/pully hooked to at the bottom of the tree, offset the bow in the holder, or do you just move the snap (on the string) to where the arrow would be, and then the placement at the center of the tillering board (at the bottom) is not enough off to matter? I'm sure that this is basic stuff that I should already know before reaching this point but it is obvious that, either I do not, or I have forgotten something important - again - LOL. Little help here please, guys. I may try it out in the AM some (different ways) to testo-testo it - with or without advice. Thanks again for mentioning it, in any case.


Shaun chipped in:

Bernie

My two cents on this topic...

I have played with this string pull position thing some and I believe the ideal situation would be to have the bow balanced at the point where it would push against your palm and the string pulled from where you middle finger would be on the string grip. BUT.. the only difference I can tell in tillering is how far the tips come around on a background marked with a grid to see if they are pulling the same distance.

I have come to believe that the more accurate way to balance this is by static tiller at brace. I like about 3/16 positive tiller for split finger. I have heard that about even works better for 3 under shooters.

I try to do most of my tillering before the bow bends past brace height and do the final touch up on the tree. Brad Merkel of Littletree bows got me started using a pair of posts near the tips and a squeeze grip bar clamp at the handle to do this early tillering to brace height and I really like the method.

Final tiller is best seen in the hand, either with a mirror or better yet with digital photo that you can stare at - like when you post here and we all get to look for as long as we can before going cross eyed.

You are doing great Bernie. Really looking forward to this Holmegaard (is that old Norse for Home Boy?) style bow - never done one myself and its now on my list for this winter.

And I replied:

Hmmm, as Dano said, Shaun, I guess there is a lot more to this, and I now remember reading much more of it on Paleoplanet. It was mostly talking theories and based on folks much longer experiences with it, and I fear I mostly brushed over it as being beyond my ken (or scope at least) at the time as I read those subjects. Still, I see the value of pulling the string (and/or pully rope) from the point one would draw it. So it looks like maybe balance the bow pretty close to center (at least of the grip - for me). I do shoot split finger. It also seems you must be pretty sure which limb is to be your tyop limb and where you are placing that limb - left or right of cradle (at least until/if the bow gets fickle and makes you change your mind), in order to have your pull off-center on the correct side of the tillering post. So I guess you would always place bows/limbs the same on your own set up, or you would need two eye bolts at the bottom of the tree (???).

With this bow, I (started out so have continued and wound up) have seen the right hand (looking at it) limb as basically the stiffer/stronger limb, so have assumed it would probably wind up my bottom limb. To be more handy to my way I probably shouyld have it on the left side - LOL - but I've continued to put it on the same (right) side for continuity of both pictures and eyeballing. This should conceivably put my line of pull to the left of the center of the post (if I'm thinking right). Then on the other hand I've seen it written that many feel you should turn the bow around on the tree and look at the other side too. I think I am confusing myself. I better shut up - for now  .

That doesn't mean I want others to. I feel a "need to know" or at least to have a usable guidline for now - 

Oh, I do have the passing thought that the Holmi (Perhaps the Holmegaard people were cosidered "Home boys" -  ) Type bows might be hard to get fully (or close, for sure) to tiller before drawing, especially if shooting for a light draw (like mine) because you wind up having to remove so much wood as you progress (at least with Hickory) - but that's just my passing thought, and from a beginner's stand point remember. On the other hand, mine seems to have "behaved rather well, so far, in that respect.

(Man, I do hope some of this makes sense - I guess I better go get breakfast and  coffee)

Glenn said:

Bernie the only way you will ever see how the limbs will bend when you are shooting the bow on a tiller tree is to place it on the tree where your hand will be and draw the bow from where you will nock the arrow. Rig up a drawing point for the rope to represent how you shoot with three fingers under or split fingers. If your bow has a shorter bottom limb the bow will want positive tiller but if you have made the bow with equal length limbs and you are nocking the arrow 1.25" above centre the bow will more than likely want to have negative tiller or reverse tiller.
When you have an equal length limb bow and you nock the arrow 1.25" above centre the string length to the top limb will be 2.5" shorter than to the bottom limb tip from where the arrow is nocked. The shorter string length will place a lot more pressure on the top limb and the top limb will have to be strengthened to balance the bow and not induce excessive string follow to the top limb. I have been doing this for 10 years now and the bows with equal length limbs and reverse tiller will take will take even set and shoot really smooth as against positive tillered equal length limb bows.
All this depends on where you hold the bow and draw the bow from...Glenn

Dano then posted:

Bernie, just in case your not totally confused, here's some more good reading to make sure you are.
http://www.bowyersedge.com/organic.html
This goes along with what Glenn said.

My reply:

I will read that, Dano (I like Dean Torges writings a lot anyway), thanks. Also thank you, Glenn. I followed that pretty well. I did make this one equal length limbs. I shoot split finger, and will see about perhaps sinking another screw eye (or perhaps two) in at the bottom of my tree (I use a climbers snap - proper name escapes me at this moment - to hook the bottom pully and snap to the screw eye anyway - easy to move it from one screw eye to another.) That way I'll be covered, whichever way I make a given bow, or whichever side the "top" limb is on. (If I can just remember when, and which, I'm doing what to - LOL)

I also re-read Jim Hamm's section on Tillering, in TBB, Vol I, this AM (for breakfast)just for more basic info refresher. 'Scuse me, I gotta go see if I have any more large screw eyes left, or if I must make a run to Lowe's - LOL

Then I added later:

QK, first of all I shoot with my arrow pretty close to level, from nock point to top of my bow hand (or a layered leather "Dano rest" that I like to use on most of my bows now, situated close to the same position. I have found this works best for me on most all wood bows).

I had one screw eye in the (real) tree I had rigged up before, out back (when I was tillering my Osage "It"). I checked where the pull should be for my draw/shooting style and it falls about a quarter of an inch in from the side of the 4x4 post (tillering post), or about 1 1/2" over from center. I drilled holes on both edges of the 4x4(for later use)for the screw eye(s), enough above the centered one, so that I would have room to twist them in, and screwed the eye in the one on the left, for this bow. The pully rope now travels straight down just inside the edge of the 4x4 from the part of the string that should be where my index finger would be when shooting. Pics later, when I get time, so you can see where I am speaking of, in case you have doubt. (I again used the long string since I wasn't sure how the bow would like, and react to, my new shenanigans - LOL). I exercised the bow some and then drew it to about the 15 or 16 inch line. Results were, the two limbs still curved quite evenly (I was pleased) but as you (and I) would now expect (I think) the top (left) tip was traveling down about 1/2 to 1 inch further than the bottom (right) limb tip, perhaps even a tad further (BTW my boards come pre-graphed in light grey 1/2" squares that you can't see in the pics). So, I take this to mean, since I can't "strengthen" the top limb, I need to weaken the lower limb to get them even again. Am I figuring right, and is this result about what you would expect, Dano, Glenn?


Sounds right to me Bernie, you will need to weaken the lower limb. You can turn the bow around the ther way so the stronger limb is the top limb if you haven't already done that...Glenn...

.............................................................................

Since I saw that the lower (right) limb was not drawing as far as the upper (left) limb, while pulling with the long string from the point that will be my drawing point, instead of pulling from the center, as I had been doing, I took the following action.

I made ten passes with my scraper on the lower limb, trying to even them up again. I then put it on the tree (still with the long string to be safe) and exercised it and took this pic. You will see I left this pic uncropped so folks could see the new position of the pully rope - i.e. to the left side of the tiller post, and lined up with where my arrow will be nocked on this bow. You will also see the right (lower) limb is still behind the upper (left limb) but the curves are still looking good (IMO):


I did the same thing again. My ten passes with the scraper on the lower limb. BTW - Ten passes on a limb this wide means (in my case), that I scrape, full length, 12 times, traversing across the width of the limb, I repeat that ten times. After that I floor tiller and flex, then back to the tillering tree again for more exercise, and another pic. This time I cropped the pic (as I usually do) for better visibility/clarity. Still looks like the lower limb is behind the upper limb but not as much:


My plans are to repeat this untill the limbs are drawing even again, from the new, more correct point of draw/pull. I will go to the short string as soon as possible, perhgaps for the next pics.


(Saga continues ........ )

At this point I must take a break to take my wife in for a med. appointment (routine) but I will be back and take this saga and bow to compleation today - Good Lord willing - I promise. Thanks for your patience.

"Hunters Are People Too" (My website Premise)
Bernie Dunn
Coastal NC

Offline OldBow

  • Member
  • Posts: 2,216
  • I'm just an old retired biology teacher.
Re: My First Holmegaard Bow - Hickory Stave
« Reply #11 on: September 15, 2008, 01:52:00 pm »
Quite the thread. Thanks for sharing. I sure am looking forward to seeing the finished product. 
When you're retired, every day is Saturday

Offline ber643

  • Member
  • Posts: 530
    • Bernie Dunn's Home Page
Re: My First Holmegaard Bow - Hickory Stave
« Reply #12 on: September 15, 2008, 04:59:12 pm »
Thank you, OldBow - not too far away now. I'm back home now and will take it on out - if I don't fall asleep - (bad when ol' folks skip they naps - LOL).

..................................................................................

Had a short, late night session (spur of the moment) last night. Got the working limbs pretty close together again now, and the short string on 'er. If all goes well on the home front, probably more pics served up, after a little more work, later today -  .
 .................................................................................

Missed your post yesterday, Glenn - didn't mean to ignore you.

I considered flipping the bow but decided not to due to some markings I have on the back. I've been working on it most of the morning, with the short string. Small scrapings to even things up and try to finish up the tillering and weight. Right now it's pulling 36# @ 20" and I'm not trying to go beyond that until I do get e'm evened out (unless it's by accident). Hope to get it set for some varied pics before dark.

........................................................................................

Been working on the bow today to even the limbs up, and, while it is not fully at that point, it appears to be close. First, though, since I have been doing some shaping, etc. during the last week or so, I took some pics to show her new "figger" and thought you might like to see them

Back unstrung:


Belly unstrung:


Belly at brace (aprox. 4"):


Now, the latest tillering pics, starting with her on the tree at low brace:


With the pully connected at my normal draw point, ready to exercise:


After exercising, drawn to 36# @ 20":


The sun was very bright in the entrance to the carport and is washing out the left limb appearance some - it's not as thin as it looks. I'm thinking the Right limb needs to bend a little more at the the handle fade and out a little ways, and that the left limb needs to bend a little more as it gets closer to the transition step - before I go any further on draw weight - but figgured I'd show it at this point anyway (I was getting tired, and my poor ol' brain was getting a little befuddled trying to get that left limb bending right again - LOL).

................................................................................

Dano said, kindly:

The right limb looks good to me, the left is deffinately stiffer, you picked a good time to take a break. This is the point where bows get ruined. Nice work on her figure Bern, don't tell Rose tho

I responded:

Yeah - that seems to be the concensus on the other site too, (with some concerne about the right being too weak). I hope not though. Thanks, Dano. I'll leave the right alone and go easy on the left to even them up, I hope.


And then added:

The left Limb is responding but awfully slow. It's been giving me fits like that all afternoon, and led me to second guess my thinking on the right limb earlier. That's what got me in trouble. I hope I can get out of it now - without a disaster.

Dano: How much are you exercising after wood removal Bernie?

Shaun: Looks likes the left limb needs scraping but I like Dano's idea of taking a break. Near the end is the time to go real slow.

My reply:

 :D if I went any slower, snails would run me over by the hordes, Shaun  (but I do agree wholeheartedly with "stepping back" when things get tangled, and I apply it - often  :). That was the reason for that last large post with pics - it forced me to break for a couple hours, or better actually.) In the Marine Corps we called it, "Fall back, and regroup," 

Dano, I religeously exercise it a lot after each reduction, first on the floor, then as I brace, and finally about 30 to 50 (relatively short) pulls on the tree. If anything I probably over exercise them. I exercise the bows I shoot a lot like that also - good training for them - and me  ;)

Actually that Right limb seemed to go very suddenly, as it had appeared the stronger to me all along. It's also funny about the left one seeming to not respond too readilly to the shaving. It appeared to be the weaker limb all along, and yet it has surprised me in how stiff/strong it is. I finally got it responding some last night, before I got too tired and quit. It looks closer now and is acting more responsive to each scraping. I'm proceeding verrrrrrrrrry slowly with it (so as not to repeat the right limb "happening"). I will try another limited scrape pass and floor exercise on it this AM, before I eat, and then hope to get back on it again later today, after family matters. In any case, it's been a real learning experience, for sure.


Dano: Sounds like your exerscing enough. I was talking to Mike Westvang of Dryad bows at Mojam, he was saying they shoot their bows with a short draw quite a bit towards final tiller, this helps register the change after wood removal better. Seems like some wood just refuses to change, then all of a sudden POW it's too weak. Your doing great Ol' Brother.

Pat B: Bernie, She is coming along well. I have found that even with a short string and exercising you aren't getting positive effects of wood removal. Try exercising it with a regular in hand draw(to only 20"mol) and see if that doesn't help. The way you hold the bow and the way it rests on the tree are totally different. You might also try leaving it strung at lo brace for an hour or so to see if that doesn't sweat out the little bit of bend on that stiffer limb.

My Reply:

Hmmmm, both things are interesting, and I have read occasionally about leaving at brace for awhile now and then, towards the end. Certainly both are easy enough to try, and couldn't hurt IMO, and I certainly respect the opinions of those making the suggestions. I short draw to try out kids bows all the time - and every now and then I short draw my own bows - when I don't mean to, come to think of it  - . I'll give them a try, before going too much further. Just got home, and may get a chance to work on it again later today.

(Saga continues ....... )
"Hunters Are People Too" (My website Premise)
Bernie Dunn
Coastal NC

Offline ber643

  • Member
  • Posts: 530
    • Bernie Dunn's Home Page
Re: My First Holmegaard Bow - Hickory Stave
« Reply #13 on: September 15, 2008, 05:20:44 pm »
I decided that instead of putting the Holmi on the tree, I would try putting it at brace for awhile first, since I had scrapped it a little more this AM. At brace it looked more even than it had since the right limb had gone wimpy on me, so I decided to take a Cane arrow out and short draw shoot a few to see how it acted, and perhaps help it take proper curvature, as suggested. I stood aprox 10-11 yards from my large foam target (just in case- LOL), and started shooting, and retrieving, the arrow. I wound up shooting 25 half-draw shots (fun!). BTW, It would have been uncomfortable for me to pull it further than that, so it still has draw weight. All but one hit landed inside a 10" center of the target, flying very well for being shot from a unserved and unnocked string, and non-compleated bow. I was impressed. A little noisey, and a tad hand-shocky but to be expected at 4 1/4" brace, off the hand, probably. (I should probably add that it shot equally as well held upside down for about 5 shots - by accident - DOH!) It still looked as good as it had before shooting, though not quite perfect yet, so I took a picture (the highlight is from the flash):


I'll run it on the tillering tree again before proceeding with any indicated further work, but I think these proceedures are viable aids and am glad they were brought up. The bow is hanging at brace, even as we speak, to "cook in" if it will - LOL.

.(As you can imagine I was feeling good again at this point and I got good and encouraging responses from a number of posters with that pic  :))
................................................................................................


Thanks, guys and I agree.

After that (and supper) I decided I just wanted to see how the bow looked on the tillering tree before I quit for the day on it. As soon as I picked it up I saw it looked even a little better (doesn't mean it will stay after unbracing - but .........???). Once I got it on the tree, exercised it, and drew it (34# @ 21"), I decided it was worth a couple more pics for your perusal as well  .

At Brace:


Drawn:


..............................................................

Dano: OH!! That looks real good!!!

Me: Thanks, Dano. Wonder if it will still be that way in the AM  ;D And if I can draw it to 25" 

Looks pretty much like whatever I might do now I pretty much need to do to both limbs (if I can),I'd guess.

Dano: She'll look great in the AM, even with no make up  ;D . You may not need any more adjustments, ya never know, take it slow you'll be fine..

Me: I'm about hesitant to do anything else to it  . May just try some more short-draw shooting with it a bit - but got to get it drawing to 25" sooner or later (and hope for the best on the poundage I reckon  )

(I did brush her off a little, early this AM, and remove some pencil lines. I also whispered sweet nothings to her  you know, just to make her feel pretty, loved, and keep her moving in the right direction -  :-* )

Dano: By my calculations  you should be at 46# at 25" right now, I think you'll make it.

...................................................................................................

Yep, that's about what I figger too, Dano - but I don't seem to be able to pull it to there, either on the tree, or in hand. So my quandry is - do I take both limbs down a little more and hope it will stay at/above 40# at 25"? (or do I leave it alone, and hope I get reincarnated with muscles, next time -  )

This AM, after breakfast (and reading Torges' article link you gave me a few posts back) I took her out on my range for some more short-draw shooting, still looking good, and shooting good. I decided a couple of things were in order, so I served the string, put a string knock point (adjustable) on, and increased the brace height to 5". Went back out, and as I had hoped, she was a little quieter, smoother, and more consistant. I got Rose to snap a pic of the short-draw with it:


(Saga continues ......... are y'all asleep yet?)
"Hunters Are People Too" (My website Premise)
Bernie Dunn
Coastal NC

Offline ber643

  • Member
  • Posts: 530
    • Bernie Dunn's Home Page
Re: My First Holmegaard Bow - Hickory Stave
« Reply #14 on: September 15, 2008, 05:33:47 pm »
I was asked about my bow scale and I responded:

I'm pretty sure the bow scale is OK I've had it quite a while but it is in very good shape and it seemed to read within a # of Mike's scale (same kind) on the last couple of bows (and some others I was just checking out, seemed to be about right).

Since I've shot the bow two or three times, and sweated it some (and it does seem to be drawing a tad further now), I may put it on the tree again this evening just to see if it's changed any. I don't believe i will do any more removal until I'm sure it has settled in real good, unless i see a real good reason to. It's not like I am planning on it for hunting season or anything, and I'd rather have it come out OK than rush it. Besides I'm having fun shooting it and it's good practice too (along with my It bow).

Dano said:

Sounds great Bernie, your right there's no need to rush at this point, most people get anxious to see it finished and end up with less than desired.

Shaun: It looks real good in the short draw picture. Nothing like seeing how it draws in the hand. I find a bow will often loose a couple of pounds in the first few hundred shots. Its a good idea to shoot it in and let it "learn" to bend. Really looks like you got the design and tiller right on.

Glenn: She's looking good Bernie, as you say no need to rush it. A lot of people, myself included have rushed to get it finished and end up with much less draw weight than desired, it's amazing how many 40# bows are made...Glenn...


(All good advice IMO - ber643)
--------------------------------------------------------------------------------

Me: I must admit I am liking it better all the time. I took it out in the near dark (darker than I would shoot at a Deer) this evening and put aprox. 15 shots in the center circle (aprox 8-10") of a target 10 yds away. A little hand shock but seems to be getting smoother all the time. Still short drawing - 21".

AND then, finally:

After a little more short draw shooting, I decided it was time to move on - slowly/carefully. I decided to cut my usual scraping pass down from 10 to 5 passes and do that to the top (left) limb to take a little more of the straightness out. It came out looking about right to these old eyes, so I took it out to shoot on my foam, in the carport (while tropical storm Hannah howled around me - LOL). She shot very well for the 10 or 12 shots (at 8yds) that I put her through. Later, after letting her "stew" at brace for about an hour, (and with the winds diminishing some) I decided to see how she'd act/look on my tiller tree.

The curves looked very even. Of course the lower (right) limb tip does not come down as far, because it starts out with a little higher "kick" than the top one anyway, but I was happy with the way it looked. Only thing is, when I pulled it to 22" the scale only registered 33.5 pounds. That worried me a little as I still hadn't been able to get to 25" draw yet. After contemplating a little I decided it was time to take the bull by the horns, go for broke - and hope it didn't ("broke", that is). I carefully eased back on the pully rope and found it would advance beyond 22" without any untoward results/noises. I kept pulling, smoothly, on the rope and realized I was making it right onto the 25" line.

"Yes!"

So much for that. With some small trepadation I went forward to check the scale - after all, I was the one who decided to do it, so it was my results to live with it - right, wrong, or indifferent.

Eureka! The scale read exactly 40# @ 25"

I did it a couple times more to check for noises and same readings. Good to go. I went in and got the wife to come and verify my observations (she's gonna be able to build bows if this keeps up - LOL). I was really pleased but, as we trucked into the house with bow in hand, I said, "Of course I still probably can't pull it to 25" in a regular draw but maybe it won't change too much getting to there."

Rose, most always the realist, asked if I had really tried since this AM's scraping.

"Well, No, but I guess I could try," I admitted - DOH!.

I got out my calibrated "measuring arra" and gave 'er a (tentative, I fear) go. Rose read the arrow at 24 inches. That was encouraging. Let me try that again. I did, several times. Yep, I can now also full draw it (and anchor) to 25" - I'm a happy camper!

I still have final sanding, a little more decreasing of tip width, shooting in (a-pleanty) at full draw but, unless something unforseen occurrs, I'm getting ready to finish her now.

I think I will call her, "Hannah Holmi", and thank you, Lord (and all the guys on the forums too - LOL)

Picture to follow when I get Hanna "dressed".


(Saga  - oh heck - what i just said above  ;D)
"Hunters Are People Too" (My website Premise)
Bernie Dunn
Coastal NC