Looking around online, it seems hard to find a spine tester thats under $100, though I fail to see the reason. The spine testers that you buy arent quite $100 worth of accuracy, and they rely so much on rules of thumb. How accurate can you be when you have to apply the 1 inch longer is 5# less spine rule six times for a 32 inch arrow? It is also a simple device, and is very easy to make. On top of that, you can easily make your spine tester adjustable; for both the length of your arrow and the style that you shoot.
So here's the build along: I'd recommend reading through it first, just so you can get the basic idea of what's there before jumping in. It's actually very simple to make, so don't be frightened about the length, I just went as far as I logically could go to explain it as best as possible. And speaking of that, don't be afraid to reply with requests for further clarification; I have a finished one right here and can add pictures and instructions very easily.
Step one: The board
Find a scrap board at least a half of an inch longer than the longest arrow you are going to measure, and at least 4 inches wide, though you might be able to get away with something narrower. Make a mark in the center, then measure half of your first arrow length out each side. For example, if the shortest arrow youll be measuring is 24 inches, measure 12 inches on either side of the center line.
Then, mark one inch further from the center on either side until you reach half of your longest arrow length. Example: if youre shortest arrow will be 24 inches, then youll start 12 inches from the center. Youll do a mark on either side at 13, 14, 15, and 16inches if your longest arrow will be 32inches.
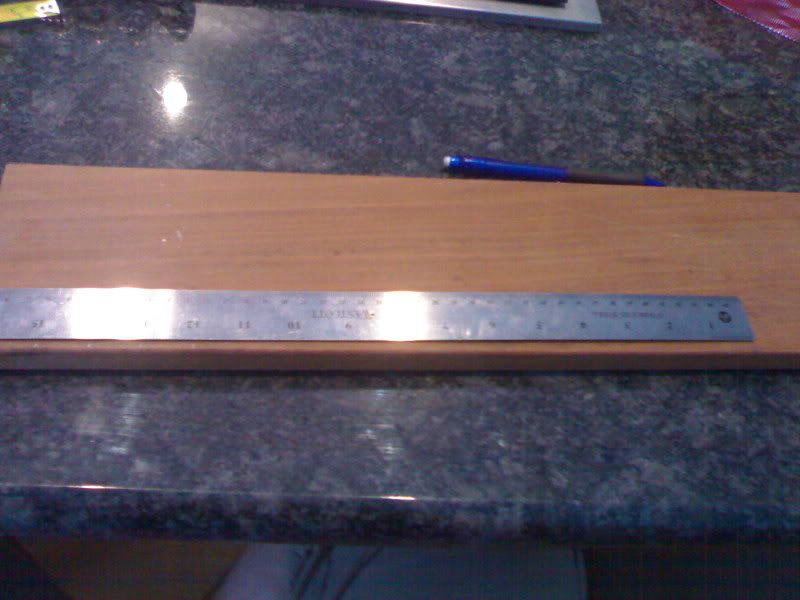
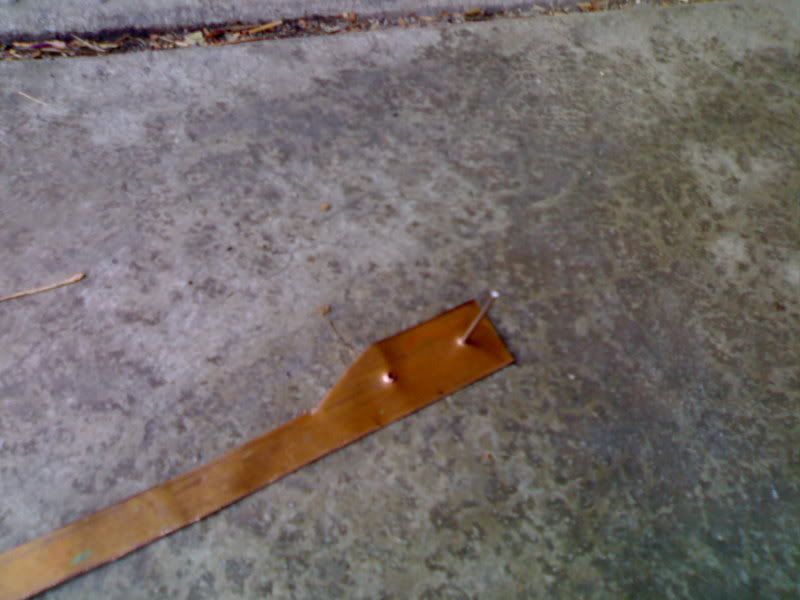
A picture of one side... it's not easy to take pictures of reflective objects! You can see that the ruler starts in the middle, then there's a mark at 12, 13, 14, 15, and 16, because I want a 24 to 32 inch range on this tester. The same thing was repeated on the other side.
Step two: Drilling
Find a dowel, bit of metal rod, or some other long, circular object. In the picture below, I will be using a nice bit of copper rod that I had lying around. Find a drill bit that is the exact diameter of your dowel or rod, or /slightly/ bigger. Mark 1 inch from the bottom at each of the marks, so that you end up with a point. Drill holes so that each point(except for the point at the center mark, well use that later) is at the very TOP of the hole, ie not in the center (theres actually a reason for this). I chose to not drill all the way through, and leave some material in the back for consistency. You can do that if you want, or not. Either way it will work, Im just being picky about my work

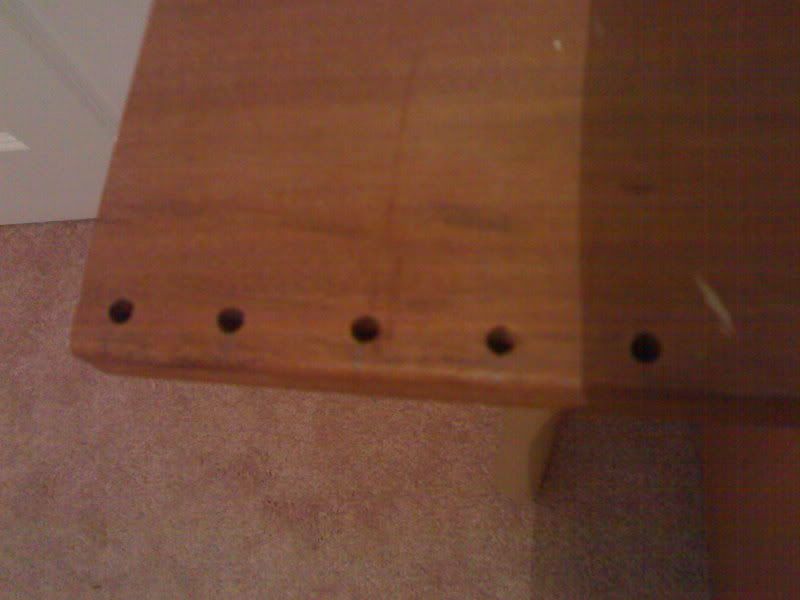
Here's one side of mine, the one that I described above. Keep in mind that the same thing is done on the other side.
Step three: The arrow supports
Get that dowel, metal rod, ect, that was drilled for in step two. Cut two pieces of it, about the thickness of your board plus one inch long. If theyre dowels, put little notches near one end of each one to hold the arrow. If its metal, like the picture below, then bend up the last quarter inch to hold the arrow.
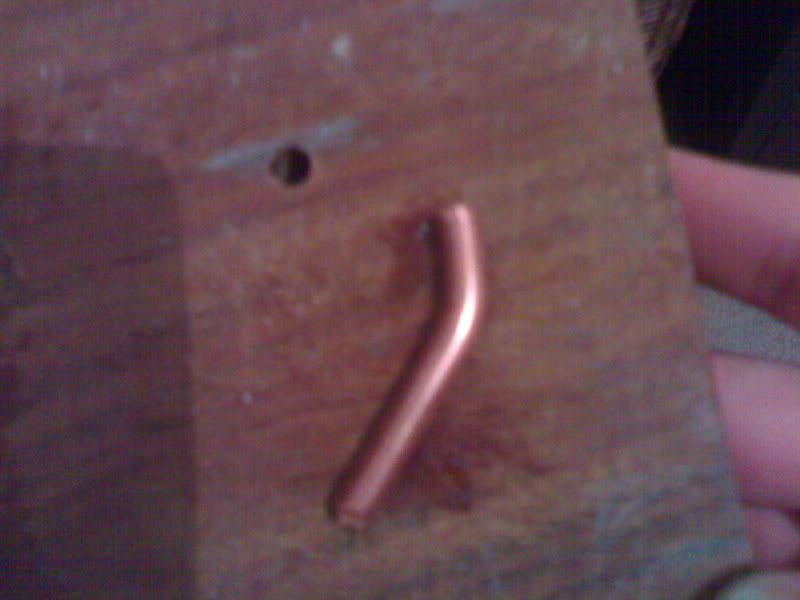
My arrow supports.
Step four: The pointer
Find something that will work for a pointer. Criteria are that it can be either nailed into or bent around a nail, and that it is ridged and will remain straight. I chose some of scrap copper sheet metal. Other ideas: wire coat hanger, dowel, other scrap piece of wood, ect. It should be at least 3-5 inches long (a bit longer for the wire-like ones), and for the sheet-like ones (wood, sheet metal, ect), about 1/2in to 1.5inches wide.
For sheet-like put one mark on the pointer a little ways from one end, then put another mark down the pointer as close to 1 inch apart as you can get, pointing down the pointer(see picture below). If your pointer is wire-like, then bend one end around the nail that youll be using, then bend it around a second nail so that the centers of the two nails are as close to 1 inch as you can get. Keep in mind that the more accurate you are in this stage, the more accurate the final product will be.
If your pointer is wire-like, then bend the entire thing as strait as possible. If your pointer is sheet-like, then nail in two nails on your marks, making sure to keep accuracy. Remove the nails. Take a ruler and draw a line down the pointer, going through the two holes. Cut from the pointer end along this line, flaring out to the left (if when holding the pointer pointing towards you) to full width about an inch before the nail holes, so that you DO NOT cut through the nail holes. See picture below for the final shape, so you can get a better idea of what Im trying to say, keep in mind that flipped versions will not work with the instructions below.
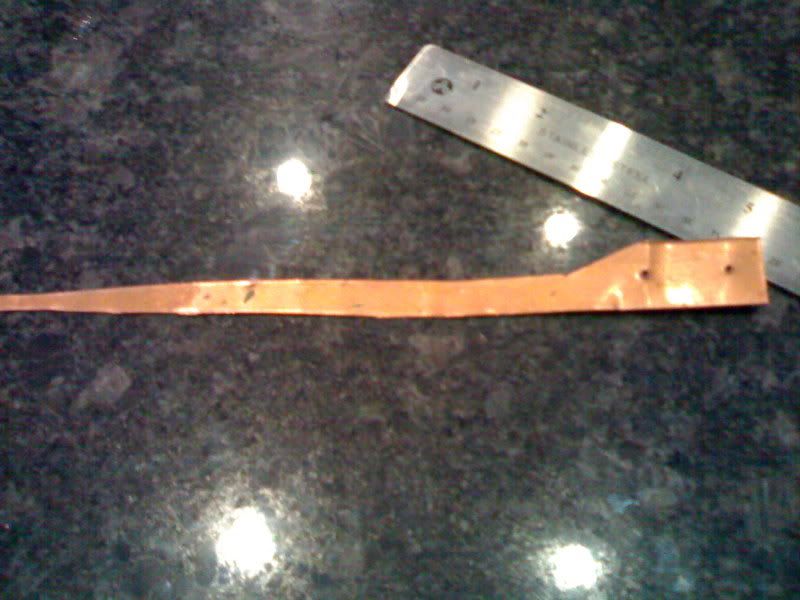
Here's my pointer, it doesn't look like it because of the light, but the top side of the pointer is cut on the line that's formed by the two nail holes. This really helps in the reading of it.
Step five: Assembly
Take your pointer, and in the hole (or bend, if your pointer is wire) that you made closest to the end. Take one of your nails, and stick it through it so that the point of the nail is pointing towards you, when the pointer is pointing to your left. (see picture).
Take your pointer, and put the other nail through the second hole, THE OPPOSITE way that you put the first. Then remember that centerline that we drew on the board in the very beginning? Find it again, and find the point you made one inch above the bottom on it. Nail the second nail into that point, though keep it loose enough so that the pointer swings freely. You should have a pointer thats nailed into your board, pointing left. There should be a nail sticking out of this, pointing towards you. File the point of the nail so someone doesnt poke out their eye.

Here's my pointer, attached.
Step six: The hard part
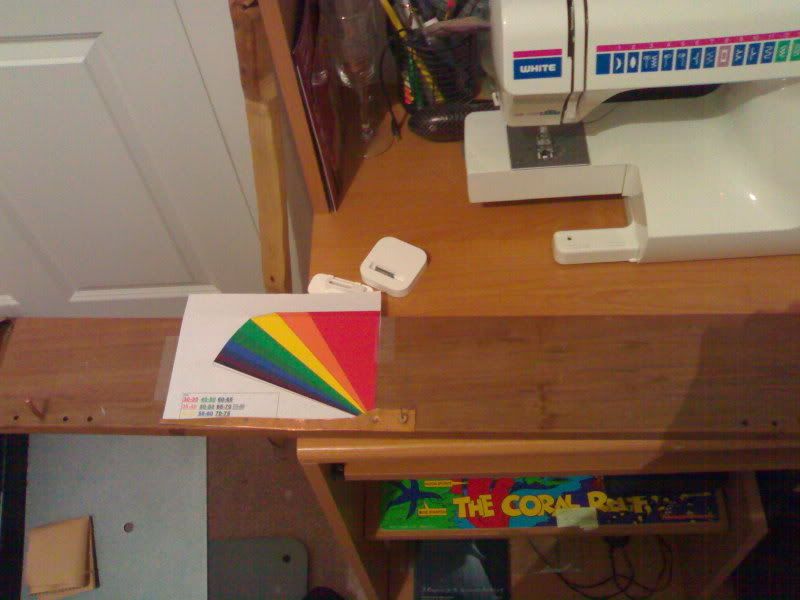
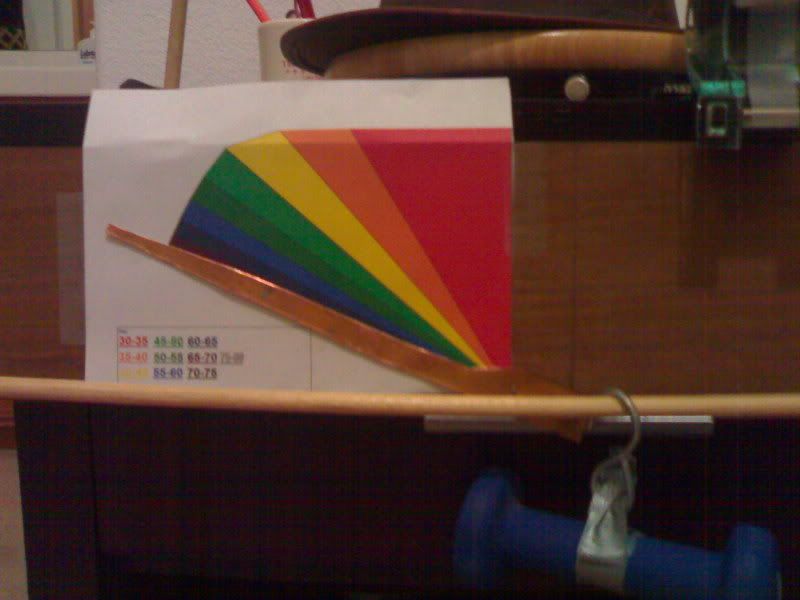
Has already been done. Below is the image that has the exact measurements for where the pointer should be. It is color coded, so with a simple box of crayons or colored pencils, you can easily differentiate between shafts that youve spined yourself by just coloring the end. If youre color blind, theres a color blind version too. Copy this into Word (or an equivalent) and make the image exactly 7 inches wide and 5.25 (five and a quarter) inches tall. Print it out, and cut it out. Slide the bottom corner under the pointer and put it right next to the nail thats nailed into the board. Make the bottom line that I have on it perfectly level, and use scotch tape to stick it to the board in that exact shape. Its ok if it hangs off the board, either cut it there or let it hang, it should work either way.
Step seven: The weight
Make or buy something that has a hook and weighs exactly two pounds, the closer to exactly two pounds the more accurate the tester.
Step eight: Measuring
You have finshed making a spine tester. To use, put the arrow supports in the longest holes that will hold the arrow, while still keeping them about the same distance from the middle (one inch isnt going to make much of a difference, but if you have one support 13 inches from the middle and the other 16, it might make a difference. In that case, one should be at 14, the other at 15). Put the arrow on the arrow supports, with the nail thats pointing out underneath the arrow. Hook the weight on the arrow, right next to the nail. Read off the top or tip of the pointer.
Here are some nifty little features it inherently has, that $100+ spine testers dont.
-- You can keep a pencil or pen by it to mark where it measures each arrow to precision match a few arrows. If your paper gets too covered in marks, print a new one.
-- The length adjustable feature means that you can get something pretty exact, even for very long arrows.
-- If you already have a set of arrows that shoot really well out of a certain type of bow that you make a lot, then you can untape the paper and ROTATE its bottom right corner around the nail (the one thats nailed in the board, not the one thats sticking out), so that those arrows fall in the weight range that the bow they shoot well out of falls in. Vola, no rules of thumb needed. You can take your pencil/pen and make a line along the bottom of the paper, marking different lines for different types of bows, IE you can have a setting for ELBs, sinew backed, short bows, perry reflexed, ect.
-- Putting a heavier weight on can give you measurements above 80lbs. If you put on a 4 pound weight, then double all the numbers on the ranges. For example, the first range (30-35) would be 60-70. The next (35-40) would be 70-80. Using this, you can get up to 160 lbs spined. You can also do the 15 to 40 range very accurately by using a 1 pound weight, just halve the numbers (ie, 75-80 becomes 37.5-40).
-- You can either mount the tester on the wall or build a stand
if you could follow these instructions then youre intelligent enough to figure out how to build a stand that will hold it up and give the weight enough room to fall.
Comments and suggestions are welcome


