Author Topic: bullsnake on self osage buildalong  (Read 25095 times)

0 Members and 1 Guest are viewing this topic.

USMC Sniper

  • Guest
bullsnake on self osage buildalong
« on: June 29, 2006, 08:20:55 pm »
this is a buildalong for the Osage r/d bow i posted in the bows forum
the first step was to debark and chase a ring on the set of Osage billets i used. i first cut off some of the sapwood with my bandsaw which left me with the left sample along the whole stave, then i used my drawknife to get it within 1 ring of my target ring.


then i chased down 1 more ing layer into my target ring, i circled the  pin nots so i could work them with a knife not the drawknife.

see how the two rings stand out in the correct lighting?
i only got close with the drawknife then used a scraper to make it perfect

then i marked out ad cut out the handle splice, 1 1/4 wide and 4 inches long z splice

cut along those lines carefully and presicely so they fit like this

after degreasing with acetone i glued them together with plenty of titebond 3 into 3 icnhes of estimted deflex no need to mesure.


more to come later

mnewcomb59

  • Guest
Re: bullsnake on self osage buildalong
« Reply #1 on: July 06, 2006, 02:50:59 pm »
Come on man, you gonna follow up? I have been waitin ro see this for awhile!

USMC Sniper

  • Guest
Re: bullsnake on self osage buildalong
« Reply #2 on: July 06, 2006, 07:05:22 pm »
i will ive been buisy lately um perhaps monday?

mnewcomb59

  • Guest
Re: bullsnake on self osage buildalong
« Reply #3 on: July 07, 2006, 02:54:13 am »
Imma hold you to it then... lol ;D

Offline Pat B

  • Administrator
  • Member
  • Posts: 37,507
Re: bullsnake on self osage buildalong
« Reply #4 on: July 07, 2006, 11:07:15 am »
Sniper, What an excellant post. This kind of information is what lots of folks are looking for. I can't wait to see the finished product.     Thanks for the build-a-long!!! 
   Showing the differance between the early and late rings and explaining about seeing it under correct lighting is very helpful.   Pat

A picture is worth a thousand words!
Make the most of all that comes and the least of all that goes!    Pat Brennan  Brevard, NC

USMC Sniper

  • Guest
Re: bullsnake on self osage buildalong
« Reply #5 on: July 10, 2006, 09:56:00 pm »
OK after the glue sets you need to rasp/file off the points of the splice that protrude above the bows back, yes you'll be violating fibers don't worry ill deal with that later. then i draw the handle shape, i like this shape its a lot like dean torges's but thats fine by me. oh and the width at the fades is 1 5/8"

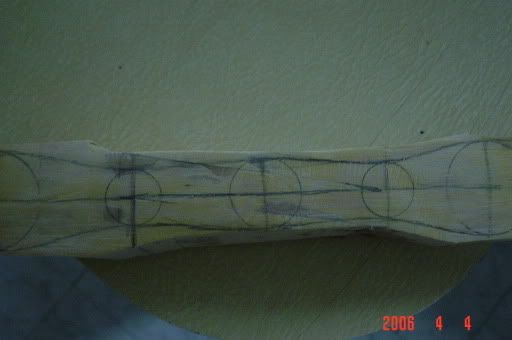
then i cut that out with my bandsaw, go slow and first take of a couple slices close to the line so your blade won't twist too much at the tight curves.

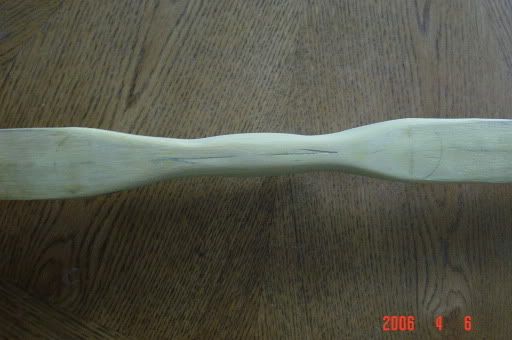
then i layed out and cut out the rough width profile, leave 1/6 around the whole bow so you can rasp out the blade marks, and so if you miss a bit it won't matter. my design was 1 5/8 wide at fades, tapering to 1 1/2 at midlimb, then on to 3/8 tips. oh and the bottom limb is 1 inch shorter. now i cut out the thickness profile. i started with 1/2 thick limbs th entire length, i cut the  thickness on my bandsaw also but i do this special, you tip bow so that the blade comes out 1/2 thru the belly side then do the same thing from the other side, that way you know your not leaving any hinges. like this

the result on the stave

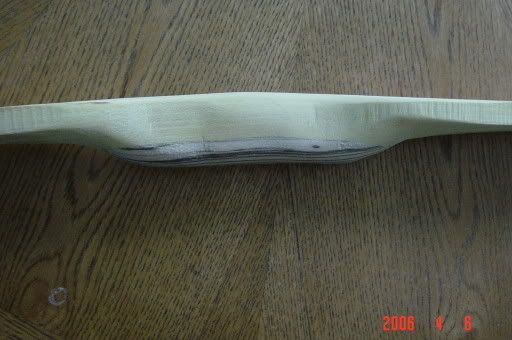
 then i just rasp or blockplane/spoke shave the facets of to leave a flat belly with no lowspots to make tillering annoying, one word of caution though do this very carefully the stave is not supported as securely as it technically should be by the bandsaws table, so make sure you have a good grip on it and have someone near by at the kill switch should something go wrong. OK then since the deflex splice left the belly side of the handle looking horrible i cut the handle evenly at 1 inch thick following the deflex, then boiled some scrap zebra wood and clamped it to the handle to let it take the perfect shape. the boil was for 1/2 hour and it was like working with rubber, i wore welding gloves cause the sucker was hot so be carefull. i glued this perfectly matched riser on and shaped the handle with rasp/file/sandpaper to fit comfortably.


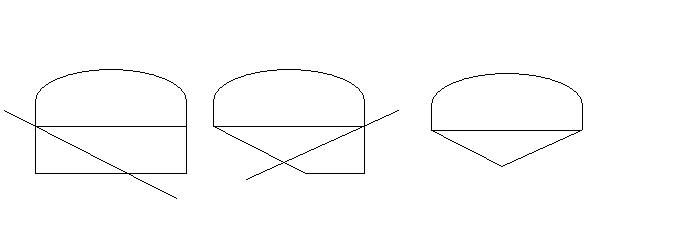
its hard to see but the cross section is a squashed oval 1 1/4 wide max and 1 3/4 deep.
 next we have to heat in the reflex, i rolled the form out of 1/4x 1 1/5 hot rolled mild steel on a bit power roller, i wrapped it in aluminum foil to keep the millscale from coloring the wood black. you could make the form out of any sturdy material this was avalable for me in my shop at my vocation high school. i clamped the tip down to the form then slowly heated and bent the curve over my electric stove a heat gun would be fine, then i let it get hotter still so that it took a deep dark temper.

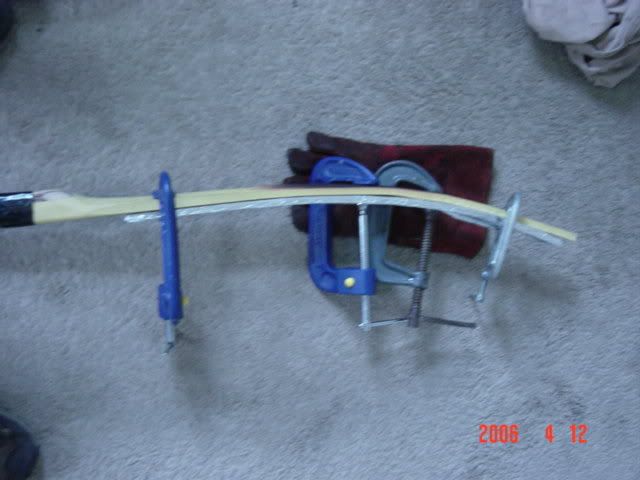
as you can see there is a black wrap around the handle, this is nylon string serving set in 5 minuet epoxy, the serving material was wrapped on tightly enough to stretch it, this is to ensure my splice stays intact, not needed but makes me feel good and its hidden my leather handle later. i elave it on the form for 12 hours to elt it cool, then i did the other limb and waited 48 hours before bending it so it could rehydrate some. here it is all bent and ready to tiller

we'll tiller it tomorrow
« Last Edit: July 10, 2006, 10:05:19 pm by USMC Sniper »

Offline Loki

  • Member
  • Posts: 381
Re: bullsnake on self osage buildalong
« Reply #6 on: June 06, 2007, 08:44:14 pm »
Did it blow up on you?
Durham,England

USMC Sniper

  • Guest
Re: bullsnake on self osage buildalong
« Reply #7 on: June 07, 2007, 03:28:31 am »
sry i forgot about my buildalong. nah it shoots great, 60lb at 27"


think i posted the finnish bow on a diff thread but here it is again. tiller looks off cause the point the reflex was added is diff on each limb, ill use a ruler nextime  :)

Offline Aries

  • Member
  • Posts: 493
Re: bullsnake on self osage buildalong
« Reply #8 on: June 21, 2009, 07:07:46 pm »
That is a pretty familiar bow lol. Ive made a few this stlye lately, they are some good shooters 8)  Ty
"If the only tool you have is a hammer,
                   you tend to see every problem as a nail."
                               ~Abraham Maslow