Author Topic: Sapling Bow Project - Holly (green reduction)  (Read 28232 times)

0 Members and 1 Guest are viewing this topic.

Offline ber643

  • Member
  • Posts: 530
    • Bernie Dunn's Home Page
Sapling Bow Project - Holly (green reduction)
« on: November 18, 2008, 08:46:32 pm »
This is another project that I started elswhere (because I was asked to join in a multi-person Sapling build thread). I ment to start posting my part of the thread to here also, much earlier but just couldn't seem to find time to get started - due to hunting, making bows, remodling carport/shop area, and family considerations. (Ahm so corn-fused  ;) )

I am about half way through it (the sapling bow). I will be (once more) making quite a few posts before catching this thread up. As before I will add something like, "(more to Follow)" at the bottom of each post until I do get it caught up to current. Hope you enjoy it. Oh, slight disclaimier - still don't know if it will end up worth a hoot - but it is kind of interesting, I think. Of course it may not be finished until the second Tuesday, of the fith week, of the 13 month  ;D.

...........................................

Most of you who will look at and read this thread, have come to know these things about me: 1) I'm slower than most everyone else, 2) I tend to take more pictures (probably more than needed) than most others, and 3) I flap my jaws ("talk") a whole lot more than most - LOL. Just wanted to make sure you are all prepared for that. I've pretty well decided, on my own, that the first Holly tree I cut dosen't quite fit Webster's definition of a sapling. That august reference book says "not over 4 inches in diameter at breast height," and mine was a little larger than that. So after it got light (and I had breakfast) I went out and cut a smaller one for this project.

Well I went out this AM (between helping my wife get Halloween decorations and blow-ups put up) and after a while I found a smaller Holly that I think will do for me. I found out that I now have more bigger Holly trees than I do small ones. I'll post the pics I took of harvesting it now, and I'll try to get it debarked this afternoon, and have the other pics then. (Most folks love pics.) This sapling is about 2 1/2" at center (about 2 3/4" at bottom). As you will see, it has a crook but I think I have a "plan" for that.

My "woods"/bush was so thick where I found this sapling, getting a pic of the whole tree was difficult:


When I cut it, it had to just come straight down:


I had to top it (cut top off) while it was still standing straight up, then the top came straight down also - you can see it and it's branches standing in the middle of the pic - to the right of the piece I cut off (laying on the ground):


Back on the lawn, I could get a clear pic of my sapling, and the tape shows where the 6 foot measurement is (a little short of where I cut the toip off):


This pic shows that the halfway point (3 feet) will fall right in the center of the crook. My "plan" is, I think I will try to turn it into a set-back handle, just for kicks:


(more to follow)
"Hunters Are People Too" (My website Premise)
Bernie Dunn
Coastal NC

Offline ber643

  • Member
  • Posts: 530
    • Bernie Dunn's Home Page
Re: Sapling Bow Project - Holly (green reduction)
« Reply #1 on: November 18, 2008, 08:57:00 pm »
Hows this for fast debarking, when I expected it to be a chore. I used my modern Draw knife . I don't (didn't) like it as well as my old one but it's a good one, and sharp. I like it a lot better now. Man it zipped right along with that thin but green bark. Made a mess though (which I cleaned up and took a pic). (I think I will attack my bigger Holly also while I am on a debarking roll, and before it gets any drier.) Then I will come back to This sapling and scrape the remains of the cambium off, and pre-shape it. Only took about an hour and a half to do this one, I'm pleased.

Now it looks like this:


When I debarked my small sapling for this thread, I didn't try to get the cambium too, as I wanted to debark my larger one before it got to tight on me. When I did the big one, I got smart and got the cambium at the same time - LOL. However, when I went back to my one for this thread today, I had to tackle the cambium layer I'd left on. It was, as you can imagine, a little drier - still damp but was more like debarking all over again - I'll know better next time (if I can remember - LOL). Anyway, below it stands in all it's nakedness (kinda pretty wood too) and awaits my shaping attempts. I may do some of it tonight, if I'm not too worn out already. Again, here you can see my planned setback handle area clearly. It should look a lot whiter than in the last pic (unless that cambium just got a lot darker since yesterday). I did this part with my trusty old time drawknife, using it mostly as a scraper :


..............................................

Oh-oh! I was going to show the progress I made last night on shaving the belly down towards the drying state. I may be out looking a new sapling today. As I went to take the picture, I looked at my sapling sitting there in the vice, and realized I put it in upside down last night before starting on it - even after marking it - DOH!. (That's what I get for trying to watch the Presidential Candidates Debate on my wife's portable TV while working on a bow. Should have known better.)

Anybody ever hear of a "set ahead" handle??? Or should I retire this one and head to the woods again? (I can't just make the shaved part the back as there are two many knots there that I cut through, instead of working around.)


I'm gonna go eat breakfast - or maybe I'll just, "go eat worms" -


(more to follow)
"Hunters Are People Too" (My website Premise)
Bernie Dunn
Coastal NC

Offline ber643

  • Member
  • Posts: 530
    • Bernie Dunn's Home Page
Re: Sapling Bow Project - Holly (green reduction)
« Reply #2 on: November 18, 2008, 09:02:27 pm »
So, it's a handle-forward/ahead design then, eh? Well it would be as interesting as a set-back handle, I suppose - and there is nothing unusual about me doing the unusual, that's for sure. Perhaps I will forge ahead, and keep shaving the limbs (belly) down a little more. I can always tuck the happening away in my "memory bank" as a "don't do again" item. LOL - I can deal with the supposed good feel and looks of a forward handle. It's a done deal (if it works); I've already been in there shaving some more on it since my last post. Gotta make up for lost time. If it works out, I may just name it "De-bait" (for a little whimsicle play on words).

I thought I accomplished quite a bit today - then I found out I just did a lot of work - LOL. Like Manny said about David's, I think mine is a "tree" too. This morning before breakfast I scribed lines on the sides to see where I should take the belly down to for pre-shape. In the morning I shaved and (Farrier) rasped the one limb to it's lines, and then this afternoon, I shaved and rasped the other limb to it's lines. I guess I'm really just down to the center of the "tree". Anyway it is still as stiff as any 4x4. If I'm supposed to leave it full width while drying, then apparently I must make it a lot thinner on the belly to get it bending, it seems. (It is only about 1 1/4" thick at the deepest part.) I need to get it to where I can strap it down for drying in order to straighten out the one limb, in particular, soon. Anyway here are some pics of my Holly after todays work.


Horizontal view still in vice - Belly on top:


Standing side view, in which you can see the forward curved handle (to the left):


Standing Belly view, and you can see that i am just begining to shave into the belly side of the handle at the center of it's forward curve:


(more to follow)
"Hunters Are People Too" (My website Premise)
Bernie Dunn
Coastal NC

Offline ber643

  • Member
  • Posts: 530
    • Bernie Dunn's Home Page
Re: Sapling Bow Project - Holly (green reduction)
« Reply #3 on: November 18, 2008, 09:07:54 pm »
All right - I've removed width (though I must take a little more off the lower Limb), and started to shape the handle a little smaller (with mostly a Four-in-Hand Rasp) after discovering, not only does it (the handle area) curve forward but to the right also. I still will take a little more off the belly side before trying to strap it to something for drying. As you can redily see,the sapling is a crooked rascal and I will need to do a lot of straightening. I ran a chalk line and it only touches the limbs at the last foot or so on each end - mostly caused by the offset of the top limb, though the bottom limb has a "nice" little crook in it too. I do think once the stave is straightened (optimist!) the string will pass nicely to the left side of the handle. It's going to be interesting to see if I can pull a bow of any account out of this malformed rascal - LOL

Belly view:


Side View:


Back view:


(more to follow)

"Hunters Are People Too" (My website Premise)
Bernie Dunn
Coastal NC

Offline ber643

  • Member
  • Posts: 530
    • Bernie Dunn's Home Page
Re: Sapling Bow Project - Holly (green reduction)
« Reply #4 on: November 18, 2008, 09:18:40 pm »
I coated the ends and back of my "sapling" with white glue (couple more coats) yesterday to prevent cracking while it's drying. I will go get some more rachet straps today and see if I can convince it to straighten up it's self some during that period. I'll post a pic if I can get it strapped decently. If I can't, I may strap it to a stick of dy-no-mite!

......................................

Now I am going to post what I have done to start the straightening process on my own goofy stave/bow - strapping it down. It is a little picture heavy but I think that is the best way to explain it and hope y'all won't mind, and might even get usable ideas from it. It also, of course, has drawbacks, and may not work well or as compleatly as I would like it too but, if not, I can then resort to heat/steam. Bear in mind, this is only used in conjunction with the drying time. I used a similar process to straighten twisted vine sticks that I wanted to make walking sticks out of. I strapped those to the leggs of my shooting tower but they are smaller (as were those saplings). Also those saplings still had their bark on them so I didn't worry about rain. With this sapling, since I am using washable white glue to seal the ends and back, if/when it rains, I will have to reapply the sealant, after the rain - one of the drawbacks I guess.

Here we go. I used Ratchet Straps because they are easier to use and to adjust the leaverage/tightness, etc as the stave dries. (and I have arms like toothpicks ). If you have normal arms (and strength) you could use belts, rope, bungee cords, dog leashes, well, you know what I mean.

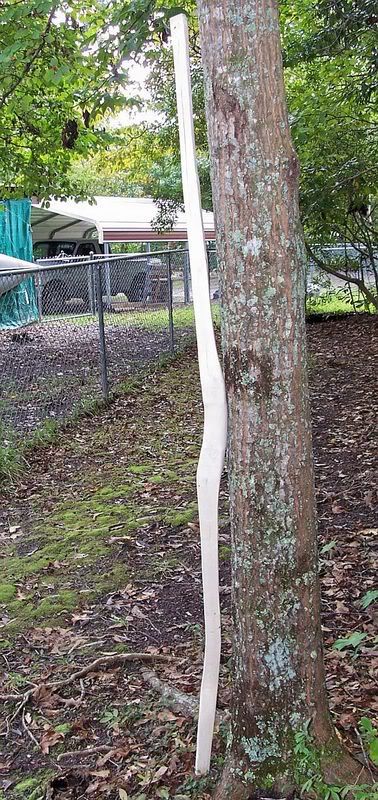
The first pic shows the sapling, pre-shaped and sealed, standing against my "Stake", (which, as you can see, is a stout tree, Oak), just to show how the limbs deviate in ways I prefer them not to:


(It is time for supper - so I will post this part, to make sure I don't lose it, and then continue the pics/process after I eat.)

..........................................

I'm back and will continue. I did enjoy supper, thank you. It doesn't take me long to polish off Rose's Home made Turkey Soup and Cornbread - LOL.

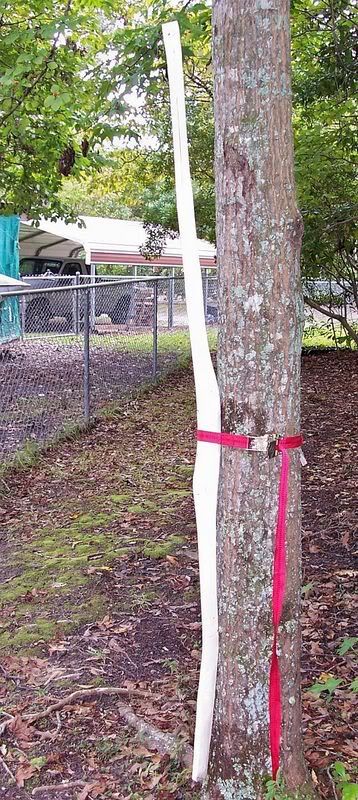
I now strap the bow at the handle area, as that is what I decided I want to be in the center, or to the right, of the limbs, if possible. You can see how this makes the top limb,and the very bottom end of the bottom limb (below the "whoopty" curve that I'm not too worried about), deviate farther to the left of center (as we are looking at it):


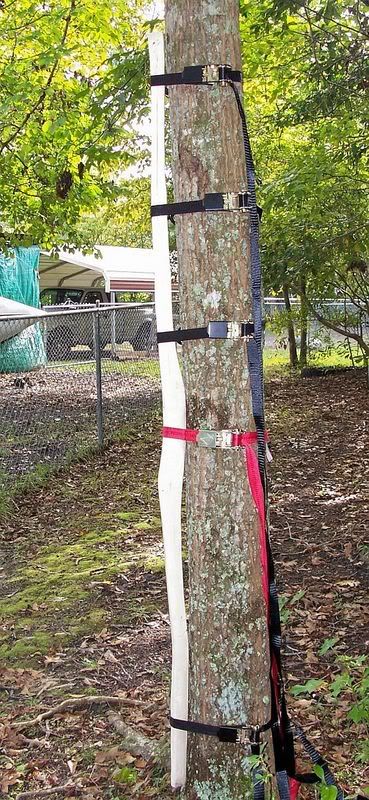
I put a strap above the first, where the top limb starts to deviate to the left, to help hold the bow in place and to start that wild top limb moving in towards the tree:


Next we drop down to strap the bottom in to the tree, as it needs to come the least distance but, at the same time, we don't want the pressure on the top limb to make the bottom limb move out further. We will adjust (loosen/tighten) these straps as we put the others on, for the optimum straightness that we can get at this time, without stressing the wood too much at a time. Remember we can tighten/re-adjust daily as it moves, we don't have to do it all at one time, and sometimes can't:


Now back up to the center, and then top, of the top limb with two final straps, to draw that errant limb in closer to the tree - and adjust all of them if needed:


I was lucky this time and really needed very little pressure on any of the ratchets to straighten this piece of wood pretty well. As it dries the straps will/may tend to loosen, so they have to be watched and tightened if needed, so as not to lose what you gain, IMO.

After adjusting and checking all the straps, bow, and pressure points, I hang the bag that I tote my rachet straps around in, on one of the rachets - to store the long straps in (off the ground):


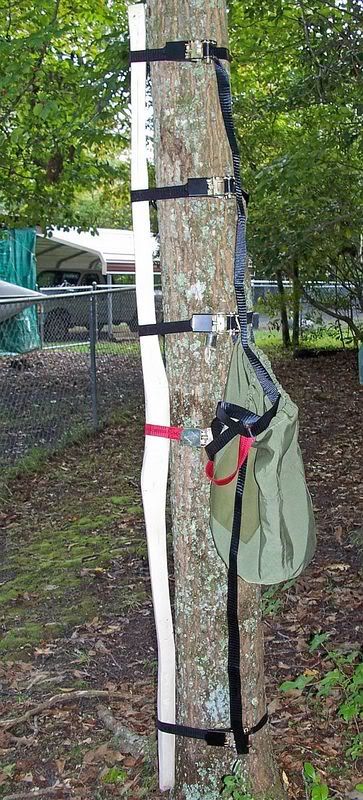
One final pic from the other side to show the strap hooks there, and it also gives a little better view of the stave/sapling/bow, because of where the light was coming from - I think:


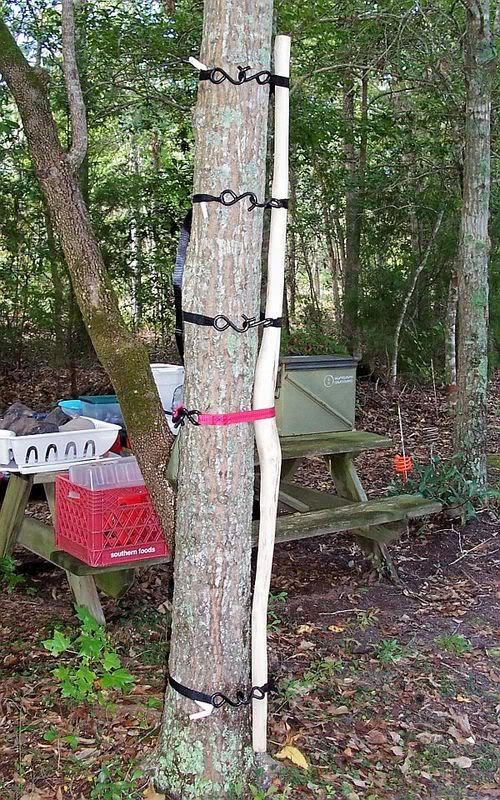
(Hope this was of interest to you all - either for now, or to store in your memory banks for later, if you've never tried anything like it before.)

It's kind of like Nature's own forms, utilized for my purposes, instead of making forms. Also, if it doesn't work, then I am in perfect position to revert to my New England heritage and "burn the witch at the stake"!

(more to follow)

"Hunters Are People Too" (My website Premise)
Bernie Dunn
Coastal NC

Offline ber643

  • Member
  • Posts: 530
    • Bernie Dunn's Home Page
Re: Sapling Bow Project - Holly (green reduction)
« Reply #5 on: November 18, 2008, 09:29:07 pm »
Here is my pre-shaped sapling bow after applying Manny's suggestion of "decorating it for Haloween" in some black plastic . Hoping to help drive the moisture content down a little quicker while it is strapped down in straightening position. Hain't it purty, all dressed up for the spooky party?


................................
WRONG - Manny explained his meaning further.
................................

Ooops - no problem, Manny, I'll correct that easily first thing in the AM. If I'd stopped to think, I would have known it (the moisture) needed an escape "hatch" or it would condense right back into the wood, especially with the plastic touching it. There I was trying to "seal" it all up (as David implied, like a person in a torture chamber - LOL). In fact I will go out and loosen the ends to let some moisture escape tonight , if it wants to - LOL. It made sense to me, Manny, I just didn't think about it enough - I really know better. Sometimes i just don't trust my own common sense as much as I should - if it's something new.

...............................

Remodling the black plastic "Hot Box" for drying my stave/bow. A couple of treated landscape timbers, that we have laying around, Strapped to the tree, top and bottom, will form the sides nicely - to act as standoffs for the plastic covering. BTW, I will most likly cut 1 1/2" off each end of this stave after drying. That will still leave me a 68" length, and will eliminate that lump at the tip-top that is formed by a cluster of 3 nasty knots:


There, now we have something that looks more like a proper coffin for Countess Dracula (only with open ends). Now, I hope it will draw in enough sun heat, and drive enough moisture out, as it is supposed to cool back down this weekend:


Referring back a little, I said, due to the cold front (and rain) moving in tonight, that I had better dismantle my sapling Hot Box . I did that with the idea in mind that if I need to set it back up later (and the weather reverses) to continue drying and straightening, then I will. Also referring back, when earlier pictures showed the limbs heading off to different points of the compass, I believe I mentioned that I tried to run a chalk line on the center of the would be bow, and it only touched the limbs for about a foot at each end (yuk!).

Well, again today we saw no Deer, unless we count the one I had bust out of a field, turn down the side of the road, and "race my truck" as I was heading towards our hunting place. What the hey! Oh well, at least that was pleasurable. However, when I "unveiled" my plastic wrapped sapling/bow and started dismantling all of its straight jacket straps, a much more satisfying result met my eyes. Apparently, there had been "a whole lot of straightening going on" and it held its new shape as the straps dropped away, one by one. "Yes!"

I brought the Holly in and took a similar pic (similar to many of my earlier ones, that is) to show the new shape of the top limb and overall bow. I still have some propeller twists towards the end of each limb and the "whoopty" curve in the bottom limb to deal with, but I'm pretty pleased:


I then decided to try running a chalk line again - just for kicks, which I then darkened with a felt tip so y'all could see it too:


Now, I don't know if this will hold (don't really know how dry the sapling bow is, but it is much lighter in weight). In any case it seems to have helped, and some of the, still needed, work may be a bit easier to do now - we'll see, eh?

(more to follow)
"Hunters Are People Too" (My website Premise)
Bernie Dunn
Coastal NC

Offline ber643

  • Member
  • Posts: 530
    • Bernie Dunn's Home Page
Re: Sapling Bow Project - Holly (green reduction)
« Reply #6 on: November 18, 2008, 09:37:30 pm »
 am doing some rasping on my bow right now - still shaping and floor tillering as I go. It seems pretty dry now, and not loosing much more weight daily. At least not other than I would expect from the wood I am taking off with the rasp. Got to get it down to where I can get string nocks on it - soon, I hope. As soon as I get any significant change in looks, I will post pics again - if all goes well.
.....................................

I picked up a new workbench and vice yesterday (so I can have one inside, and outside) so I am going to be busy for a couple days or so, changing tables, vices, and other furniture/tools around to make my two work stations more "Bernie friendly" - I hope - I promise though, that I will try to continue a little shaping on my sapling bow, between bouts of exhaustion -
....................................

Thanks, I got things pretty well put back together (in the new configuration) where I can at least work at either station. As I mentioned before, a lot of periphiral work to get things completely like I want them. Spent a little time on filing my bow this AM and will again in a few minutes. Might even take a pic of it - just to show off the "new" "glory hole room" work station - LOL.
..............................

Here is a pic of a little shaping started on the handle of my Holly sapling bow:


And here I changed it's position in the vice and backed off - so you can see the early shaping of the whole bow (and the new work bench and station - LOL) You can see the table is shorter giving me more room to work on the bow without crowding the bow rack on the closet door, and a bit higher for comfort, also has a peg board back for handier place to put tools - as well as a couple drawers (behind the drop cloth):


I knew I was going to have to shift more "stuff" but thought I could at least work, "as was" last evening. However, this AM I went to make my sapling tips a little smaller, for a start, and found that, with the new workbench also being narrower (in Depth), The chest of drawers that used to be in the corner was now in the way (of my elbo). My wife came up with a quick fix idea, and now the chest is against the side wall (as I enter), and the narrower racks that were there, are now stacked in the corner (where the chest was). AND the sapling tips then got a little smaller - LOL. (and a lot of smaller stuff also got moved in the process - of course as you probably can notice, my horses are now looking for a new "pasture") :


Thanks, - I can fully understand any confusion (about my spaces) however, some of the folks who read here have seen pics of my work spaces (bench inside, and tillering tree in carport) in my threads so many times recently (and still are seeing them) that they probably know my spaces almost as well as their own . Besides Folks get ideas from other folks spaces, just as you guys did with the drop cloth (table cloth) . With that in mind I will finish the changes off with two more pics - because (hopefully) they will be seen a lot of times in future threads as well - I moved the big table, from my glory hole room to the carport, and replaced a small work bench with it to give me more room for my grinders (under the back 2 plastic boxes), and my small electriic hand tools (saws, drills hand sanders, etc.) inside the front two plastic boxes - all to keep down humidity damage:


Then I used the (old) small work bench (set free by the big table) to mount my new vice and my belt sander on - in the middle of the carport, across from my "tillering tree" on the far wall - giving me also a place to work my tillering rope, camera, etc. from:


OK - now I'll leave that stuff, so as not to confuse anyone more than I may have already -

(more to follow)

"Hunters Are People Too" (My website Premise)
Bernie Dunn
Coastal NC

Offline ber643

  • Member
  • Posts: 530
    • Bernie Dunn's Home Page
Re: Sapling Bow Project - Holly (green reduction)
« Reply #7 on: November 18, 2008, 10:00:50 pm »
After getting that all done the last two days or so, this afternoon I could enjoy it all, while scraping and filing my bow down more. Hope to start tillering before too many more days. Now the sapling/bow looks like the below pics.

Side View:


Belly View:


Back View:


Oh, when I mentioned the horses "looking for a new pasture", I just ment the horse statues, that used to be on the chest of drawers, are now in boxes in the storage shed - waiting for us to find a new place to put them - smile. I have a lot of horses in a number of places around the house.

By the advice of my local teacher, Mike, (and my own good experiences following his advice) I like to leave anything other than large adjustments (like the one I did with the ratchet straps) until I see how it pulls, when I start exercising it a lot (during tillering and short draw shooting). Quite often small adjustments seem to iron themselves out and become non-problems. I may try to leave the handle off-set, even though I will have to be careful that it doesn't cause me to torque the bow when drawing - we'll see about that. I think that, if the bow is not dry, that it must be very close to it - this reckoned by weight and behavior under the draw knife and rasp.

Holly Sapling Bow, belly view - progress:


I've taken my handle down quite a bit (not 3/4" yet, though - LOL) and the area around it some also but I want to try to do some more before posting pics. I may take one at this stage though and then post it along with the next one I take, after some more work.

I'm slimming it down some - slow but sure - and getting closer to doing some heat bending. I also took a little more off the belly and sides and it is beginning to bend a little, rather nicely. My "newer, slimmer" Holly :


It dawned on me that you might not be able to see the difference all that redily (although the shape is a little different too) so I fastend the ruler to it with a rubber band and took a close-up of the handle. You can see it is now 1 1/4 to 1 3/8" wide at the handle (originally, as I recall, it was about 2 1/2" and a much deeper curve in the handle):


I may still take it a little smaller before bending - I'll decide tonight or tomorrow

(more to follow)
"Hunters Are People Too" (My website Premise)
Bernie Dunn
Coastal NC

Offline ber643

  • Member
  • Posts: 530
    • Bernie Dunn's Home Page
Re: Sapling Bow Project - Holly (green reduction)
« Reply #8 on: November 18, 2008, 10:07:10 pm »
I did some more rasping and scraping on my handle this AM and set things up for some dry heat bending. My first set-up broke the base board on my little adjustable "work bench - el cheapo but handy), so I had to fall back and regroup. I then went to a 4x4 to replace the base board (it'll still be useful - maybe more so). My little "forms" are two halves of an old triangle whetstone holder (they make pretty good ones too).

Basic Set-up:


Put some aluminum foil over the 4x4, for protection of it, and reflection of the heat up onto the underside of the handle/bow, and put the heat gun to her:


Moving the gun slowly back and forth on 3 sides of the bow, until the handle was too hot to lay/leave my fingers on it comfortably:


After it was heated well, I quickly slapped 3 clamps on it (one heavier one). Right now it is cooling down:


I still may have to do it again (couldn't go any tighter on the clamps, with the "forms" placed where they were) but I will wait for it to cool real good first. Then I will try to take the curve out of the bottom limb, before I decide whether the handle needs more straightening or not. More pics later. (Don't know if I'm getting anywhere, or not, but I'm having fun and getting practice.)

(more to follow)

"Hunters Are People Too" (My website Premise)
Bernie Dunn
Coastal NC

Offline ber643

  • Member
  • Posts: 530
    • Bernie Dunn's Home Page
Re: Sapling Bow Project - Holly (green reduction)
« Reply #9 on: November 18, 2008, 10:22:19 pm »
More heat treatment (my back gets one next - )
Trying to take out some of the "whoopty" (curve) in the bottom limb - same heat gun proceedure:

More heat treatment (my back gets one next - )
Trying to take out some of the "whoopty" (curve) in the bottom limb - same heat gun proceedure:


Then back to the handle only a little more on the upper portion of it:


Neither of them moved quite as much as i would have liked but was able to straighten things some. I layed a string on it and it looks a lot better. (still a little twist in the end of each limb I may have to deal with later). I will do some more shaping, see how it looks then, and try to bring it closer to tillering stage tomorrow. But before I start any tillering I will see if I need to try a little more heat straightening first.

After the bow cooled off I stood it up, and it does look enough better to warrent another pic tonight. (It may look even better after I do a little more shaping in the AM.):


(more to follow)


"Hunters Are People Too" (My website Premise)
Bernie Dunn
Coastal NC

Offline ber643

  • Member
  • Posts: 530
    • Bernie Dunn's Home Page
Re: Sapling Bow Project - Holly (green reduction)
« Reply #10 on: November 18, 2008, 10:27:49 pm »
Just barely a floor tiller, at this point as I haven't been (and didn'get to today either) taking any off the belly (or edges) lately - while messing with heat bending and working on handle. I did do some more shaping on the handle today, during what little time I had. It is looking and feelling pretty good now in my hand but not sure if it looks much different in pics. In that position, and at night, the flash washes out the "whlte Holly " some - loosing the shape/edges. Anyway I got it enough smaller (the handle area) that I felt it would heat bend again, if I put the "form blocks" a little further apart than last night. Looks like it worked (same kind of pics as last night). After it cools, if there is noticable change I will take a standing pic again - maybe it'll show the handle shape better too.

Before heat application:


After heat:


Well, the heat allowed a little more alignment of the handle/bow. This time, after cooling, I took a picture of the bow from the side to show the shape of the handle now to better advantage (the width of it now is only about 1 inch - BTW):


(more to follow)
"Hunters Are People Too" (My website Premise)
Bernie Dunn
Coastal NC

Offline ber643

  • Member
  • Posts: 530
    • Bernie Dunn's Home Page
Re: Sapling Bow Project - Holly (green reduction)
« Reply #11 on: November 18, 2008, 10:30:27 pm »
For those who wonder about Holly, from what I've been told about Holly (here), it may not make the fastest or flashiest bow, but it definitely will be a strong and lasting bow, if done right (watching the knots). I like the look and feel of the wood, when you hit clear patches - smile. It's fairly dense, and the fibres seem to be quite interwoven. It rasps/files well and sands nicely - IMO. Scrapes well too, except for the knots. Hope that helps. I believe either Censu or Asier (on Paleoplanet) said that they used a lot of Holly where they are (Malta and Spain).

.........................................

I really like the sort of molded grips and/or Bulbuous ones (as covered by Dean Torges in his "Hunting The Osage Bow" - and on his web site I believe) and or combinations thereof. I went to work on tapering the edges of my bow this AM (used mostly Farrier's Rasp, Four in Hand, and then a cabinet scraper - did use a draw knife in one area where more had to come off). After that action the floor tiller is a little more pronounced. I'll probably take a pic this PM. I'll soon get my nocks filed in and start taking the belly down in thickness.

.........................
Posted on Halloween:

As I promised, a pic of the Holly after tapering the sides to the tips earlier today (belly side). ....... oh, and "TRICK OR TREAT":


Dark Soul, a friend from another country, after seeing that last pic, suggested a name for this sapling - I made the following reply:

"Hollyween", eh? That is not a bad idea, D S, I was thinking something along those lines, when I viwed the pic just after taking it but I didn't think of combinning the words that way - I may just do that, if the bow survives. I really like to use "plays on words" like that. Thanks for the idea. (I did decide to adopt the name, and you will see it used in subsequent posts - of course I may not finish the bow until NEXT Halloween - LOL)

(more to follow)

"Hunters Are People Too" (My website Premise)
Bernie Dunn
Coastal NC

Offline ber643

  • Member
  • Posts: 530
    • Bernie Dunn's Home Page
Re: Sapling Bow Project - Holly (green reduction)
« Reply #12 on: November 18, 2008, 10:37:27 pm »
I did manage to get some scraping (after filing) on the "Hollyween" belly yesterday. A little more today and I'll cut in (file) nock grooves - so I can get a long string on it.
....................................

Some more pics after a bunch of rasp and scrapping, and some heating and bending. You can see, I've cut nocks. Got a long string on but not on the tree yet - heavey rain here yesterday and today.

Some straightening of "propeller" tips (both tips, more to do):


Belly:


Nock:


(Right) Side:


Back:


I've also done some more shaping since the last pic and have more heat/bend proceedures to tackle too- more pics soon.

(more to come)

"Hunters Are People Too" (My website Premise)
Bernie Dunn
Coastal NC

Offline Keenan

  • Member
  • Posts: 4,824
Re: Sapling Bow Project - Holly (green reduction)
« Reply #13 on: November 18, 2008, 10:39:02 pm »
Berney,
   I am very impressd with your progress and the way you have problem solved and taken the care in the curing of your stave. Excellent tutorial for anyone ;)

Offline ber643

  • Member
  • Posts: 530
    • Bernie Dunn's Home Page
Re: Sapling Bow Project - Holly (green reduction)
« Reply #14 on: November 18, 2008, 10:43:05 pm »
Thank you, Keenan - that's a very encouraging and kind thing to hear.
....................................................................

After some more filing, scraping, heat bending, and shaping Here is how Hollyween looks at floor tiller, top limb up:


Bottom limb up:


No, the handle isn't bending, that's it's shape. I will put it on the tillering tree next, with a long string. However, we start on closing in my carport/workshop tomorrow (which is where my "tree" is mounted) so, depending on how well/quick that goes, it may be next week before I can get to tillering.

(more to come)

"Hunters Are People Too" (My website Premise)
Bernie Dunn
Coastal NC