Author Topic: Making a tillering gizmo  (Read 14237 times)

0 Members and 1 Guest are viewing this topic.

Offline Eric Krewson

  • Member
  • Posts: 5,311
Making a tillering gizmo
« on: May 11, 2010, 11:44:34 am »
Thought I would add this to to this board as I often make reference to it.

Since I made my initial tillering gizmo there has been an input of ideas to make it work better from other bow makers. Consequently it has evolved into a differently made tool than my original design.

Here is how to make the latest version. I use a drill press, bandsaw and belt sander because I have them. This tool can be made out of any scrap wood, holes drilled by hand, out of square and work just fine.

I cut a large downed cedar looking for a bow stave. I may or may not have found a stave but I definitely found a bunch of beautifully grained gizmo material.

I start by cutting a piece of wood 1" square and 6" long. You can make the gizmo longer if you want to, length is not a critical issue


A little sanding to get rid of the saw marks.


Mark the center of the block length wise and center.


Drill a 5/16" hole on the center mark.


I use a 1/2" forstner bit to cut A 1/2' deep hole over the 5/16' hole I just cut. The forstner bit cuts a clean hole but any 1/2" bit will work just fine.


Next I mark the ends of the block with a 45 degree angle to shorten side opposite the pencil of the gizmo. This allows one to run the gizmo closer to the tips while tillering.


I cut on my lines


I tap a 5/16" nut into the 1/2" hole and seat it all the way down with a piece of dowel.


Offline Eric Krewson

  • Member
  • Posts: 5,311
Re: Making a tillering gizmo
« Reply #1 on: May 11, 2010, 11:46:59 am »
Too many pictures for one post so here is the rest of the story.


Screw a pencil into the nut(I put the pencil in a vise and screw the gizmo on it) and you are ready to tiller. I sand the pencil a little after I cut thread on it so it will screw in and out easily. It only took me 10 minutes to make this tool, start to finish.

With a little Tru-Oil this will be a beautiful little tool, it has a wonderful grain pattern.


Offline Eric Krewson

  • Member
  • Posts: 5,311
Re: Making a tillering gizmo
« Reply #2 on: May 11, 2010, 11:50:38 am »
USING THE TILLERING GIZMO


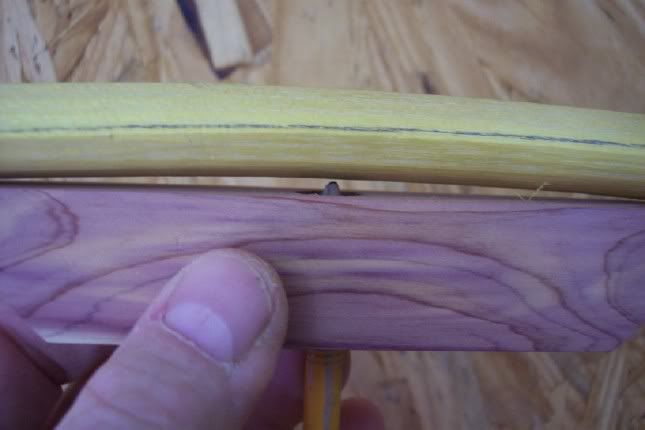
After floor tillering your bow, bend the bow slightly on your tillering tree or tillering stick using the long string. Retract the pencil in the Gizmo and run the wood block up the bow’s belly and find the widest gap. Screw the pencil in the block to a point it is almost touching the bow’s belly at the point where you found the widest gap. I change the angle the pencil has been sharpened to a very short angle and sand the tip of the pencil flat for the best results in marking the limb. This lets you work very slight bends.


Initially I set my gizmo pencil about 1/8” off the limb for the first few corrections. This course setting will mark only the stiffest spots. If you set the pencil too closely for your first few passes it will mark the whole limb.

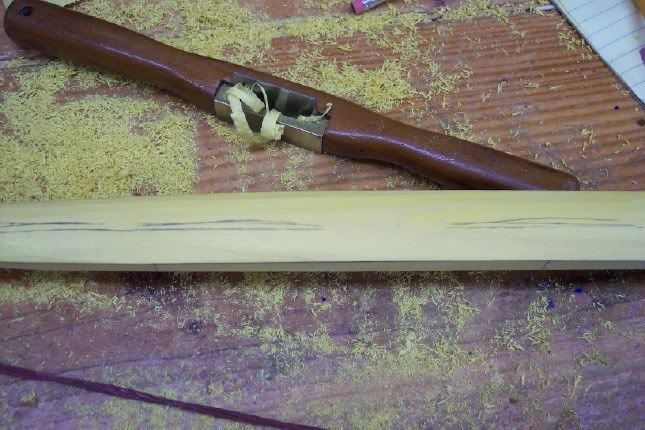
Run the Gizmo up the belly making sure it is centered on the limb. The
pencil will mark non bending areas that need wood removed. Always check the entire limb with the gizmo every time you use it and scrape wood from all the stiff spots at the same time, not one stiff spot at a time.  Start on the long string, continue at brace and up to about 20” of draw. You do need to have a way to hold your bow string while you mark the limbs with the Gizmo. 

I often set my gizmo for one limb and use this setting on the opposite limb as well. This way you will end up with two closely matched limbs.
                                               
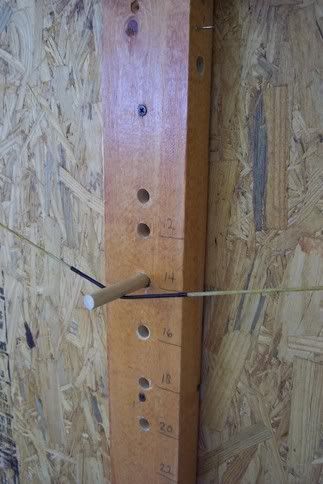
I have holes in my tillering tree and insert a 3” piece of dowel in one of the holes to hold the string with the limbs slightly bent while I mark the limbs with the gizmo.


Go slowly, no more than ten scrapes on the marked areas of the limb, flex the limb 30 times and recheck. I have found it usually takes 5 or more check, scrape and check sessions to get a stiff spot moving so be patient.  You can get the limb bending perfectly this way. You will still have to eyeball bending in the fades but the rest of the limb will be perfectly tillered. Hinges will be a thing of the past.


Make a few passes with the gizmo on your limb and the areas that need attention will be perfectly obvious. You can fine tune the tillering by closing the gap between the pencil and limb to almost nothing. At this point I like to use a cheap orbital sander to remove both wood and any tool marks that are left. With course sand paper, the sander will leave tiny swirls in the wood so I like 220 grit for my final tillering work with the sander and follow with a light hand sanding.

The gizmo doesn’t work in the fade out area of the riser so you will have to eyeball the bend in this area or put a flat board across the back of the bow in your tillering tree and watch the gap between the back of the bow and the board to see where the limb is bending.   

Tillering that once took me hours to get close  takes me about 45 minutes with the Gizmo and the end result is close to perfect.

Remember the key thing to remember for proper tillering is using a scraper or sand paper and work slowly, only scrape off your pencil marks, flex the bow and recheck. I often make a zig-zag pencil mark from one side of the limb to the other over the gizmo’s pencil mark to make sure I remove equally from one edge of the limb to the other.

 If you ever get the urge to grab a course rasp or use a belt sander to speed things up even more, take a coffee break and come back when these thoughts have passed.

Offline dmassphoto

  • Member
  • Posts: 187
Re: Making a tillering gizmo
« Reply #3 on: May 11, 2010, 12:19:50 pm »
Thanks!  This is going to give me an excuse to steal one of those little pencils next time I go golfing  :D

Offline Jesse

  • Member
  • Posts: 2,128
Re: Making a tillering gizmo
« Reply #4 on: May 11, 2010, 12:30:18 pm »
Im sure a lot of guys will find this very helpful. Thanks for posting.  I tried one a few years ago and it worked good. The reason I dont use one alot is that I seem to like building r/d bows where you wouldn't want the whole limb bending the same.  Also do you think character staves might present the same problem ?   
Great instructions and great pictures. Thanks :)
"If you can find a path with no obstacles, it probably doesn't lead anywhere."
    --Frank A. Clark

Offline Eric Krewson

  • Member
  • Posts: 5,311
Re: Making a tillering gizmo
« Reply #5 on: May 11, 2010, 02:07:08 pm »
No problem with snakey bows but this tool won't work well with a roller coaster limb. It does work well on board bows, round belly bows and flat belly bows.

bowkee

  • Guest
Re: Making a tillering gizmo
« Reply #6 on: May 11, 2010, 04:39:11 pm »
Thanks for that instruction. :)

Offline Jim Davis

  • Member
  • Posts: 1,337
  • Reparrows
    • Reparrows
Re: Making a tillering gizmo
« Reply #7 on: May 11, 2010, 11:41:28 pm »
Eric, I have thought your gizmo was a great idea from the start.

A decade or so ago, I read in "Archery the Technical  Side," about a device to do the same thing, called with tongue in cheek, a "bend-o-meter" if I remember Correctly. It used a dial indicator and was far too complicated in use. One had to record the readings at different stations on the limbs and scrape accordingly.

Your gizmo is much more practical! I made one of the dial indicator versions and only used it a couple of times before I realized it was just too involved.

Jim Davis

Kentucky--formerly Maine

Offline AncientArcher76

  • Member
  • Posts: 1,113
Re: Making a tillering gizmo
« Reply #8 on: May 12, 2010, 01:16:12 am »
Ive used this method before and it works!  Thanks for posting it it will give others a good idea on "gizmos" to help perfect their craft.  Have a good day!

Russ
Time, dedication, cuts, tons of broken rock, a wife, and perhaps a few girlfriends are some of what it takes in becoming a skilled flint knapper!!!
 
"Ancient Art"  by R. Hill

Offline Postman

  • Member
  • Posts: 1,154
Re: Making a tillering gizmo
« Reply #9 on: May 12, 2010, 01:30:23 pm »
Great tutorial and advice on using it!
"Leave the gun....Take the cannoli"

John Poster -  Western VA

Offline hillbilly61

  • Member
  • Posts: 893
  • Fly straight and true
Re: Making a tillering gizmo
« Reply #10 on: May 23, 2010, 04:34:03 pm »
 Thought this needed to be backon the 1st page for anyone that might have missed it. Very nice Eric ;)
I will say of the Lord,"He is my refuge and my fortress;
  My God, in Him I will trust."  Psalm 91:2

Offline okiecountryboy

  • Member
  • Posts: 502
Re: Making a tillering gizmo
« Reply #11 on: May 23, 2010, 06:50:40 pm »
has this been archived?
would'nt be a bad idea to do so
Ron
God, honor, country, bows, and guns.

Offline Pat B

  • Administrator
  • Member
  • Posts: 37,495
Re: Making a tillering gizmo
« Reply #12 on: May 23, 2010, 06:52:36 pm »
I can move it to the "How To" section. Just let me know.
Make the most of all that comes and the least of all that goes!    Pat Brennan  Brevard, NC

Offline Sidewinder

  • Member
  • Posts: 1,946
Re: Making a tillering gizmo
« Reply #13 on: February 19, 2014, 11:14:36 am »
Eric,

I was reading another post where this was mentioned and thought I would look it up. seems like a great little tool and I have decided I am gonna make one. Gotta question though....

- If you don't want the wood to bend in the last 10" or whatever on the levers, say like on a molly or something like Blackhawk makes like a modern holmgard, do you stop the marking when you reach the areas you want to bend?

Thanks in advance Danny
"You know a tree by the fruit it bears"   God

Offline Pat B

  • Administrator
  • Member
  • Posts: 37,495
Re: Making a tillering gizmo
« Reply #14 on: February 19, 2014, 11:22:33 am »
A tillering Gizmo only tells you where the working portion of the limb is not bending enough. In non-working areas it is not necessary. Every wood bowyer should have a tillering gizmo in his tool kit.
Make the most of all that comes and the least of all that goes!    Pat Brennan  Brevard, NC