Author Topic: 16th century Spanish "ballesta" crossbow - with shooting videos and testing info  (Read 60322 times)

0 Members and 1 Guest are viewing this topic.

Offline Dane

  • Member
  • Posts: 1,870
Re: 16th century Spanish "ballista" crossbow
« Reply #30 on: December 07, 2012, 07:16:15 am »
Next, I laid out where the front bearing block will go. I did this at an angle to give me the most "meat" in a very tiny piece of bone. The blocks will be flush on the top surface of the stock/tiller. I used a 1/8" and 1/4" inch chisel and went slow and easy, and it was really not as difficult as I had anticipated.


« Last Edit: December 07, 2012, 07:22:59 am by Dane »
Greenfield, Western Massachusetts

Offline Dane

  • Member
  • Posts: 1,870
Re: 16th century Spanish "ballista" crossbow
« Reply #31 on: December 07, 2012, 07:22:07 am »
And finally, there is the front bearing block. A little more work needs to be done to get a better wood to bone fit, but overall, I am pretty pleased.


Here it is with the lock plate held into place with finger pressure.


I started the rear bearing block, which is not as deep or heavy, and that should be all done and ready to glue in today.


After that, Final touchup of the metal plate inletting, and I can then make the arrow groove and inlet the trigger, sometimes called the tickler.

Dane
« Last Edit: December 07, 2012, 07:25:26 am by Dane »
Greenfield, Western Massachusetts

Offline Del the cat

  • Member
  • Posts: 8,279
    • Derek Hutchison Native Wood Self Bows
Re: 16th century Spanish "ballista" crossbow
« Reply #32 on: December 07, 2012, 08:52:01 am »
I wouldn't have thought it needed a rear bock as all the force is pulling it forward?
Do have a precedent for the bearing blocks? I've not seen a crossbow of that era dissassembled so I've no real idea.
Del
Health warning, these posts may contain traces of nut.

Offline Dane

  • Member
  • Posts: 1,870
Re: 16th century Spanish "ballista" crossbow
« Reply #33 on: December 07, 2012, 09:14:49 am »
I honestly am not sure why crossbows have a rear bearing block (called foreseat and rearseat by Jens Sensfelder, a major German authority on crossbows), but they do seem universal with crossbows having rolling nut lock systems. You can always see them. They look like little bone strips in front of and behind the nut. With heavier bows, they seem to have been pinned into place vertically.

Dane
Greenfield, Western Massachusetts

Offline Del the cat

  • Member
  • Posts: 8,279
    • Derek Hutchison Native Wood Self Bows
Re: 16th century Spanish "ballista" crossbow
« Reply #34 on: December 07, 2012, 09:26:49 am »
I honestly am not sure why crossbows have a rear bearing block (called foreseat and rearseat by Jens Sensfelder, a major German authority on crossbows), but they do seem universal with crossbows having rolling nut lock systems. You can always see them. They look like little bone strips in front of and behind the nut. With heavier bows, they seem to have been pinned into place vertically.

Dane
Cheers, I didn't realise they went so deep. I'd thought they were just sort
 of decorative strips that protected the edges of the socket. It's good to learn new stuff.
Del
Health warning, these posts may contain traces of nut.

Offline JW_Halverson

  • Member
  • Posts: 11,823
Re: 16th century Spanish "ballista" crossbow
« Reply #35 on: December 07, 2012, 01:41:26 pm »
Having incredible hindsight, would it have been easier inlaying the unshaped bone into the stock and then boring out the space for the roller?

I am fascinated with the bone bearqings, had no idea they were used for this purpose.  Thanks for the education, Dane.
Guns have triggers. Bicycles have wheels. Trees and bows have wooden limbs.

Offline Dane

  • Member
  • Posts: 1,870
Re: 16th century Spanish "ballista" crossbow
« Reply #36 on: December 07, 2012, 03:50:22 pm »
My pleasure, Del.

JW, I did try that with an earlier project. I inletting the two bone blocks into a wooden block, then drilled the nut socket into this, the idea being to then make and drop it into a mortise chiseled into the top of the tiller. But the heat from the drilling operation (I use forstner bits) ended up seperating the glue line on both blocks from the heat of the drilling. This was with 2 part epoxy. Other glues may work better, but it was a great deal of work, and this method is a lot faster and more satisfying for me.

Dane
Greenfield, Western Massachusetts

Offline Dane

  • Member
  • Posts: 1,870
Re: 16th century Spanish "ballista" crossbow
« Reply #37 on: December 07, 2012, 04:02:50 pm »
Today, I got to stay home and work from my home "office", revision work, and at 8:40, I was in the dentist's chair to fix a filling that had fallen out on Monday. No novicane, I was out of there in about 40 minutes, so huzzah!

So, I get to spend some time in the shop.

I finished making the rear bearing block, and then inletted it. Everything went well, and I think the second one is a little better. Still a TINY bit of addtional work for both sides, but I am about ready to glue them in.


Finally, I began the trigger / tickler. This is 0.375" x 0.5" 1018 barstock. Being not a smith, it was fun. I measured where I wanted two bends, then clamped it in my vice, and grabbed hold, and began bending, with much grunting and such. Of course, the bar was so long, it slammed into the garage door chain mechanism, so I cut it and then proceeded to bend again, using my body weight. I then put in the second bed so it is a longish s-shape now. This follows the pattern of the actual Spanish crossbows, and they are as long as the tiller / stock, all the way to the butt. It actually was not too bad, and I did a bit of addtional "adjusting" (meaning pounding the hell out of it with a sledge hammer as the trigger rested on a big wooden stump I use for brute force fun. :)


Now, since I am going to have to wait for glue to dry, I am using a program called Google Sketchup (free and a lot of fun CAD for challeged folks like me, ha ha) to find the exact placement of the axel pivot hole. I will go into this later, but the idea is that you want to NOT push the nut forward in it's socket as you push on the trigger. The trigger as it engages the sear will just push the nut forward if you don't factor this in and create a kind of convex surface. If that makes no sense, it will later.

More soon,

Dane
« Last Edit: December 07, 2012, 04:07:22 pm by Dane »
Greenfield, Western Massachusetts

Offline bow101

  • Member
  • Posts: 2,235
Re: 16th century Spanish "ballista" crossbow
« Reply #38 on: December 07, 2012, 06:50:50 pm »
 ;D Lol I have built 1 cross bow, a low shooter because of the trigger design, it was an experiment. Soon I will build A medievel style cross bow with the roller nut trigger.
Just want to say that for the roller nut, what I have got is old bed legs some of them are hardwood, you just have to grind away untill the taper is level. Other sources are old rolling pins for rolling bread dough, hundreds of them in the thrift shops. good luck..... ;D
"The privilege of a lifetime is being who you are."  Joseph Campbell

Offline Del the cat

  • Member
  • Posts: 8,279
    • Derek Hutchison Native Wood Self Bows
Re: 16th century Spanish "ballista" crossbow
« Reply #39 on: December 07, 2012, 07:05:06 pm »
;D Lol I have built 1 cross bow, a low shooter because of the trigger design, it was an experiment. Soon I will build A medievel style cross bow with the roller nut trigger.
Just want to say that for the roller nut, what I have got is old bed legs some of them are hardwood, you just have to grind away untill the taper is level. Other sources are old rolling pins for rolling bread dough, hundreds of them in the thrift shops. good luck..... ;D
I wouldn't use wood, it could just snap off across the grain and would thus be rather unsafe.
Horn, bone, antler, steel (or aluminium or nylon if you don't mind modern materials). All of those except steel will need an insert for the sear.
There are simple safe wooden mechanisms.
Del
Health warning, these posts may contain traces of nut.

Offline Dane

  • Member
  • Posts: 1,870
Re: 16th century Spanish "ballista" crossbow
« Reply #40 on: December 07, 2012, 07:28:46 pm »
I agree with Del, but for low poundage crossbows, you can use a hardwood nut. Just remember, low poundage, and be sure the grain configuration is right. I know one crossbow builder who did use walnut for his nut, but you will need to insert a metal sear. In medieval times, it was a steel wedge inset into the nut from benieth.

Moose antler is about the most perfect material. I use stems, and turn them on a metal lathe. This material can handle up to 1000 pounds or more, and you can drill and insert steel pins in the nock ears to reenforce them. Not all antler will work, though, and stuff with a lot of pith will not be that desirable.

Delrin is a thermoplastic that is actually a fantastic material for nuts up to maybe 200 lbs. Very easy to work, and it comes in rods of various diameters. You can get different colors, and the cream and white colors look a bit like antler from a few paces away. I have a very dark grey, almost black, that looks really nice polished up.

ABS is also a plastic that you can use, but up to a certain poundage, say 100 to 150. Steel makes for a slow nut, and so a slower bow, but you can machine in the sear out of the nut material and drill some holes to lighten the thing a bit.

Aluminum I would stay away from. It is easy to machine and work with hand tools, but it oxydizes an ugly black that gets all over the place, and gums up the nut socket pretty quickly.

Dane


Greenfield, Western Massachusetts

Offline bow101

  • Member
  • Posts: 2,235
Re: 16th century Spanish "ballista" crossbow
« Reply #41 on: December 07, 2012, 08:02:24 pm »
 ;D LOL... ;D Oh I hear yaaa. low poudage your are ok using wood as a roller nut. The one I built is only around 50-60 pounds max. I have seen ones with the sear made out of metal, that's what I would do if using a wood piece exceeding 80#..
"The privilege of a lifetime is being who you are."  Joseph Campbell

Offline Dane

  • Member
  • Posts: 1,870
Re: 16th century Spanish "ballista" crossbow
« Reply #42 on: December 08, 2012, 09:38:27 am »
I figured all those words were not needed for you :) Drilling and sinking two steel pins in the lugs would also really help keep a wooden rolling nut together, too, say, 3/16 D cold rolled stuff.

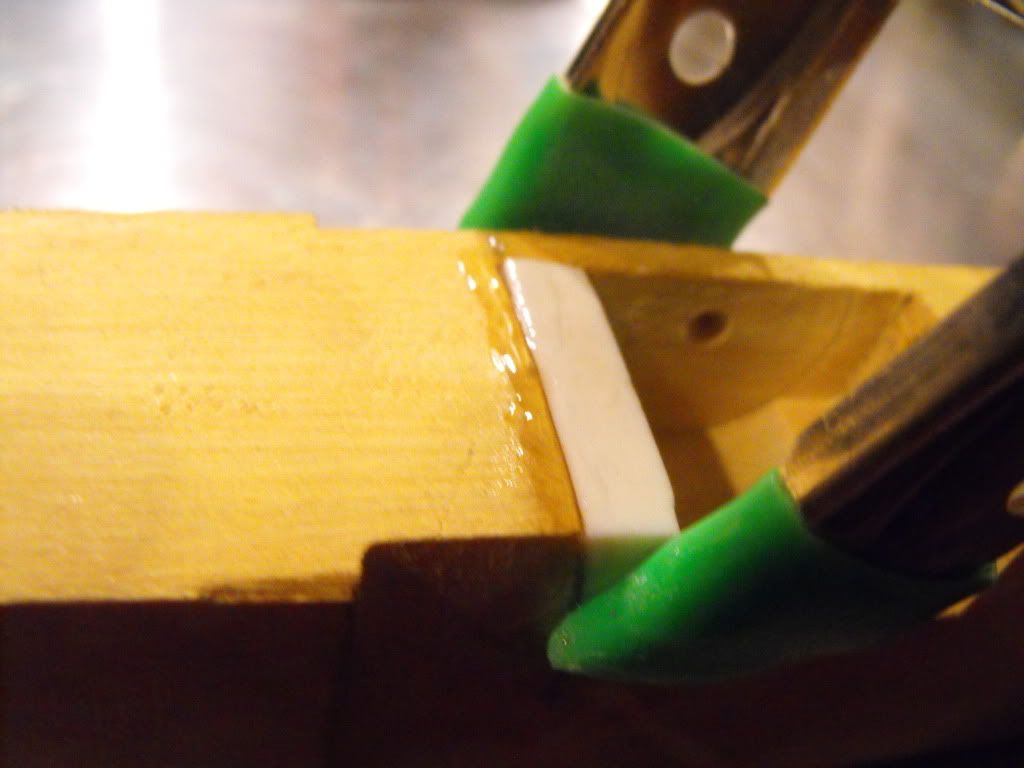
Okay, I glued up the front bearing block. Nothing earth shattering or new here for this community. I used 2-part epoxy, mixed it with a little plastic cocktail sword to give it a kinda swinging lounge vibe, and clamped it up. Later today, I'll do the same to the rear block, maybe using a cocktail umbrella, as I am out of regular toothpicks.


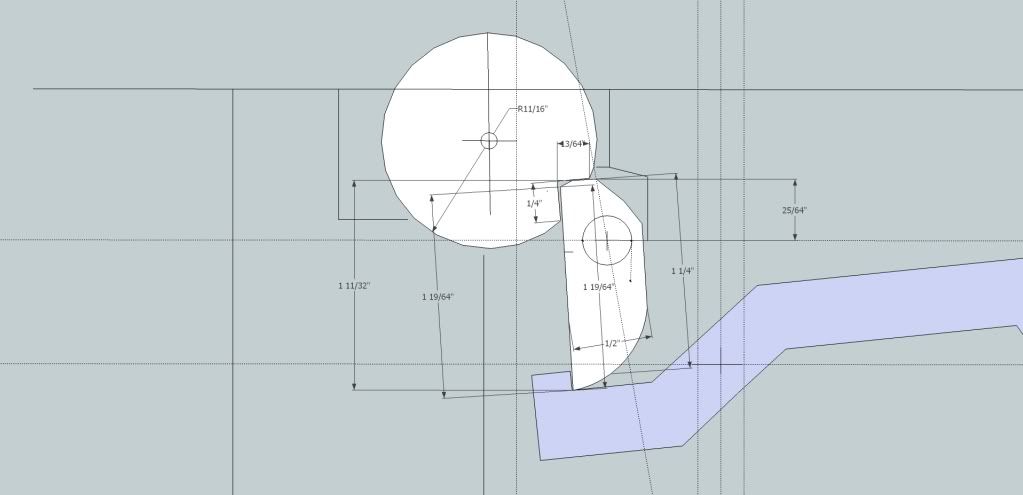
I want to talk a bit about sear points and how they interact with the trigger. As you push the tickler / trigger up to fire the crossbow, if you have a square facing to the end of the trigger, it will push the sear forward as it travels down, and that means the the rolling nut will move forward and than backward a bit, and that will impact accuracy, and I imagine may even set up a dangerous situation with misfires. I have a program called Google Sketchup, which I highly recommend everyone getting. Free program, it is a very simple 2D CAD type program. I've struggled for years to learn CAD with very little luck, but Sketchup is a great tool, easy to use, and great for all kind of design situations.

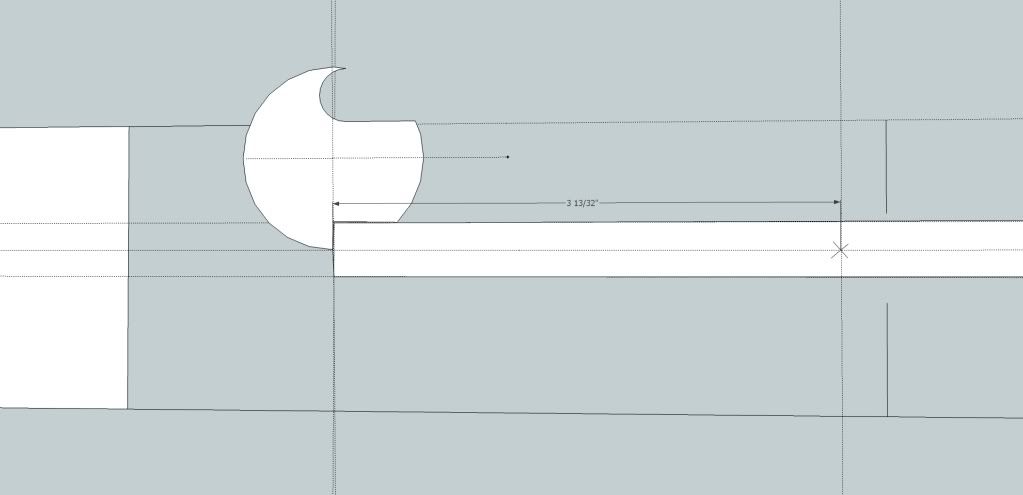
Attached here are two very rough (you can do some amazing things with this program, but I was working fast and dirty) drawings of the crossbow mechanism. Illustrated here is the tickler / trigger and the rolling nut. And, then, you can see a closeup of the sear and sear point. See how the end of the trigger is rounded off? This ensures that the above issue never crops up. I have had this happen with other projects, and it can really ruin your day, and sometimes, a new trigger has to be made to solve the problem. The nifty thing about the drawing program is that I can draw the different components as seperate elements and then use a rotate tool to see how things interact. If the axel point is not right, it may push the nut badly forward as the shooter engages the trigger. About 30 minutes spent doing this drawing and playing with it really eliminates some grief, and is time well spent. Plus, you get to feel like a real engineer. :)

The third drawing is for a two axel trigger design for a commissioned crossbow I have in the works, a super heavy 900 lb. German crossbow. The two axel design is much more appropriate for this kind of draw weight, and so much more time has to be spent designing the trigger. The whole point of posting it here is not to amaze you or impress you lol, but just to illustrate how handy Sketchup is here. Just moving the axel points a tiny bit really impacted how everything works together, and the time I spent with this program paid off handsomly. I have printed this at 100%, and am using it as a template to drill the axel holes precisely, and to make all the interior components to the correct dimensions. Otherwise, you'd hear my curses all the way to the west coast. :)

The Spanish single axel lock:


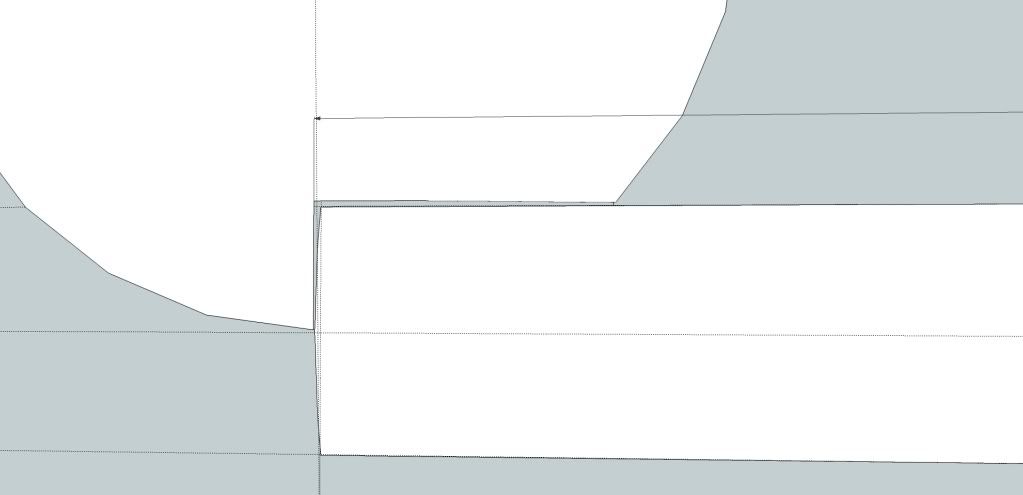
And the German double axel lock:

Greenfield, Western Massachusetts

Offline Del the cat

  • Member
  • Posts: 8,279
    • Derek Hutchison Native Wood Self Bows
Re: 16th century Spanish "ballista" crossbow
« Reply #43 on: December 08, 2012, 10:05:16 am »
...
Aluminum I would stay away from. It is easy to machine and work with hand tools, but it oxydizes an ugly black that gets all over the place, and gums up the nut socket pretty quickly.
Dane
I was a bit lazy, I meant a decent Aluminium alloy really :-[ , but even so it's prob not the best choice if you have other alternatives.
Del
Health warning, these posts may contain traces of nut.

Offline Dane

  • Member
  • Posts: 1,870
Re: 16th century Spanish "ballista" crossbow
« Reply #44 on: December 08, 2012, 10:12:42 am »
Yup, an alloy would be okay, not sure which material would be best in that category. A fellow countyman of yours, Todd (I know you know him, since you posted a goat's foot of his) uses steel I think pretty much exclusively in his crossbows, and his work is just top rate all around.

I'd like to try steel one day, but currently lack the ability to machine in the sear. Perhaps one day I will invest in a little benchtop milling machine. That would open up all kinds of avenues for making neat toys. :) Casting in bronze would also be really interesting. I have an unfinished furnance I need to get back to, crucibles, etc. The chances of a horrible firery death has kind of made me hesitant to continue in that direction, though. :)

Dane
Greenfield, Western Massachusetts