Author Topic: 80" White Elm Warbow Build-along  (Read 60765 times)

0 Members and 1 Guest are viewing this topic.

Offline adb

  • Member
  • Posts: 5,339
Re: 80" White Elm Warbow Build-along
« Reply #45 on: February 16, 2014, 10:31:00 pm »
Nice! Lookin very good. Yes, you're getting close. I have a 200# scale. Come get it if you want.

Offline Badger

  • Member
  • Posts: 8,119
Re: 80" White Elm Warbow Build-along
« Reply #46 on: February 17, 2014, 02:21:21 pm »
   Great job on the tiller. I always struggle on long bows trying to get that nice uniform transition where the rate of bend increases gradually and then starts to decrease again as it nears the tips. Again, Good Job!!

Offline lostarrow

  • Member
  • Posts: 1,348
Re: 80" White Elm Warbow Build-along
« Reply #47 on: February 17, 2014, 06:30:23 pm »
 Thanks for the info on programs! Looking great! Like watching a hockey game in overtime ;)

Offline Cameroo

  • Member
  • Posts: 1,579
    • Cam's Stuff
Re: 80" White Elm Warbow Build-along
« Reply #48 on: February 17, 2014, 09:52:53 pm »
Thanks for the feedback guys, I appreciate it. 

Steve, I don't want to sound cocky, but I found that with the process I used to tiller this bow, those transitions you speak of came almost automatically.  They were just the result of tillering very slowly, analysing the pictures after every wood removal/exercise session, and just looking for flat spots in the tiller.  Sure, it took a long time, but I'm in no hurry :)

Just a quick update on the bow - I didn't get much done today because I had to do a little heat correction for the tip alignment.  Going to leave it alone now for a few days to let things equalize again.

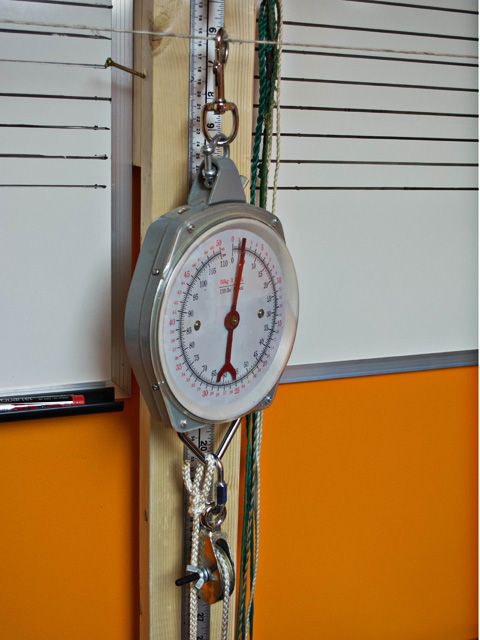
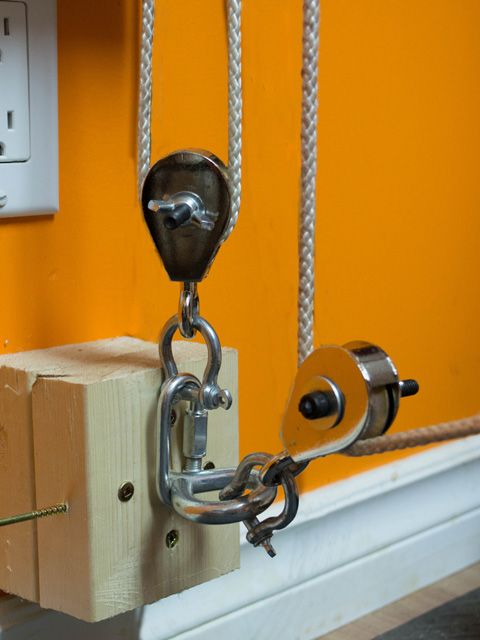
Someone asked me about my pulley setup so I figured I'd snap a couple pictures.  I rigged up a system using 3 pulleys to make it a little easier to yank this girl back on the tree.  You can see in the pictures below that I am using a 1/4" nylon rope tied to the bottom of my scale, it runs down to a pulley, back up to another pulley attached to the scale, and then back down to another pulley before leading out from the wall to a wooden dowel handle.  I only have to pull with half the force (or is it 1/3rd? I forget my high school physics class), but also have to pull twice (or 3 times) as much rope to get the same draw length.


Offline toomanyknots

  • Member
  • Posts: 3,132
Re: 80" White Elm Warbow Build-along
« Reply #49 on: February 17, 2014, 10:31:16 pm »
Cool setup, I like the 3 pulleys, I would like to try 3. I got me a setup with two right now, yours is pretty cool.
"The way of heaven is like the bending of a bow-
 the upper part is pressed down,
 the lower part is raised up,
 the part that has too much is reduced,
 the part that has too little is increased."

- Tao Te Ching, 77, A new translation by Victor H. Mair

Offline adb

  • Member
  • Posts: 5,339
Re: 80" White Elm Warbow Build-along
« Reply #50 on: February 17, 2014, 11:16:18 pm »
Thanks for posting your pulley system. Instead of the 3 separate pulleys, could you use a double wheel side-by-side pulley on the bottom?

Offline Cameroo

  • Member
  • Posts: 1,579
    • Cam's Stuff
Re: 80" White Elm Warbow Build-along
« Reply #51 on: February 18, 2014, 12:14:43 am »
Adam - I initially had a bolt running through both of the bottom pulleys together, essentially making it a double pulley, but it kept wanting to twist the eye-bolt, making the rope bind, and pulling everything all cock-eyed.  I think it was because there were still two separate clevises attaching the pulleys to the eye bolt.  This is just what seemed to work best with what I had kicking around, but I think if a guy used a proper double pulley with only one clevis, that should work too.

I got curious about the physics so I did a little google search and found this.  My setup resembles the third illustration (but upside-down), so basically I am pulling with 1/3 of the force, but pulling 3 times as far.


I couldn't resist doing a bit more work on it tonight.  It is now sitting at about 115 lbs @ just over 30".  There was surprisingly little wood removed between this picture and my previous update.  Basically just tweaked the tiller a bit and gained another 2.5" draw length.  But for that little bit of wood removal, the tiller certainly became much more circular.  Just goes to show how easy it would be to screw things up when you are near final tiller.

I think it's about time to do some finish sanding and call it a bow!  I'm still debating whether I want to try full horn nocks, or just do some sort of overlay. I change my mind every time I think about it :)


Offline adb

  • Member
  • Posts: 5,339
Re: 80" White Elm Warbow Build-along
« Reply #52 on: February 18, 2014, 12:32:45 am »
Outstanding tiller, Cam! I'd call it done on the tiller, and shoot it in now. I can't wait to see it.

Offline WillS

  • Member
  • Posts: 1,905
Re: 80" White Elm Warbow Build-along
« Reply #53 on: February 18, 2014, 05:32:36 am »
That looks perfect.  Amazing job!

Offline Del the cat

  • Member
  • Posts: 8,291
    • Derek Hutchison Native Wood Self Bows
Re: 80" White Elm Warbow Build-along
« Reply #54 on: February 18, 2014, 07:53:33 am »
Yeah, that looks great.
Like you say, when you are getting close, it doesn't take much wood removal. Just sneezing on the bow and you can get another inch of draw :laugh:
Del
Health warning, these posts may contain traces of nut.

Offline Cameroo

  • Member
  • Posts: 1,579
    • Cam's Stuff
Re: 80" White Elm Warbow Build-along
« Reply #55 on: February 20, 2014, 11:33:36 pm »
Thanks guys. 

Del, I spent a good while perusing your blog tonight.  Some really good info there.  I think you have inspired me to try horn knocks, providing the horns I have will work. Your method cleared up a lot of the questions I had about getting a proper fit.  I was wondering though, approximately how wide is that custom-shaped spade bit at the base of the cone?  Would 1/2" be enough for a heavy weight bow, or do you think I should make the cone a little wider?

Offline WillS

  • Member
  • Posts: 1,905
Re: 80" White Elm Warbow Build-along
« Reply #56 on: February 21, 2014, 06:31:42 am »
Half inch is plenty.  The MR tips are just under half an inch at the cone base.  My recent 120# yew has a cone base width of 10mm.

Offline Del the cat

  • Member
  • Posts: 8,291
    • Derek Hutchison Native Wood Self Bows
Re: 80" White Elm Warbow Build-along
« Reply #57 on: February 21, 2014, 07:38:19 am »
Thanks guys. 

Del, I spent a good while perusing your blog tonight.  Some really good info there.  I think you have inspired me to try horn knocks, providing the horns I have will work. Your method cleared up a lot of the questions I had about getting a proper fit.  I was wondering though, approximately how wide is that custom-shaped spade bit at the base of the cone?  Would 1/2" be enough for a heavy weight bow, or do you think I should make the cone a little wider?
First one I ever did was a 1" bit :o... but that was daft.
I bought a couple of 16mm bits they are cheap enough, I have about 3 different sizes, one tiny one for miniatures. One for regular and one for Warbows, Oddly the last 100# I did I used the 'regular' on the top tip and the 'warbow' on the bottom.
So the bottom line is 16mm is plenty, as the hole in the horn will always end up a tad oversize anyway, 'cos you can't gring it perfectly symmetrical and it will prob' chatter. (It's a pig to try and clamp a tapered bit of horn tight in a vice)
If you make the taper nice and long you can just go in deeper if you want it a tad wider. I don't like the ones where they have a perfect straight sided cone IMO it should be a slightly curved point... don't s'pose it makes any real difference really.
Glad you find the blog useful. I started it as a reference for myself really and it just grew from there. It's so easy to forget how you did something the last time.
I used to hate doing horn nocks, now I'm quicker n slicker I love 'em :laugh:
Del
« Last Edit: February 21, 2014, 07:42:37 am by Del the cat »
Health warning, these posts may contain traces of nut.

Offline WillS

  • Member
  • Posts: 1,905
Re: 80" White Elm Warbow Build-along
« Reply #58 on: February 21, 2014, 09:53:05 am »
As a bit of side info, there was a thread on the EWBS forum a couple weeks back about the shape of the Mary Rose horn nocks, and the cones on the bows.  They're all slightly curved like the wing of a spitfire rather than a straight taper, and Mark Stretton's theory behind it is that on certain cow horn (I think on the younger cows or fresher horn) there is already a cone shaped hollow through the natural horn that is that curved taper shape.   So the bowyers just shaped the tips to fit the natural hole rather than drilling into the horn itself.

That's probably where the theory that all the horn nocks were removable and not glued to the bow came from, as the cones would all be very similar.

mikekeswick

  • Guest
Re: 80" White Elm Warbow Build-along
« Reply #59 on: February 21, 2014, 10:00:21 am »
I have a good little tool for making the fit perfect.
Get a chunk of something hard and drill a hole in with your bit a deep deeper than your finished intended depth of cone. Then get a tenon saw or similar and cut a slot into one side of the cone hole (the full length of it).
Then get a bit of sandpaper, insert it into the slot, pull a bit throught so it touches the other side of the hole.
Push onto your rough shaped cone and rotate. It then sands off the high spots until you have a perfect fit.
Easy peasy!