Author Topic: Mary Rose Replica Bow Build-Along--An Entrance into the World of War Bows  (Read 202550 times)

0 Members and 1 Guest are viewing this topic.

Offline Dane

  • Member
  • Posts: 1,870
Re: Mary Rose Replica Bow Build-Along--An Entrance into the World of War Bows
« Reply #75 on: November 11, 2006, 09:52:15 am »
Thanks Dane,

A couple of my friends and I are planning to build a disposable/flamable hut specifically for the purpose.  Thatching is an interesting subject.  I had a roommate in college who was a missionary kid from the Philippines.  He told me stories about how they would have thatching parties.  Almost sounded like a barn raising. 

I'll post something on cross-section soon.  Take care.

               J. D. Duff

Good luck building that thatched strucure. Thatching is essentially bundles of reeds in layers, trimmed then up then with a special knife. A good thatched roof can last fifty years or more.

You might want to google and look at the Globe Theater site, as they show some excellent shots of thatchers in action. The Globe reconstruction is the first thatched building in London allowed since the Great Fire. They used Norfolk reed for that project, and the results are magnificent.

I do hope you make your hut medieval-looking, since so much time and effort is going into that goal of buring the sucker down. A few manequines (sp) might add to the fun.
Greenfield, Western Massachusetts

Offline Badger

  • Member
  • Posts: 8,118
Re: Mary Rose Replica Bow Build-Along--An Entrance into the World of War Bows
« Reply #76 on: November 11, 2006, 11:47:59 am »
Good thread Josh, looks like some fine bows you will be making there. I have a tendency to pay attention to Pip Bickerstaff as well, I think he has earned some respect in this field and I tend to think he is as objective as possible. has anyone ever weighed these bows? The physical weight of the bows themselves. This might also give us a better assessmnet of what they were drawing. Steve

Offline Kviljo

  • Member
  • Posts: 488
  • Archaeologist, Antitheist
Re: Mary Rose Replica Bow Build-Along--An Entrance into the World of War Bows
« Reply #77 on: November 11, 2006, 12:17:28 pm »
The conservation-method of the original bows has most likely weighted them down a bit. At least that is the case with some medieval bows we have here in Norway.

Looking forward to hearing how the side-nocking works out :)

duffontap

  • Guest
Re: Mary Rose Replica Bow Build-Along--An Entrance into the World of War Bows
« Reply #78 on: November 13, 2006, 03:33:50 pm »
Thanks Dane!

Hey Badger and Kviljo,

The weight issue is an interesting one.  Pip has said that Yew from Oregon will make a much lighter (physically) bow than European Yew for the same draw weight.  That being said, I don't know how scientific we can be in comparisons between their and ours.  One thing that is important to note is that bows made today to the same dimensions as the Mary Rose bows, from Alpine Italian Yew tend to average around 140#s. 

The next step follows...

duffontap

  • Guest
Step 5: Limb Depth and Cross-Section
« Reply #79 on: November 13, 2006, 03:45:25 pm »
Step 5:  Cross-Section and Limb Depth

The outline of our war bow has been carefully cut out and the tips have been worked down to just over 1/2” wide.  If you have taken the plunge and bought a full-length Yew stave for your war bow, you may soon understand why Yew has gained such a favored reputation in the course of archery history.  At this point the depth of the limb needs to be reduced to an approximate 1:1 relationship with the width.  It will be reduced further as the section begins to take shape, but for now it is better to have too much wood than too little. 

You may proceed as usual with your band saw now, but be very cautious—ruining a good Yew stave is a high crime.  As I was saying about understanding why Yew has gained its favored reputation throughout history—grab a draw knife and no further explanation need be given.  Working a good piece of Yew with a draw knife yields long, sweet-smelling curls of wood and leaves behind an almost polished surface.  Those of you who have primarily worked white wood may have wondered why the draw knife and spoke shave are part of the bowyer’s toolkit at all.  As you shape your Yew stave with just such tools, those questions will well be answered.  Conservatively work the limb depth down to match the limb width, or just under.

The limb tips should be perfectly round and will eventually finish out to 12mm (just barely under 1/2”).  It is a good idea to use a dial caliper to help shape the tips down close to their finished size.  Follow with a 1/2” hole drilled in a piece of scrap to check for roundness.  A perfect fit with the horn nock (mandatory) is achievable only with a perfectly round limb tip (a few tips on horn nocks Wednesday). 

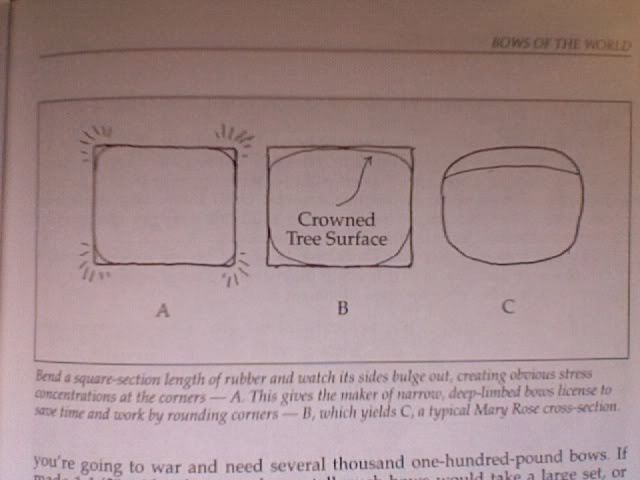
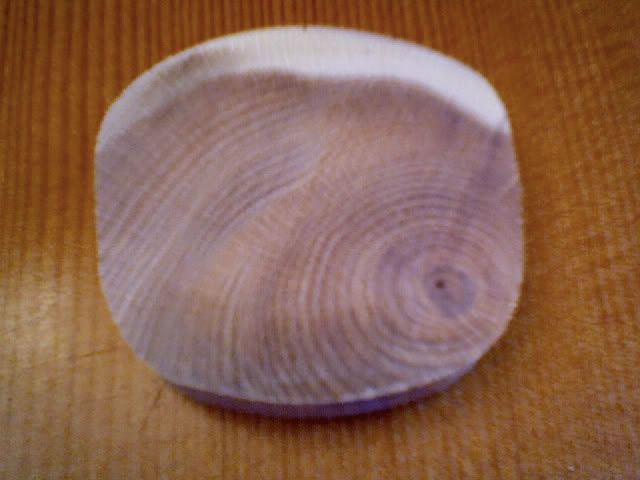
When the limb tips are round and close to their finished size, you can proceed from there toward the handle.  At this point you will be rounding the edges of the back and belly and will have to decide on a cross-section.  Although the limb section of English bows is generally referred to as a ‘D-section,’ there is flexibility offered in the range of sections on the Mary Rose samples.  For the most part the Mary Rose bows were about 38-40mm wide in the handle and 33-35mm deep.  This establishes an approximate 7:8 depth-to-width ratio, but slight divergence is permissible as the small surviving sampling of medieval war bows shows that there was latitude for bowyer’s preference. 

If you have the Traditional Bowyer’s Bible Volume Three, you should take the time to read the section on war bows in chapter 3.  This is a fairly good explanation of the advantages of the D section. 


Another valuable resource for understanding relative tension/compression stresses is the following thread on this site:

http://www.primitivearcher.com/smf/index.php/topic,490.0.html

Some Mary Rose-like sections and their advantages may include:

Semi-rectangular:  Most working wood.  High energy storage and low set.  More vulnerable to a tension break. 


Semi-Oval:  Lots of working wood.  No vulnerable ridges.  Even stress distribution.  Good section for a stave with a high crown.


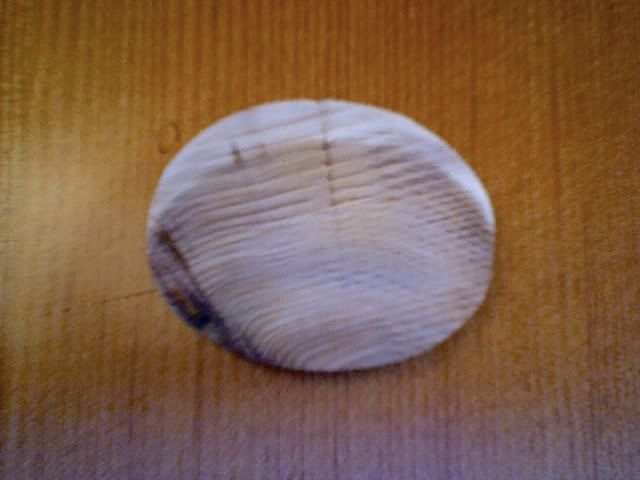
Semi-Round:  Similar to oval section but with a higher crown.  More vulnerable back.
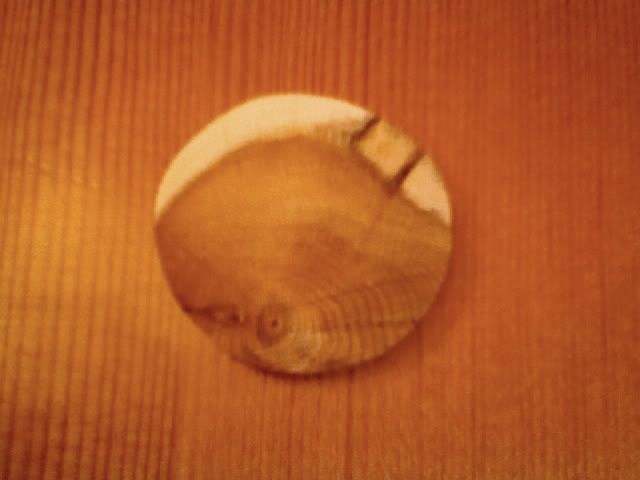


True-D:  The narrow belly becomes the ‘weak link.’  The back is wider (thus stronger) than the belly, so the belly is more likely to fret or take set than the back is to explode.  A good section for cautious bowyers, or in cases where the back looks vulnerable to breakage.  Also, a good choice for Pacific Yew in general. 


In the case of my own replica, I have chosen to use a true D section and a depth-to-width ratio of 5:6 (1 1/2” wide by about 1 1/4” deep).  I have done this partially on Pip’s recommendation to keep my bow wide, as Oregon Yew is not as dense as European Yew and thus benefits from the extra width in the back to share the tension strain.  I chose to do a deep D section because I wanted my bow to have that classic shape, and because I wanted to use the section that would make my bow less vulnerable to breakage.  I was willing to allow for a little more set to keep this bow from blowing up at a 30” draw.  Also, my stave came from a 10-12” tree, so the back is very flat, and a round or oval section would require violating too many growth rings on the back (not a huge problem with Yew, but I’m being very cautious here).

We’ll begin the tillering process tomorrow.  Until then…

           J. D. Duff
« Last Edit: November 13, 2006, 03:47:19 pm by J. D. Duff »

Offline Asiertxu

  • Member
  • Posts: 126
Re: Mary Rose Replica Bow Build-Along--An Entrance into the World of War Bows
« Reply #80 on: November 13, 2006, 07:46:06 pm »
REALLY interesting thread Josh....!!...and can´t wait to see your WARBOW replica finished.... 8)....

Best regards and all the best mate...!... ;)...

Asier.
//Asier from "Basque Country" Spain.

duffontap

  • Guest
Re: Mary Rose Replica Bow Build-Along--An Entrance into the World of War Bows
« Reply #81 on: November 13, 2006, 08:00:01 pm »
Thanks,

I should be posting the finished pics in just a few days.  It turned out really good.  I shiver when I think about how cool war bows are. 

          J. D. Duff

Offline Skeaterbait

  • Member
  • Posts: 197
Re: Mary Rose Replica Bow Build-Along--An Entrance into the World of War Bows
« Reply #82 on: November 14, 2006, 02:46:53 pm »
AAAARRRRRGGGGGHHHHHH! Stop teasing, let's see it ;D

Offline Badger

  • Member
  • Posts: 8,118
Re: Mary Rose Replica Bow Build-Along--An Entrance into the World of War Bows
« Reply #83 on: November 14, 2006, 03:37:42 pm »
That was some real goo info JD, it can be tricky trying to ballance draw weight and limb ratios, makes a bowyer slow down a bit, very enjoyable work these long bows, Steve

duffontap

  • Guest
Re: Mary Rose Replica Bow Build-Along--An Entrance into the World of War Bows
« Reply #84 on: November 15, 2006, 01:30:14 pm »
skeaterbait,

If I showed you, I would have to kill you.  My bow is currently the first line of defense for the otherwise vulnerable North Oregon Coast.

Badger,

The thing I love about the PA forum is that I'm always learning stuff.  I try to do a post once in a while that requires a little effort on my part.  This was a lot of effort.  I'm about done.  Thanks for following along.
 
            J. D. Duff


duffontap

  • Guest
Re: Mary Rose Replica Bow Build-Along--An Entrance into the World of War Bows
« Reply #85 on: November 15, 2006, 02:33:44 pm »
Hello again,

The bow is finished, and while it waits for its armor-piercing arrows, you have a couple days to finish your own and meet me on the beach for a Medieval flight shoot.  For those of you who wonder why this is taking so long—let me tell you—a bow like this is not easy to build.  Since it is a replica bow, lots of rules must be followed and rushing has not been an option.  Well, let’s finish this up.

Step 6:  Tillering a Heavy

Tillering: 

Many bowyers, particularly newer bowyers, have trouble hitting their desired weight.  They may be shooting for 50 lbs. and end up with 33.5 lbs.  This problem increases as higher weights are desired.  So, when faced with the task of building a war bow of 100# plus, the risk of the bow coming under weight should always be on your mind.  A couple things that helped me a lot:

1. Dial caliper:  the Medievals didn’t have this tool but I didn’t have a 5 year apprenticeship.  Check everything twice with a dial caliper before you take wood.  You can ruin a heavy with one misguided stroke of a drawknife.  I can tiller a good 60# hunting bow in a couple hours.  This bow took me days.

2. Tillering String:  The first picture shows me pulling on my war bow with a tillering string I made.  I’m pulling really hard to get this 3” of bend!  It’s easy to forget, this bow will be too stiff to floor tiller in the regular fashion—unless you’re much bigger and stronger than me.

3. Card scraper:  The most versatile bow-building tool out there.  If you don’t have one, they cost ten bucks at the most and they’re easy to sharpen.  I had a luthier show me how to sharpen my scraper once and it’s my favorite tool now.  I wouldn’t trade it for a bow scraper.  I must have tillered about fifty pounds off this war bow with a scraper, removing long, transparent sheets of wood.

4. Bend, Caliper, Scrape, Sand, Repeat.  After you’ve gotten your section perfect and all the tool marks scraped and sanded, the real tillering begins.  Never let a heavy bow get to the point where you have to take ten pounds off to fix the section or get tool gouges out. 

If you make it through the floor tillering process with enough wood to still make a war bow, you’ve survived the worst.  At this point I added temporary nocks and shot my bow from an 18” draw to work it a little.  I was a little displeased at how much is was following the string so I put it in my drying box for a week at 95 degrees to dry it out a little more.  Then I added the horn nocks.  Many of you who are reading this have successfully done horn nocks already.  If you’re had any trouble, look at the pictures for a simple tool you can use to check the taper of your bow tip.  When you get a perfect fit, you can glue the tip on with almost anything.  I’ve used epoxy, wood glue, and super glue.  Five drops of super glue will work as well as anything and sets fast. 

It’s my day off and I need to get busy making arrows.  I’ll post the finished bow on a new thread on Monday.  Thanks for hanging around everyone.  My knowledge about these bows has grown immensely since we started.  It’s been a lot of fun, too.

Oh, yeah—I’ll post a video before too long of the flaming arrow and thatched roof.  Give me a little time though!

       J. D. Duff


[attachment deleted by admin]

Offline Dane

  • Member
  • Posts: 1,870
Re: Mary Rose Replica Bow Build-Along--An Entrance into the World of War Bows
« Reply #86 on: November 15, 2006, 03:10:09 pm »
JD, this has been tons of fun, informative, and very generous of you to take so much effort and time on this topic.

I was wondering if you are going to address the string you plan to make or buy for this bow? Linen, Dacron, etc.? Endless, Flemish? What is marginally or safely safe for such a powerful bow?

As well, how about arrows, and where you sourced your broadheads, bodkins, etc.? I kind of think of all this as a weapons system, before maybe the term was invented.

Thanks,

Dane
Greenfield, Western Massachusetts

duffontap

  • Guest
Re: Mary Rose Replica Bow Build-Along--An Entrance into the World of War Bows
« Reply #87 on: November 15, 2006, 03:27:08 pm »
Thanks Dane,

I was wondering if anyone was still listening.  ;D  I'll cover arrows and strings, too then.  I'm working on arrows today, so I'll take pictures as I go. 

I'm currently researching strings and talking to some other war bow shooters about what they're using.  I'll include my string choice in the next couple of days. 

Thanks.

       J. D. Duff

Offline Ryano

  • Member
  • Posts: 3,578
  • Ryan O'Sullivan, North Western Pennsylvania
Re: Mary Rose Replica Bow Build-Along--An Entrance into the World of War Bows
« Reply #88 on: November 15, 2006, 03:47:00 pm »
LOOKIN GOOD JD! :D i JUST MADE THE SAME TOOL AND INSTALLED THE HORN NOCKS ON MINE! WOW, YOU GOT TO LOVE THE SMELL OF HORN GRINDING !  :P NOT!
Its November, I'm gone hunt'in.......
Osage is still better.....

Offline Justin Snyder

  • Administrator
  • Member
  • Posts: 13,794
Re: Mary Rose Replica Bow Build-Along--An Entrance into the World of War Bows
« Reply #89 on: November 16, 2006, 12:35:15 am »
Thanks Dane,

I was wondering if anyone was still listening.  ;D 

       J. D. Duff
I have been listening for quite a while, the problem is I always wind up having to read it anyway.  ;D Thanks for keeping on working, we all appreciate this post. Justin
Everything happens for a reason, sometimes the reason is you made a bad decision.


SW Utah