Author Topic: Hazelnut bow build-a-long (fixed pictures)  (Read 284719 times)

0 Members and 1 Guest are viewing this topic.

Offline Gordon

  • Member
  • Posts: 3,299
Re: Hazelnut bow build-a-long
« Reply #90 on: November 14, 2007, 11:06:24 pm »
Quote
You asked me at enumclaw whether heat treating the belly was a help on hazlenut....So whats your opinion???

YES!!!!

RT,

I think the rawhide technique probably works best where the fractures are localized. Are you seeing crysals all along the belly?

Gordon

Offline Gordon

  • Member
  • Posts: 3,299
Re: Hazelnut bow build-a-long
« Reply #91 on: November 14, 2007, 11:20:39 pm »
Okay RT, I saw a picture on your thread. That looks like a good candidate for a patch. I use cow rawhide that is about 2 mm thickness. I bet wild hog hide would work great. Otherwise I could put a patch in an envelop and send it to you in the mail. After applying the patch to a limb I wrap it with serving and then do a similar wrap on the other limb for looks. Here's a pic of a bamboo backed yew that I fixed in this manner. The fracture was caused by a knot that came through the belly and was rather severe. But it has not given me any problems since I fixed it - and I shoot this bow a lot.

Gordon

Offline deerhunter97370

  • Member
  • Posts: 374
Re: Hazelnut bow build-a-long
« Reply #92 on: November 15, 2007, 03:33:06 am »
Great bow as always. Thanks for the biuld along. Joel
Always be ready to: Preach, Pray, or Die. John Wesley

Offline Gordon

  • Member
  • Posts: 3,299
Re: Hazelnut bow build-a-long
« Reply #93 on: November 15, 2007, 12:33:17 pm »
A number of bowyers that I hold in high regard have expressed doubts that the rawhide technique I used to fix a fret is effective. An alternative treatment that is proven is to remove wood to below the fracture line and then glue on a strip of matching wood.

Next up - final tiller
Gordon

Offline Gordon

  • Member
  • Posts: 3,299
Re: Hazelnut bow build-a-long
« Reply #94 on: November 15, 2007, 05:06:59 pm »
The bow gained some weight after the heat treatment so it took a bit of work to get back to where I was previously. I’ve been scraping on the bow whenever I can sneak away into the garage for a few minutes. Here she is pulling 55# @ 25”. Tiller looks pretty good except the left inner limb looks like it may be bending just a little more than I like. I won’t remove quite as much wood from this area as I continue to reduce weight. String follow is minimal at this point.


« Last Edit: October 06, 2012, 06:36:11 pm by Gordon »
Gordon

Offline Gordon

  • Member
  • Posts: 3,299
Re: Hazelnut bow build-a-long
« Reply #95 on: November 16, 2007, 10:08:59 pm »
When you are in the final phase of tillering it is important to keep your tools sharp. That is because you need to have very fine control over how much wood you are taking off. I use a sharpening jig and diamond stone to keep my bowyer's edge sharp.


After more fine tuning of the tiller and wood removal the bow is pulling 55# @ 26”. I’m very close now and between each wood removal session I sand the limbs smooth and remove any tool marks. That way I don’t worry about losing weight due to a lot of finish sanding after I’ve hit my target.


« Last Edit: October 06, 2012, 06:36:31 pm by Gordon »
Gordon

Offline cowboy

  • Member
  • Posts: 7,035
  • Paul Wolfe. Springtown, TX
Re: Hazelnut bow build-a-long
« Reply #96 on: November 17, 2007, 09:38:39 am »
Gettin anxious to see that handle wrap and finish, that's my problem - I rush through tillering and screw it up to see the finished bow >:(. Patience is almost an art itself.....
When you come upon a track or trail you do not know, follow it to the point of knowing.

Offline Gordon

  • Member
  • Posts: 3,299
Re: Hazelnut bow build-a-long
« Reply #97 on: November 17, 2007, 04:05:30 pm »
I’m very close to final tiller and target weight. Now I make certain that any remaining surface blemishes and tool marks are removed. I perform this step in natural light because the smallest flaws are nearly invisible in artificial light, but show themselves readily when the finish is applied. After blemishes are removed I lightly sand the whole bow with 150-grit followed with 220-grit.


The bow is tillered and just a bit over my target weight at 27”. For the next week I will thoroughly test the bow on the tree to break it in and then make minor tiller adjustments as necessary. But the hardest part is behind me. Now it's up to her -  if she makes it through the next week of boot camp, she’ll graduate to bow status.


Next up – backing with silk.
« Last Edit: October 06, 2012, 06:37:02 pm by Gordon »
Gordon

Offline Ryano

  • Member
  • Posts: 3,578
  • Ryan O'Sullivan, North Western Pennsylvania
Re: Hazelnut bow build-a-long
« Reply #98 on: November 17, 2007, 05:13:51 pm »
Tiller looks pretty good Gordon. ;)
why back it with silk? Isn't hazel nut a strong tension wood like hickory?  ???
Its November, I'm gone hunt'in.......
Osage is still better.....

Offline Gordon

  • Member
  • Posts: 3,299
Re: Hazelnut bow build-a-long
« Reply #99 on: November 17, 2007, 05:38:52 pm »
Ryan,

The gentleman that I am building this for would like snakeskins on the back. Since I'm doing this I might as well add a little protection by puting silk underneath and it doesn't add any significant weight. Also I think it will make a good addition to the build-a-long. But I agree with you - the bow doesn't really need it.
Gordon

Offline Gordon

  • Member
  • Posts: 3,299
Re: Hazelnut bow build-a-long
« Reply #100 on: November 20, 2007, 02:50:18 am »
2 days into boot camp and she is holding up fine. I gotta good feeling about this one.
Gordon

Offline bootboy

  • Member
  • Posts: 441
    • vinland longbows
Re: Hazelnut bow build-a-long
« Reply #101 on: November 20, 2007, 11:21:48 am »
Gordon that was one of the best build a longs i have read  to date. thank you for all your photos it has helped me alot on this bow im working on now.
knapp 'um if you got 'um

Offline Gordon

  • Member
  • Posts: 3,299
Re: Hazelnut bow build-a-long
« Reply #102 on: November 22, 2007, 07:37:34 pm »
I pulled the bow to full-draw about 1000 times – no issues and tiller has remained unchanged. She has graduated with honors and can now be called a bow. She’s going to get dressed up with snakeskins but first I’m going to apply a silk backing. The bow doesn’t really need a backing but since I’m giving it to someone else its good insurance against breakage.

I cut a strip of silk about 2” wide and long enough to cover both limbs.


I’m going to dye the silk a dark color to bring out the colors and pattern in the snakeskin.


« Last Edit: October 06, 2012, 06:37:28 pm by Gordon »
Gordon

Offline Gordon

  • Member
  • Posts: 3,299
Re: Hazelnut bow build-a-long
« Reply #103 on: November 22, 2007, 07:41:27 pm »
I rough the back of the bow up with some 100-grit sandpaper and then cleanup any contamination with denatured alcohol.


I then spread a thin coat of liquid hide glue on the limbs and will let it dry. This is called sizing the back and will help ensure that the silk will adhere properly.


After the glue has dried, I spread another thin layer on the limbs in preparation for applying the silk.


« Last Edit: October 06, 2012, 06:38:02 pm by Gordon »
Gordon

Offline Gordon

  • Member
  • Posts: 3,299
Re: Hazelnut bow build-a-long
« Reply #104 on: November 22, 2007, 07:42:41 pm »
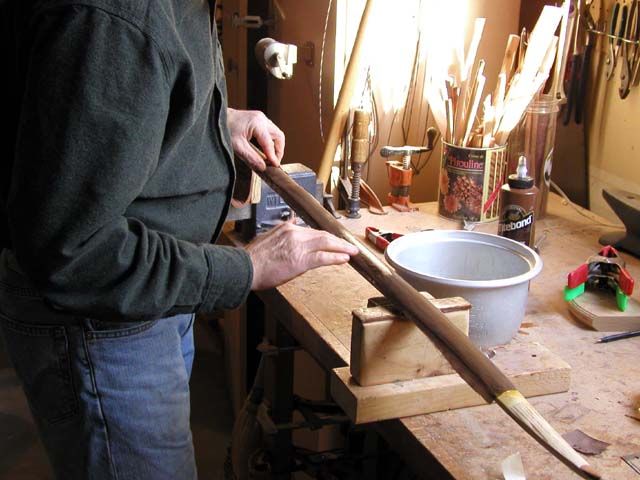
After the glue is spread, I immediately stretch the silk along the bow and work the backing on with my finger.


After the backing is applied, I use a little water and my finger to smooth the surface and ensure that the silk has completely bonded.


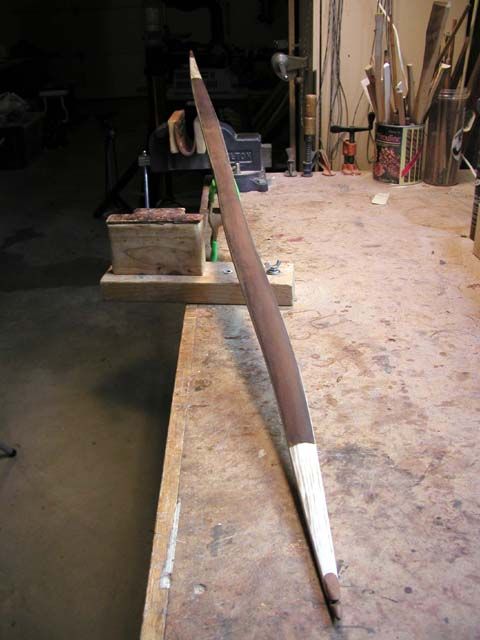
I let the bow dry for a few hours and then trim the excess silk off with a razor blade.


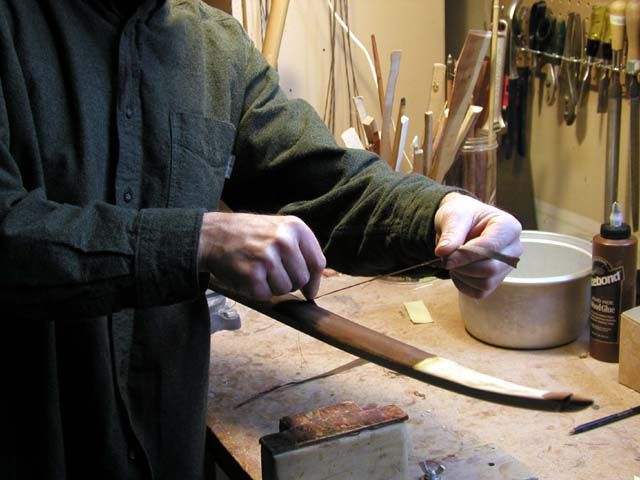
Then I smooth the edges with sandpaper and a block making smooth strokes from the back to the belly.


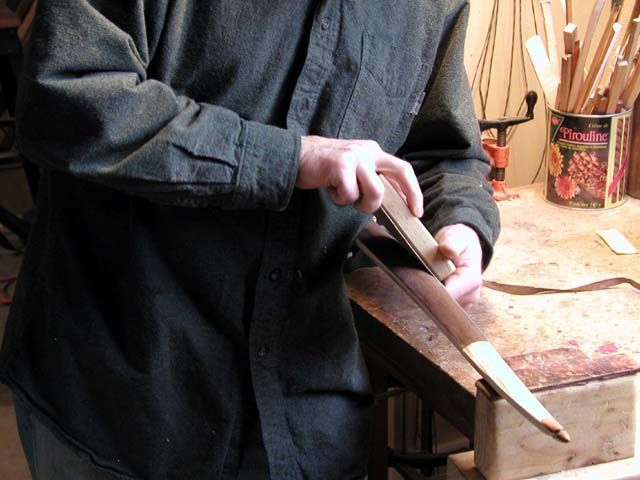
And viola, the silk backing is finished. The tips are bare because I will be painting them later.


Next - applying snakeskins
« Last Edit: October 06, 2012, 06:38:58 pm by Gordon »
Gordon