|
|
||||||||
|
|
|
||||||||
|
|
We spend a lot of time learning to craft good shooting, durable wooden bows but most fledgling wood bowyers opt for “store bought” arrow shafting. Most often the same parallel cedar shafting that they used with their glass backed recurves or longbows. Although cedar makes a wonderful shaft, comes weighed, spined and more or less straight, there are other more “natural” options available which make perfectly good arrows with just a little work…well a lot of work actually. Don’t be discouraged though, making your own arrow shafting is as rewarding as making your own bows, and is part of the entire self sufficiency process. Another great benefit is this arrow shafting material is generally free for the taking for anyone willing to seek it out. It’s possible to make arrows from blocks of wood, cut into 3/8-inch squares with a table saw and then using a hand plane to make the four sides into eight sides, then the eight sides into 16 sides, which for all practical purposes is round, and then sanding smooth, but in this article we are talking about taking plant material that grows naturally round or tubular to begin with and converting it into arrows. I have made serviceable arrow shafts from river cane, switch cane, and shoots or branches from gray dogwood, wild rose, mock orange, black haw viburnum, sourwood, ocean spray and many others. I have also wasted time making arrows from natural materials that were not suited for arrow shafting due to weight or strength such as some of the other viburnum species and horseweed. Just as with making bows, experimentation is half the fun. The process for making any natural tubular material into an arrow is the same with minor variations, so I will try to cover them both where there are any differences.
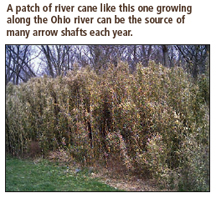
My number-one favorite natural arrow shaft material is river cane (Arundinaria gigantea) or it’s slightly smaller cousin switch cane (A. tecta). Both are bamboos that belong to the grass family Gramineae. Cane grows wild in large colonies along stream and river edges, and in moist bottom lands. The river cane tends to grow both in diameter and height than the switch cane, but both make wonderful arrows. The advantage of using one of these over the other natural shaft materials is their incredible strength, their naturally protective waterproof outer casing, and the fact that they are naturally tapered from one end to the other. The natural tapering provides for an arrow that tends to clear the riser better, which is a major considerationwhen shooting non center-shot bows like our self bows. I also find it helpful that they grow in colonies or patches
so that when you do find a patch you can gather
Once you find a patch of suitable arrow shaft material it is time to harvest some. For cane or rose you will need strong sharp clippers, and in the case of the rose, some heavy gloves and a heavy jacket will prevent a lot of your blood being spilled while gathering shafts. For branches or shoots you will need a small hand saw. For cane, look for a shaft about the size of an 11/32-inch arrow shaft in the middle portion of your length of cane. This will leave the tip slightly larger and the nock end slightly smaller than your 11/32-inch shaft. On the other materials you will want a shaft slightly larger than that as the diameter will be reduced after you scrape off the bark. Regardless of material, you will want to cut your proposed shaft longer than what you think you are going to need. Remember natural material arrows tend to shoot well if they are left a little long. So if you want an arrow for a 27- or 28-inch draw, it doesn’t hurt to cut your shoots a full 36 inches long or more. Better to have them too long and cut some off later than cut them too short. My friend Ron Thompson of Ohio who turned me on to rose shafting suggests you cut them at least a foot longer than what you think you’ll need. This also allows for some end splitting while drying.
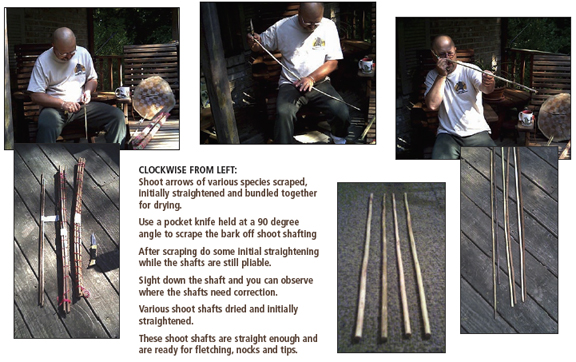
Once you have a dozen or so pieces cut, on the rose shafts you will want to cut off all the thorns first. On all the shafts except the cane you will then take a pocket knife and sit down and scrape off all the bark. Hold the knife blade at a 90 degree angle to the surface and scrape away from you removing all bark until the shafts are clean and white. On the cane shafting you will want to cut off any remnants of the flower or leaf from the nodes. Once this is done you can go ahead and do some initial straightening by hand while the sticks are still green and soft by bending the major curves in the cane or shoot against your palm until they are reasonably straight. Don’t try to get them perfectly straight as they will only warp again while drying. Just try to get some of the major bends kind of straight. Next take a dozen or so, bundle them up with twine, and throw them in a warm dry spot to dry out. This can take anywhere from 90 days to 6 storage location, ambient temperature, and relative humidity. Check them periodically but you will know when they are dry. Instead of being soft and pliable they will be hard like, well, arrow shafts… only really crooked arrow shafts. Cut the binding to release these new raw arrow shafts and let the fun begin. First of all you will want to cut them to length. Remember what I said above about longer arrows flying better? So, if you normally use a 28-inch b.o.p. arrow, let’s start with cutting them 32 inches long. Examine each shaft before you cut to get the most appropriate 32 inches of material. You can always shorten them later if desired, but if you cut them too short to account for your self-nock and trade slot to begin with you’re going to be really unhappy later. Remember you are going to want enough material for a self-nock at one end. It’s better to have too large of tip end than to have not enough material in the nock end. If you were careful in raw shaft selection, this shouldn’t be a problem though.
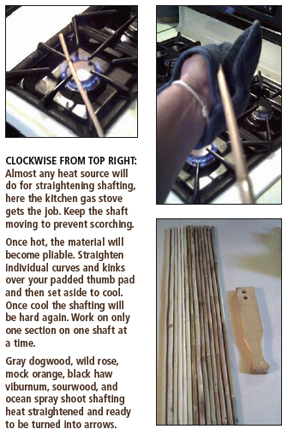
In order to make these shafts fly straight, we are going to have to straighten them. For rose and shoot shafts we will generally be dealing with larger bends, but in the case of the river cane or switch cane we can be dealing with major internodal bends plus kinks at the nodes, often in different directions. Trying to straighten any of the shafts or bends without heat is futile. Heat softens the shaft allowing it to be re-bent, which then hardens again as it cools. I have straightened shafts over candles, open campfires, over Coleman heat gun and with a propane torch, but my favorite is over the burner on our gas stove in the kitchen. Heat is heat. Some guys will use oil, almost any kind of cooking oil, to coat the shafts. This helps the shaft absorb heat more evenly and helps prevent scorching. I forego the oil and just keep the shaft moving over the heat source so as not to scorch it.
To finish our primitive arrows we can now cut selfnock slots, cut trade point slots, or slots for flint heads, or taper the tip for a manufactured head. Fletch as you would any other shaft material paying attention to put the cock feather on opposite the stiffest side of the shaft. You can use precut manufactured feathers, but why not go all the way and use my favorite, hand stripped turkey feathers. Use your favorite fletching glue, or fletch tape or if you want to get really primitive, hide glue and spiral wrapped thread. When using fletch tape you will want to lightly sand the fletching area on cane arrows to break the glaze to give the glue or tape something to grip to. When you cut your selfnocks, be sure to wrap the shaft ahead of the nock to prevent splitting and also wrap the leading edge of your fletching to help hold it down and to make it look sharp. Use colored thread covered with glue for decorative purposes or sinew and hide glue for a more primitive look. Once you have fletched the shafts, cut your nocks, and mounted your heads, you can seal the arrows with some Birchwood Casey Tru-Oil or tung oil. I usually put on three or four coats. You do not have to seal the cane shafting as the hard outer coating is already waterproof. If you find at any time that a bend has returned in any of your shafts, a little heat and some pressure will make it straight again. Often the heat from just rubbing your palm on it briskly will be enough to allow you to fix that stubborn spot. Here’s something to think about, man has been making arrows in this manner and killing critters for sustenance for many thousands of years. If it was good enough for them it should be good enough for you. I can tell you it’s been good enough for me. Using arrows made in this manner I have killed turkeys, wild hogs, javelina and white-tailed deer, plus a pile of small game. Yes, making natural material arrows is very labor intensive,
but it should be a labor of love, taking you one step closer to being
self sufficient as a bow hunter and as a “primitive archer” (like
the name of this
|
Copyright ©2016
Primitive Archer Magazine
All rights reserved.
 There’s an old Indian saying, which I’ll paraphrase. “Making
a good bow is easy, but making a good arrow heap much work.” Not
sure who should be credited with this profound statement, but whoever
it was obviously had considerable experience making arrows from natural
materials. By natural materials I mean materials found growing wild in
nature locally in the area where you live.
There’s an old Indian saying, which I’ll paraphrase. “Making
a good bow is easy, but making a good arrow heap much work.” Not
sure who should be credited with this profound statement, but whoever
it was obviously had considerable experience making arrows from natural
materials. By natural materials I mean materials found growing wild in
nature locally in the area where you live.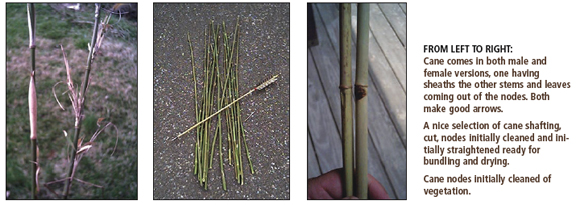
 Another natural shaft material that grows “abundantly” is
multiflora rose. Multiflora is an invasive wild rose shrub found throughout
the Midwest, originally brought in from Asia for weed control and for
small animal cover. It makes a good hard durable arrow but it is impossible
to get rid of the warts from the thorns. They will still shoot straight,
but they will have a lot of “character” to them as it were.
Another natural shaft material that grows “abundantly” is
multiflora rose. Multiflora is an invasive wild rose shrub found throughout
the Midwest, originally brought in from Asia for weed control and for
small animal cover. It makes a good hard durable arrow but it is impossible
to get rid of the warts from the thorns. They will still shoot straight,
but they will have a lot of “character” to them as it were.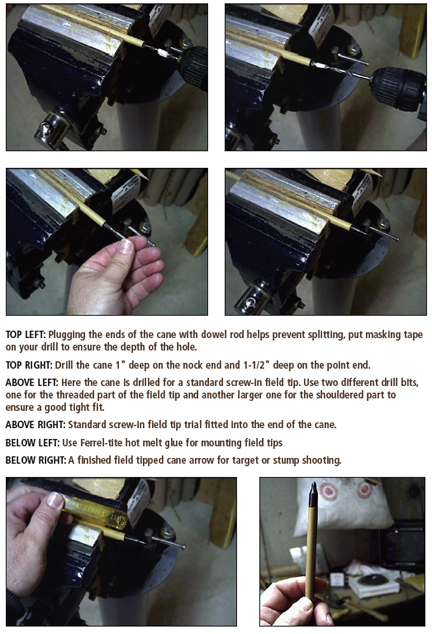
 I like to work on six or so shafts at a time. Select one
of the shafts and hold one end up just below your eye sighting down the
shaft looking fo the bends. Pick out one individual bend in that shaft
and see which way you need to apply pressure to remove the bend. Then
heat the shaft in just that area. Remember keep it moving, rolling side
to side as you move it back and forth over the heat source. When the
shaft softens, remove the bend by applying pressure where needed either
over your padded palm or with your two thumbs and then set aside to cool.
Select shaft number two and repeat. Then number three and so on. Wor
on one bend on one shaft at a time. After you have fixed that one bend,
set aside and work on the next shaft. You cannot remove all the bends
in a shaft in a single heating session. It often takes up to a half dozen
sessions to straighten a shaft completely. So in the course of straightening
half a dozen shafts you may heat and straighten bends in each of them
half a dozen times each. Get them as straight as you can, but they don’t
have to be perfect. In the end you will be surprised how straight you
can get some gnarly old sticks, often rivaling the “store bought” cedars.
One thing to keep in mind is, as long as the tip and nock are in line
longitudinally, the shaft can be somewhat crooked in between and still
fly straight. At first this doesn’t make sense. After all the “modern
arrow manufacturers” have been telling you for years that arrows
must not have any out of roundness and often quote how close to being
perfectly round their arrows are, and that you need that for shooting
straight. Then again the “modern bow manufacturers” have
been telling you that you need 80-percent let off, and a straight line
string path, and split limb technology and all manner of things or you
won’t be able to shoot straight either. Since you are reading this
magazine I take it you don’t automatically buy into everything
these manufactures tell you. Still, believing that arrows don’t
have to be “perfectly straight” to fly straight is one of
the hardest sells in primitive archery.
I like to work on six or so shafts at a time. Select one
of the shafts and hold one end up just below your eye sighting down the
shaft looking fo the bends. Pick out one individual bend in that shaft
and see which way you need to apply pressure to remove the bend. Then
heat the shaft in just that area. Remember keep it moving, rolling side
to side as you move it back and forth over the heat source. When the
shaft softens, remove the bend by applying pressure where needed either
over your padded palm or with your two thumbs and then set aside to cool.
Select shaft number two and repeat. Then number three and so on. Wor
on one bend on one shaft at a time. After you have fixed that one bend,
set aside and work on the next shaft. You cannot remove all the bends
in a shaft in a single heating session. It often takes up to a half dozen
sessions to straighten a shaft completely. So in the course of straightening
half a dozen shafts you may heat and straighten bends in each of them
half a dozen times each. Get them as straight as you can, but they don’t
have to be perfect. In the end you will be surprised how straight you
can get some gnarly old sticks, often rivaling the “store bought” cedars.
One thing to keep in mind is, as long as the tip and nock are in line
longitudinally, the shaft can be somewhat crooked in between and still
fly straight. At first this doesn’t make sense. After all the “modern
arrow manufacturers” have been telling you for years that arrows
must not have any out of roundness and often quote how close to being
perfectly round their arrows are, and that you need that for shooting
straight. Then again the “modern bow manufacturers” have
been telling you that you need 80-percent let off, and a straight line
string path, and split limb technology and all manner of things or you
won’t be able to shoot straight either. Since you are reading this
magazine I take it you don’t automatically buy into everything
these manufactures tell you. Still, believing that arrows don’t
have to be “perfectly straight” to fly straight is one of
the hardest sells in primitive archery. 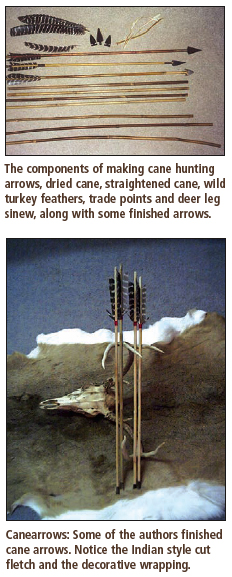 OK, back to arrow making. Believe it or not we’re
almost done. We have straightened our shafts and are about ready to turn
them into arrows. For the cane arrow we will want to knock off the high
points of the node. Do not take them all the way down even with the internodal
cane, just smooth them out some. Use a small file or sandpaper. The small
node bumps won’t hurt a thingand the arrow will still fly well.
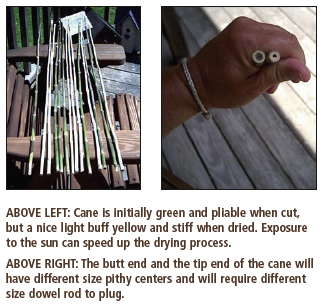
Since cane is more or less hollow I like to plug the nock and tip ends
with hardwood doweling. Using the appropriate size drill that matches
the doweling, without weakening the outer shell of the cane, I drill
the nock end 1 inch deep and the tip end 1-1/2 inch deep and using Titebond
II wood glue, glue in pre-cut sections of dowel. The nock end dowel will
naturally be smaller than the tip end dowel. This doweling is available
at nearly any hardwood store or hobby shop. (By the way many primitive
archers make arrows out of the larger sizes of doweling at the hardware
stores. They are often referred to as Ramin wood arrows). The other shaft
materials won’t need this doweling unless the pith line in the
center of the shaft is too large to allow proper tapering of the tip.
OK, back to arrow making. Believe it or not we’re
almost done. We have straightened our shafts and are about ready to turn
them into arrows. For the cane arrow we will want to knock off the high
points of the node. Do not take them all the way down even with the internodal
cane, just smooth them out some. Use a small file or sandpaper. The small
node bumps won’t hurt a thingand the arrow will still fly well.
Since cane is more or less hollow I like to plug the nock and tip ends
with hardwood doweling. Using the appropriate size drill that matches
the doweling, without weakening the outer shell of the cane, I drill
the nock end 1 inch deep and the tip end 1-1/2 inch deep and using Titebond
II wood glue, glue in pre-cut sections of dowel. The nock end dowel will
naturally be smaller than the tip end dowel. This doweling is available
at nearly any hardwood store or hobby shop. (By the way many primitive
archers make arrows out of the larger sizes of doweling at the hardware
stores. They are often referred to as Ramin wood arrows). The other shaft
materials won’t need this doweling unless the pith line in the
center of the shaft is too large to allow proper tapering of the tip.