|  There
are a lot of White Birch trees, or Paper Birch as some call it, where
I live. White Birch has bark that can be used for many things. It’s
great for starting fires even in wet conditions; additionally, its waterproof
qualities are great for making birch bark canoes or shelters. Its attractive
look and flexibility are good for decorative crafts including decorative
backing for bows. Another use beneficial to bow hunters is in making
quivers. There has been an increasing interest in birch bark quivers
of late, so I decided to write down my experience and methods used in
making There
are a lot of White Birch trees, or Paper Birch as some call it, where
I live. White Birch has bark that can be used for many things. It’s
great for starting fires even in wet conditions; additionally, its waterproof
qualities are great for making birch bark canoes or shelters. Its attractive
look and flexibility are good for decorative crafts including decorative
backing for bows. Another use beneficial to bow hunters is in making
quivers. There has been an increasing interest in birch bark quivers
of late, so I decided to write down my experience and methods used in
making
them. With this article you will be shown the whole process, from selecting
a tree and removing the bark to the finished quiver. In addition, I will
give you information on what problems you may run into, how to avoid them,
and how to fix them if they develop.
 HARVESTING BIRCH BARK HARVESTING BIRCH BARK
At certain times of the year, birch bark can be peeled off the tree in
large pieces and these pieces can be rolled up into tubes that, when
decorated, make attractive and durable quivers. Birch bark is very
rot resistant and can remain on the ground for years without deteriorating.
This is of value, as a quiver made from birch bark can last for a long
time even in wet conditions. There are many opinions on when is the
best time of year to peel the bark from the tree, but I have found
it to be early spring when there are still freezing nights but warm
days. The change of temperature seems to loosen the bark from the cambium
and makes it quite easy to remove without damaging it.
I prefer the bark from a tree
that has recently died, mainly because I don’t care to kill a tree
just for its bark. Also I have found that after a birch tree dies the
bark undergoes a change that bonds all the layers into one solid sheet.
This makes it easier to peel the bark off the tree in sheets without
damage and will produce a better quiver in the end. The bark that has
bonded itself together like this can be up to 1/8" thick and is
very strong and stiff. A tree of at least six inches in diameter is needed,
but a ten-inch or more diameter tree is preferred as the bark is generally
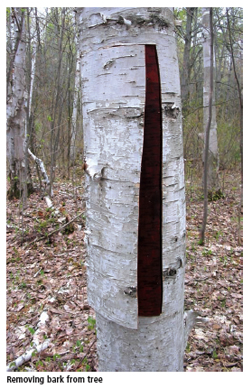
thicker on larger trees. To get the bark off the tree I make a vertical
cut through the bark to the wood down the length of the tree with a sharp
knife, making the cut a bit longer than the quiver I plan to make. I
then take the knife and cut around the circumference of the tree at both
the top and bottom of the vertical cut—I usually drag my machete
along for this.
 Once I have the bark off the tree in one piece (occasionally it doesn’t
go quite as planned), I loosely roll it up and tie it off. I do this
because if the bark is to be stored for future use, it will dry out and
roll itself up—sometimes in undesirable shapes— and once
the bark starts to dry out, it becomes very hard to roll up. Once I have the bark off the tree in one piece (occasionally it doesn’t
go quite as planned), I loosely roll it up and tie it off. I do this
because if the bark is to be stored for future use, it will dry out and
roll itself up—sometimes in undesirable shapes— and once
the bark starts to dry out, it becomes very hard to roll up.
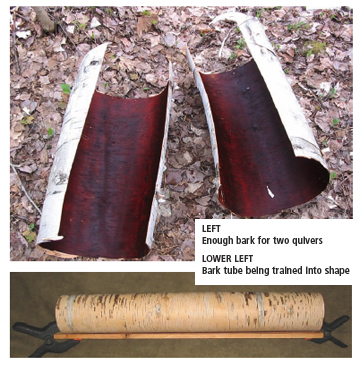
Additionally, this process will start to
train the bark into taking the shape of a tube. If the bark starts to
curl, then this curledup edge must be trimmed off first or the bark may
start to split along the vertical cut, which will be the quiver’s
seam. Some people like their quivers with the bark inside-out, but, for
transportation purposes, it is best to roll the bark up as it grows on
the tree. If an inside-out quiver is preferred, reshaping the bark can
be done in the workshop by soaking it in very hot water before rolling
it up insideout. Rolling the bark this way can be done without the use
of heat, but the bark may be damaged or even ruined this way.
 SHAPING SHAPING
Once I have the bark back home, I get it ready for making it into a quiver.
In the workshop, a flat surface and careful distribution of pressure
is a must when you roll the bark so that it does not split around its
circumference. Before I begin, if there are any scabs or loose bark
I carefully remove these. Then I ready a couple of spring clamps and
a small straight slat of wood the length of the bark, which will be
used along the edge of the seam to keep it down. I carefully roll the
bark up into a small diameter tube, shaping the bark into a quiver
as follows:
1. I lay the bark down on a flat surface.
2. I lay my hands down along both ends of the bark (seam) and then spread
my fingers out so that I have as much contact on the bark as possible.
3. I slowly work the bark around until the tube is approximately the
size I want and I use spring clamps at each open end of the tube to hold
it in that shape.
4. While keeping light pressure on the bark, I place the slat of wood
on the outside of the tube along the edge of the seam and tie it off
well from one end to the other by wrapping a string around it. The wooden
slat held down by the string will stop the edges from curling or lifting
and the tube from springing open.
5. Then I set it aside and let it sit for a week or so to allow the bark
to set in this shape and make it easier to glue.
6. Once the bark has taken the memory of a small diameter tube, I trim
the top and bottom, still leaving it longer than my desired length, and
trim any excess off the edges. Also if there are any splits on the edges
or scabs that may interfere with gluing, now is the time to trim those
off. The bark is now ready to be formed into its final shape and secured.
 TRIMMING TRIMMING
1. Before gluing the bark up, I check for any loose bark and remove it.
2. Then I roll up the bark into a tube the size I want and adjust one
end to form a cone shape. I use spring clamps to hold the bark cone in
place.
3. Then, since rolling the bark into a cone has displaced the original
vertical seam, I create a vertical seam down the side of the quiver.
At the top of the quiver (wider mouth of cone), I make a pencil mark
on the outside of the pointed edge of the overlapping bark. Then I draw
a vertical line down from this point to a centered pencil mark on the
bottom rim of the cone.
4. With tin snips, I cut along this line, removing the excess bark and
creating a vertical seam.
5. In order to create the same vertical seam on the inside of the cone,
I reverse the process. I gently unroll the bark and then roll it back
up with the straight seam inside and allow for an overlap of 3 to 4 inches.
6. I make two more marks at the top and bottom of the cone (as in Step
3), draw a vertical seam line from top to bottom, and again trim the
bark with tin snips. I now have seams running straight down the quiver
on both the outside and the inside.
GLUES AND GLUING
I usually use glue to hold the bark together. I have tried a blend of
pitch and fat, but it takes forever to dry, and the seams come apart
after being left in the sun. My preferred glue is modern glue such
as TB3 or even regular carpenter’s glue. These will dry inside
of a week and hold the bark quite well. Birch bark quivers put together
with these glues stay together well and, with the bark being waterproof,
are relatively unaffected by rain. Regular hide glue is not recommended
as the waterproof bark will trap moisture in and the glue will rot
before it dries. Commercial liquid hide glue or fish glue will also
work as they have fungicides that will prevent the glue from rotting
while allowing it the necessary time to dry. However, due to high moisture
content, these glues can take up to a month of drying time! In the
pictured quiver, I decided to use fish glue to keep the final product
as natural as possible.
1. I roll the bark back up to the size and shape of cone I want, clamp
with the spring clamps, and pencil a line down the seam. This is to give
me an idea of where to put the glue and makes it easier to roll the bark
back to the size I want.
2. Then, I open the bark up a bit and apply some glue inside the overlap
on the edge of the seam. I also apply a line of glue about one inch in
from the seam.
3. Once the bark is rolled back up to the pencil line, I put temporary
clamps on the bark a little ways back from the seam. This holds the bark
in place.
4. I place the piece of wood on the seam and put a spring clamp at both
ends of that. The glue makes the bark slippery, and the tube will want
to keep opening back up so this holds everything together.
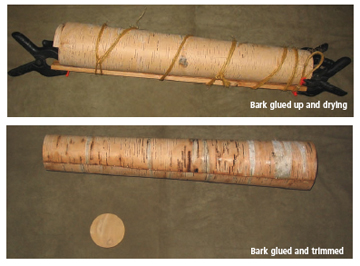
5. I take twine and wrap it tightly around the quiver from one end to
the other; this causes the seam to draw down tight. Sometimes, if the
inside seam doesn’t sit tight, I put a slat of wood on the inside
as well.
6. Then I put the bark aside to dry for several days. Remember, because
the bark is a moisture barrier, it can take up to a week or more for
the glue to completely dry, depending on which glue you use. It is best
to lay the bark down flat with the seam on the bottom while it dries.
Do not stand the bark up. If you do, the glue will run down between the
seams and glue it down to whatever it is sitting on— been there,
done that!
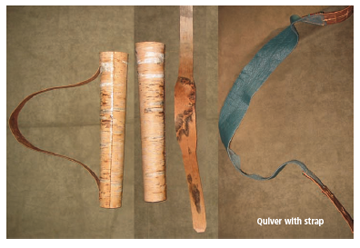 ATTACHING A STRAP ATTACHING A STRAP
Once I have the basic quiver shape, it is time to attach a strap. Generally,
I use leather for a strap, but for the quiver pictured, I thought I
would use a piece of bark for that purpose. I have pieces of birch
bark of all shapes and sizes around my house; from these I selected
a piece that was long enough from which to make a strap. I cut this
to the shape of a strap and then glued it onto the quiver. I also sewed
the strap down to secure it once the glue was dry since the glue by
itself is not enough to hold it in place. Birch bark is quite thick
and strong, but it does have a weakness—it can split easily.
Trying to punch a hole though birch bark will sometimes cause it to
split. To stop this, I drill pilot holes through the bark using a 1/16" drill
bit. Even taking these precautions, if you draw up too tight on the
thread when sewing, you might split the bark; snug is all you need
to do here.
Once the strap is firmly attached I plug the bottom of the quiver. For
this, I used a piece of Northern White
Cedar that I had prepared beforehand. This piece of wood is press-fitted
into the bottom and glued in. The bark and the cedar are both rot resistant
so that makes this quiver nearly indestructible. Once all of this has
dried, I tried on the quiver for fit. The fit was good, but unfortunately
the bark strap was uncomfortably stiff and inflexible. Since the bark
strap had been sewn down and glued it would have been difficult to remove
completely, so I decided to circumvent this problem by leaving short
pieces of bark strap extending from the quiver at both the top and bottom
and sew a supple leather strap insert onto these. Once I made this change,
the quiver fit quite well.
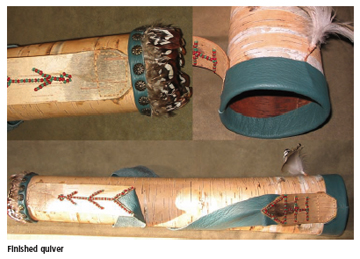
DECORATING
A birch bark quiver is attractive on its own, but a little more decoration
certainly doesn’t hurt. I have an assortment of decorative items
to choose from including beads, colorful feathers from game birds,
and colorful leathers. From the selection of leather, I chose a piece
for the mouth of the quiver that was the same color as the strap. I
like leather at the mouth because it makes the quiver quieter when
taking out or replacing arrows. The addition of some feathers taken
from a Wood Duck put a nice finishing touch on it. The strap was a
bit bland, so I decided to do a bit of beadwork where the leather strap
attached to the bark strap remnants. Using a pattern that matched the
method of attachment seemed appropriate. Red and green beads were used
for this—the green because it matched the leather and the red because
it catches the eye. The bottom was also in need of decoration, and for
this I used pheasant feathers tucked into a narrow leather band. I attached
this to the quiver using fancy upholstering tacks. The last thing I did
was insert something down to the bottom of the quiver. This quiets the
quiver as arrow points hitting the wooden plug at the bottom would make
the quiver sound like a drum.
For questions you can email me at mrstlouis3@basicisp.net, or contact
me at the new Primitive Archer Message Board http://www.primitiv earcher
.com/smf 
|