|
|
||||||||
|
|
|
||||||||
|
|
by Billy Berger
I remember climbing and playing in young pine trees as a kid, and at the end of the day I would come home with pine sap all over my clothes and hands. Impervious to soap, water, and even, I remember thinking to myself, this has to be the most useless and annoying substance on earth. Little did I know, many years later, just how valuable pine sap would prove to be.
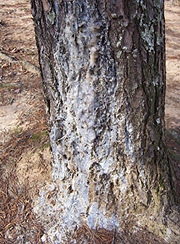
Before modern hot melt glue and epoxy were invented, pine sap was used for centuries by native peoples as an adhesive and waterproof filler. In the western United States, ponderosa pine trees are common, and one tree will often have gallons of sap dripping off its trunk and branches. Western Native American cultures made full use of this valuable resource, coating woven baskets with pine sap to create waterproof containers for carrying water whenever they travelled. But for primitive archers, it serves its most important role as hot-melt glue for securing stone points to the ends of arrows. When a pine tree is injured, sap oozes out to cover the wound
and protect it from insects. When roaming the forests, look for pine trees
with damaged bark; sometimes you can find large amounts of sap on just
one tree (photo 1). Regardless of which type of sap you
collect, always try to get the freshest, softest sap you can find. Fresh
sap tends to bond much better and hold the point much more securely. Old
sap that is hard and brittle makes brittle glue that will crack away at
the slightest movemen between the point and the shaft, but if that’s
all you can find, then by all means use it.
Making pine sap glue is a very easy process. But making quality
glue means searching for the right kind of sap. Pine, fir, and spruce
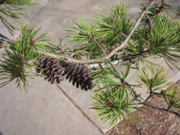
trees are good sources for sap, but some are better than others. In the
southeastern United States, I seek out the shortleaf pine (photo
2). This tree has short needles, small cones, and the bark peels
off in thin scales. This type of pine is much more resinous and produces
copious amounts of sap that is perfect for making glue (photo 3).
Most importantly, the sap it produces is often soft and sticky. As mentioned earlier, ponderosa pines are sap-producing machines.
When I lived in Oregon I remember a mature ponderosa just behind my office
with gallons of sap oozing from just that one tree. Fir, spruce, juniper,
and cedar also produce sap, but I have found that they produce very little,
and their sap quickly becomes brittle and dry, making it less than ideal
for hafting points. After you have collected the sap, use a small, clean tuna
can to slowly heat it up and melt it. You can put the tuna can over a
gas or electric stove, or a small campfire. In Most likely there will be small pieces of bark, pine needles,
and other debris in
Now that the sap is melted, mix in a binder to give the sap
more strength. Binders can be small pieces of fibrous vegetable matter,
crushed charcoal, wood ash, dried and crushed rabbit or deer droppings,
sawdust, or even fine dirt. I prefer to use finely-crushed charcoal made
from burned softwoods like pine or willow. I mix in just enough charcoal
so that when the sap is stirred it has a dark green color. Exactly how
much binder you will need depends on the quantity of sap and how fresh
it is. Whatever binder you choose, add it slowly and a little at a time.
Ideally you want just enough binder so that when the sap cools it will
be slightly gummy, like very stiff chewing gum. That way it will retain
some flexibility, which will allow the glue to give slightly if the stone
point hits something hard. Brittle glue will shatter and crumble when
the point impacts a target, and the glue bond will be lost. If the only sap you can find is dry and brittle, you can
improve its flexibility by adding beeswax or beef fat to it when it is
melted. Don’t overdo it though. Whatever you add to the sap, always
add a little bit at a time and then let it cool to check its consistency.
You may have to do this several times in order to get the consistency
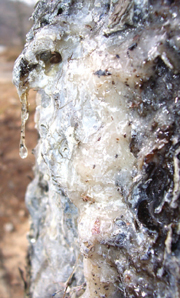
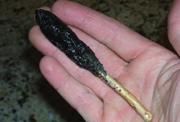
just right, but it is worth the time and effort. You should now have a container with what appears to be black
tar in the bottom. Once the glue has the right consistency, it can either
be stored as-is and will keep indefinitely, or it can be used immediately.
Prehistoric cultures would often glob the warm glue on the end of a small
stick to make a glue stick they could carry with them on their travels
(photo 4).
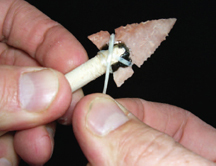
When carving the notch in the end of the arrow for the stone
point, be very meticulous so the point fits perfectly in line with the
arrow. Test the fit frequently; the stone point should fit snugly and
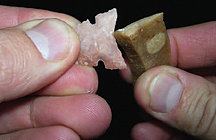
not wobble when the arrow is spun. Also, before gluing the point, use
a small waste flake to grind the basal edges of the point as well as the
inside of the notches to dull them, otherwise they will cut the sinew
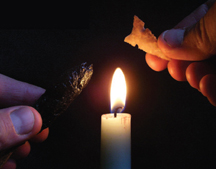
wrappings (photo 5). When the fit
is good and the point is in line with the shaft, remove the point from the
arrow and carefully heat the base of the stone point while also melting a small
amount of glue (photo 6). For this step I use
a candle because it gives very precise heat over a very small area. Heating
the stone point is important because the glue will bond much better if
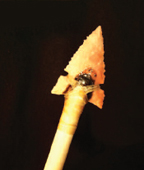
the stone point is very warm. Once the glue
is melted, fill the notch on the end of the arrow with glue, then slide the
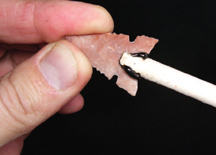
stone point into the notch and adjust it so it is perfectly in line with the shaft (photo 7). When the point is aligned, carefully hold the point
over the candle and slowly rotate it so the point and glue are slowly heated up
one last time (photo 8).
When the point
reaches a certain temperature, the glue will run and fill all the remaining
voids between the point and the shaft. Check the alignment once more, and make
any adjustments needed. Just be careful because the point may be quite hot.
Then set it aside to cool.
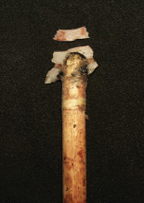
The final step is wrapping the point with sinew. Soak a long
strand of leg or back sinew in warm water until it is soft, then chew
it for several minutes to further soften it. Once it is very soft and
white, wrap the shaft just under the base of the point, and then criss-cross
the sinew
If you don’t have real sinew, you can use artificial
sinew or even unwaxed dental floss, but ironically the performance of
the more primitive sinew greatly surpasses man-made alternatives. Synthetic
threads don’t work as well as real sinew because sinew shrinks as
it dries, holding the point much more securely.
This primitive method of securing stone points will result
in an amazingly strong bond that can take a tremendous amount of abuse.
Using just pine sap glue and sinew to mount stone points, I have been
thoroughly impressed by their strength. I have smashed stone points against
rocks, glanced them off cement walls, buried them in trees, and shot them
through deer and found the pine sap glue still holding the points as securely
as though they were glued with modern epoxy. In the more severe cases
where the stone points have hit rocks head-on, the point will often be
pulverized, and yet after removing the sinew wrappings the base of
Last October I shot a stone-tipped arrow through both lungs
of a very large doe, its forward momentum finally stopped when the stone
point shattered the fourth rib on the far side. The doe ran over 100 yards
before the arrow fell out of her chest. We recovered the deer that night
(photo 11), but it wasn’t until the following
afternoon that I found the arrow. Even though the stone point had broken
after shattering the rib, it was still held fast by the pine sap glue
and sinew wrappings (photo 12). For me, it was an eye-opening
example of how well primitive materials work in real hunting scenarios.
|
Copyright ©2015
Primitive Archer Magazine
All rights reserved.