|
 If your desire is to make a wood bow, you are going to need
some tools. This article will deal with the tools used in the making
of natural-wood onepiece bows (not backed, laminated, or board bows).
I will reference Osage a lot in this article because I use it a lot,
but the principals of tool use work for all the woods, whether whitewood
or yellow. I once competed in a contest where the only tool one could
use to fashion a bow, from start to finish, was a hatchet. This included
acquiring the wood, cutting it to shape, tillering the limbs, and even
cutting in the nocks. It took me approximately nine hours to make my
bow using the hatchet (for the record, my bow came in third out of nine
submitted in that particular event). However, if you aren’t interested
in going quite that primitive and want to be able to make a few bows,
I suggest getting several specific bow making tools which will make your
job much easier. If your desire is to make a wood bow, you are going to need
some tools. This article will deal with the tools used in the making
of natural-wood onepiece bows (not backed, laminated, or board bows).
I will reference Osage a lot in this article because I use it a lot,
but the principals of tool use work for all the woods, whether whitewood
or yellow. I once competed in a contest where the only tool one could
use to fashion a bow, from start to finish, was a hatchet. This included
acquiring the wood, cutting it to shape, tillering the limbs, and even
cutting in the nocks. It took me approximately nine hours to make my
bow using the hatchet (for the record, my bow came in third out of nine
submitted in that particular event). However, if you aren’t interested
in going quite that primitive and want to be able to make a few bows,
I suggest getting several specific bow making tools which will make your
job much easier.
 |
| A selection of draw knives: the one on top, the Sorby,
is the author's favorite; the third and fourth from the top can also
be used as scrapers. |
In my opinion, there are two types of tool groups. Group
One: tools that are pretty much indispensable, in that it would be difficult
to make bows without them. Group Two: tools that are not absolutely necessary
but nice to have, enabling one to make the job of bow building just a
bit easier. Each bowyer has his favorite tools and each individual decides
in which group a particular tool belongs. As you acquire tools, you may
think you are buying for Group Two but end up using your purchase so
much you find, at least for you, it belongs in Group One. I will cover
the tools I consider Group One and mention tools I consider Group Two
as well.
To begin, you must decide whether you will cut your own
trees for staves or purchasing your bow wood. I suggest purchasing your
first couple pieces of wood from a reputable seller (if you don’t
know anyone willing to give you a couple pieces of good wood). Make sure
you explain to your wood source that you are a novice bowyer looking
for straight, clean Osage with around seven to nine growth rings per
inch. You may pay handsomely for such a piece of wood, but, take my word
for it, in the long run it will be worth the money. A knotty twisted
piece of wood with 30 or more growth rings to the inch will be a very
difficult piece of wood for a novice to work. Save that until you have
a few dozen bows under your belt. Once you’ve made a bow or two,
you can decide if you are truly interested in making more. Making a wood
bow is a lot of hard work. Many, after making their first, decide it’s
more work than they are willing to put forth and they’d rather
buy bows made by someone else. Make just one and you will soon realize
why a good bowyer asks as much as he does for a “simple wood bow.”
 If
you decide you are going to be making quite a few bows, it would benefit
you to start cutting your own wood. If you do, the first tool you will
find indispensable is a chain saw. Now, I suppose you could use a double
bit axe to fell, cut free, and trim an Osage tree, say ten to twelve
inches in diameter, but I’m pretty sure you’d only do it
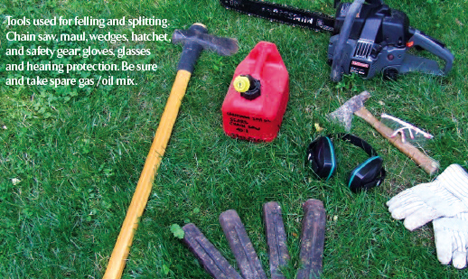
once before investing in a good chain saw. In addition you will need
a hatchet, a maul, and at least four steel splitting wedges. Six wedges
would be even better. If
you decide you are going to be making quite a few bows, it would benefit
you to start cutting your own wood. If you do, the first tool you will
find indispensable is a chain saw. Now, I suppose you could use a double
bit axe to fell, cut free, and trim an Osage tree, say ten to twelve
inches in diameter, but I’m pretty sure you’d only do it
once before investing in a good chain saw. In addition you will need
a hatchet, a maul, and at least four steel splitting wedges. Six wedges
would be even better.
There’s nothing worse than being twenty miles from
home, a quarter mile from the truck, standing in the middle of a fence
row dripping sweat (even though it’s the dead of winter), splitting
a big Osage log you’ve just brought down, and having all your wedges
stuck head deep in the cracks of the stubborn wood. Don’t ask me
how I know. Chain saw, hatchet, maul, and wedges are most assuredly Group
One tools.
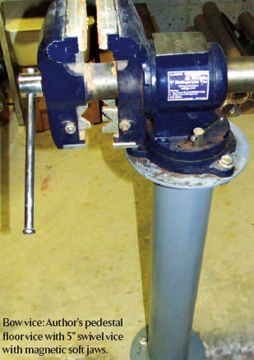
Once you have a supply of aged quarter splits, it’s
time to get them down to near bow making dimensions. For this step, you
will need some way to hold the quarter split while you are working on
it. Most bow makers use a bowyer’s bench, with a large clamp the
wood. These are Group One tools for most. Some use a small three- or
four-inch vice bolted to a workbench. I use a steel pedestal mounted
five-inch swivel vice with both hard and soft jaws bolted to my workroom
floor. For me, the pedestal wood securing category, and I really don’t
know how I ever made bows before building this tool. My bowyer’s
bench has been sitting in my shed unused for years now, relegated to
a Group Two tool.
 To begin the wood removal process, some bowyers will use
a band saw for cutting bow staves to length, to width, for removing excess
belly wood, and for removing bark and sapwood from the back. I avoid
using power tools when making bows, but other bowyers have no problem
using them. Each bow maker should make up his own mind on that subject.
Personally, other than the initial felling of the tree with the chainsaw,
I make the rest of my bows using nothing but hand tools. I enjoy the
process of making bows; using my hands and the hand tools of the craft
is part of the process for me. If I were making bows for a living, perhaps
I would choose the quicker, easier electric power way, but enjoyment,
I stick with the tools I enjoy using. To begin the wood removal process, some bowyers will use
a band saw for cutting bow staves to length, to width, for removing excess
belly wood, and for removing bark and sapwood from the back. I avoid
using power tools when making bows, but other bowyers have no problem
using them. Each bow maker should make up his own mind on that subject.
Personally, other than the initial felling of the tree with the chainsaw,
I make the rest of my bows using nothing but hand tools. I enjoy the
process of making bows; using my hands and the hand tools of the craft
is part of the process for me. If I were making bows for a living, perhaps
I would choose the quicker, easier electric power way, but enjoyment,
I stick with the tools I enjoy using.

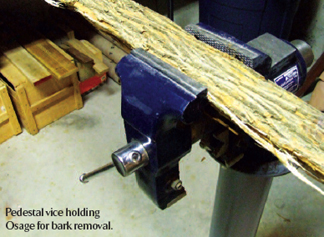
 My tool of choice for removing the bark, the sapwood, for
reducing a quarter split to near bow dimensions, and for removing excess
belly wood is a large drawknife. This is a necessity—a Group One
tool for me. I use a Robert Sorby drawknife out of Sheffield, England.
Strong steel and a wide thick sharp blade with deep tangs all the way
through the handles make this drawknife a real workhorse, capable of
hogging off lots of wood in a My tool of choice for removing the bark, the sapwood, for
reducing a quarter split to near bow dimensions, and for removing excess
belly wood is a large drawknife. This is a necessity—a Group One
tool for me. I use a Robert Sorby drawknife out of Sheffield, England.
Strong steel and a wide thick sharp blade with deep tangs all the way
through the handles make this drawknife a real workhorse, capable of
hogging off lots of wood in a
short period of time. Running into a knot is not a problem for the Sorby.
It cuts through them. Even though it can remove wood like a rabid beaver,
by using a more delicate hand, one can also remove the bark and sapwood
down to just above the growth ring you wish to use for your back. I do
have another much smaller drawknife made in Sweden that I use for delicate
drawknife work and for scraping. This is a Group Two tool for me: not
necessary, just nice to have.
 For cutting the bow stave to length, I use a standard cross
cut handsaw, which for me is another Group One tool. Without using a
band saw, there are few options for cutting off two ends of a quarter
split. The cross cut saw is fast and efficient for this purpose. For cutting the bow stave to length, I use a standard cross
cut handsaw, which for me is another Group One tool. Without using a
band saw, there are few options for cutting off two ends of a quarter
split. The cross cut saw is fast and efficient for this purpose.
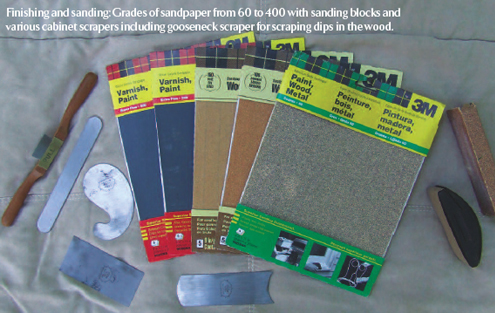
Once
the bark and sapwood are removed, the next tool you’ll need is
one for scraping the back into a single clean growth ring. There is only
one tool for this—the steel cabinet scraper. This Group One tool
comes in different shapes, mainly rectangular and gooseneck. I have dozens
of cabinet scrapers, but if you are like me, you’ll find among
the dozens there will be one or two that you prefer for how they feel
in your hand and how they shave the wood. You will find yourself instinctively
reaching for them whenever scraping is needed.
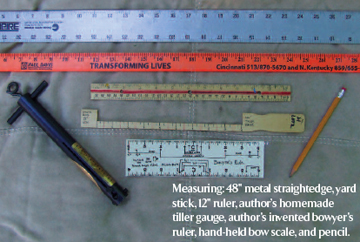
The next step is bow layout.
For this, you will need something for measuring, something to use as
a straight edge, and of course a pencil. Any sharp pencil will do, as
will any ruler or wooden yardstick. However, for making a lot of bows
several tools will be indispensable. A carpenter’s chalk line for
laying out the initial centerline down the crown of the stave is a real
time saver. A forty-eight-inch metal rule is essential for laying out
long straight lines. For bow dimensions, you can easily measure from
your centerline. These are Group One tools, no doubt. However, I found
the wooden rulers, the yardsticks, and even the metal rule lacking because
the back of a stave is naturally curved and not flat.
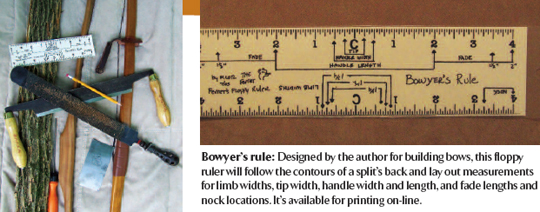
 As result, I came
up with a specific ruler designed just for making bows. I called it a “Bowyer’s
Rule” but on the internet archery boards, it got nicknamed Ferret’s
Floppy Ruler. If you go to the Primitive Archer Magazine’s website
in the “HowTo’s and Build-a-longs” section
of the message board forum, search “Ferret’s Floppy Ruler-PDF
File” (or Google that name) and there is a PDF file for downloading
and printing your own. It’s a handy tool for making bow layout
a snap, especially for beginners. Things like limb widths (3 different
sizes), tip width, nock location, handle width and length, and fade lengths
(2 different sizes) are all marked on the bendable ruler for accurate
and easy bow layout. It’s a Group One tool for me, and I believe
it will be for you as well. As result, I came
up with a specific ruler designed just for making bows. I called it a “Bowyer’s
Rule” but on the internet archery boards, it got nicknamed Ferret’s
Floppy Ruler. If you go to the Primitive Archer Magazine’s website
in the “HowTo’s and Build-a-longs” section
of the message board forum, search “Ferret’s Floppy Ruler-PDF
File” (or Google that name) and there is a PDF file for downloading
and printing your own. It’s a handy tool for making bow layout
a snap, especially for beginners. Things like limb widths (3 different
sizes), tip width, nock location, handle width and length, and fade lengths
(2 different sizes) are all marked on the bendable ruler for accurate
and easy bow layout. It’s a Group One tool for me, and I believe
it will be for you as well.
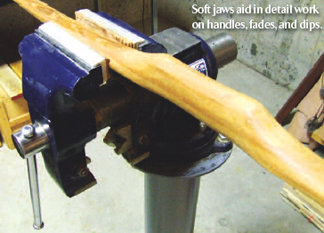 Once you get your stave to near bow dimensions, you will
need a tool to reduce belly wood in order to get your limbs bending and
to shape your handle, fades, and dips. My Group One tool for this job
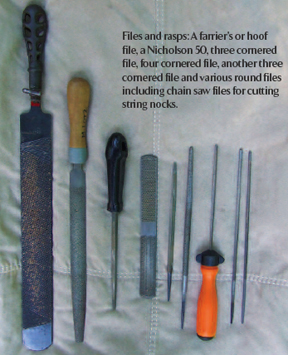
is the Farrier’s rasp (a large rasp for flattening horse’s
hooves prior to shoeing). This rasp, with different coarseness of teeth
on each side, will remove large amounts of wood without causing excessive
damage to the wood. Use one side of the rasp for hogging and the other
side for smoothing out the gouges from the first side. Group Two tools
in this category include the Nicholson #49 and #50 rasps, the four-in-one
or four cornered rasp (rounded on one side, flat on the other with four
different grades of rasp depending on which side or which end of the
rasp you are using), and the 10" half round file (rounded on one
side/flat on the other). Once you get your stave to near bow dimensions, you will
need a tool to reduce belly wood in order to get your limbs bending and
to shape your handle, fades, and dips. My Group One tool for this job
is the Farrier’s rasp (a large rasp for flattening horse’s
hooves prior to shoeing). This rasp, with different coarseness of teeth
on each side, will remove large amounts of wood without causing excessive
damage to the wood. Use one side of the rasp for hogging and the other
side for smoothing out the gouges from the first side. Group Two tools
in this category include the Nicholson #49 and #50 rasps, the four-in-one
or four cornered rasp (rounded on one side, flat on the other with four
different grades of rasp depending on which side or which end of the
rasp you are using), and the 10" half round file (rounded on one
side/flat on the other).
For filing in your nocks, there is basically
one tool that is universally used— a chainsaw blade-sharpening
file. A little 5/32-inch round file. For me, this is another Group One
tool. I have at least three or four of them. Just as the cabinet scrapers,
for some reason, one file will become your favorite.
|